Introduction
Entering the first CustomerHansa keeps all information about Customers in a Customer register, with one record for each Customer.
Before entering Customers, you should first make sure all relevant Payment Terms (used to calculate Due Dates and settlement discounts in Invoices) have been entered in the Payment Terms setting. You may also wish to define Customer Categories (used to group together Customers of a similar type).
To enter your first Customer, follow these steps:
- Select the Sales Ledger or Sales Orders module from the Modules menu. The same Customer register is available in both modules. If neither module is available on the Modules menu, this will probably be because you have not granted yourself access to them in the System Usage setting. Please refer to the Modules, Users and Companies page.
- Open the Customer register by clicking the [Customers] button in the Master Control panel. If you are using a new database, a blank browse window will appear. Otherwise, it will list all Customers previously entered.
- Click the [New] button in the Button Bar at the top of the browse window.
Use the 'Customer: New' window shown below to enter information about the Customer. For full details about each field on the screen, please refer to the Customers page.
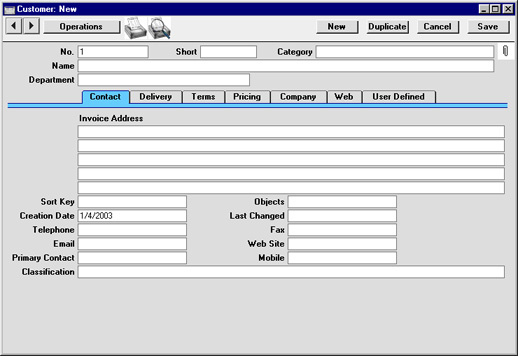
- Click the tabs (named 'Contact', 'Delivery', 'Terms', etc) to enter more information about the Customer.
- Click the [Save] button in the top right-hand corner of the window. The Customer is saved in the Customer register.
- The window title changes to 'Customer: Inspect', giving you a chance to check you have not made any mistakes in entering the record.
- Close the record by clicking the close box or using the Ctrl-F4 (Windows and Linux) or ⌘-W (Macintosh) keyboard shortcut.
- If you have a number of Customers to enter, click [New] instead of [Save] at step (5) above (or use the Ctrl-N/⌘-N keyboard shortcut). The Customer is saved and closed, and a blank window is opened, allowing you to enter another Customer straight away.
Entering the First Supplier
Hansa keeps all information about Suppliers in a Supplier register, with one record for each Supplier.
Before entering Suppliers, you should first make sure all relevant Payment Terms (used to calculate Due Dates and settlement discounts in Invoices) have been entered in the Payment Terms setting. You may also wish to define Supplier Categories (used to group together Suppliers of a similar type).
Select the Purchase Ledger or Purchase Orders module from the Modules menu. The same Supplier register is available in both modules. If neither module is available on the Modules menu, this will probably be because you have not granted yourself access to them in the System Usage setting. Please refer to the Modules , Users and Companies page. Open the Supplier register by clicking the [Suppliers] button in the Master Control panel. If you are using a new database, a blank browse window will appear. Otherwise, it will list all Suppliers previously entered. Then, follow the same basic process described above, under 'Entering the First Customer'.
For full details about each field in the 'Supplier: New' window, please refer to the Suppliers page.
If you wish to import Suppliers from your old accounts system, please follow the import instructions described on the Setting up a Basic Accounts System page to import a text file created by that system. For details of the composition of this text file, please refer to your Hansa representative.
Naming Address Fields
In a new database, the address fields (for both the Invoice and Delivery Addresses) in the 'Contact: New' and 'Contact: Inspect' windows will be unlabelled: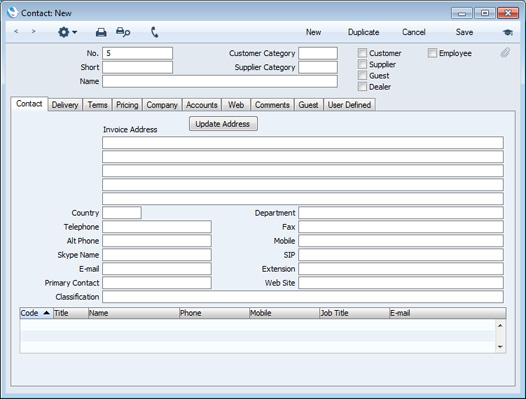
- Using the [Module] button in the Master Control panel (or the Ctrl-0 (zero) or ⌘-0 keyboard shortcut), ensure you are in the CRM module.
- Open the list of settings by clicking the [Settings] button in the Master Control panel or using the Ctrl-S or ⌘-S keyboard shortcut and double-click 'User Defined Field Labels - Contacts'.
- When the 'User Defined Field Labels - Contacts: Inspect' window opens, click the 'Address' tab in the centre of the screen:
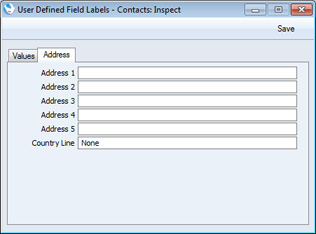
- Assign a name to each address line as appropriate:
In the UK, it is recommended that you use the fifth line of the address for the postcode. This will enable you to use the "Update Address" feature.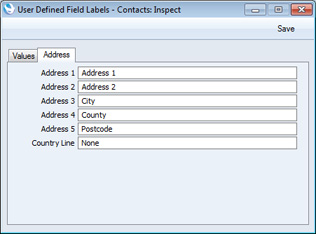
- After saving, these names will appear in the 'Contact: New' and 'Contact: Inspect' windows (and also in the 'Invoice: New' and 'Invoice: Inspect' windows):
In some installations, you may need to close Enterprise by HansaWorld and restart for the change to take effect.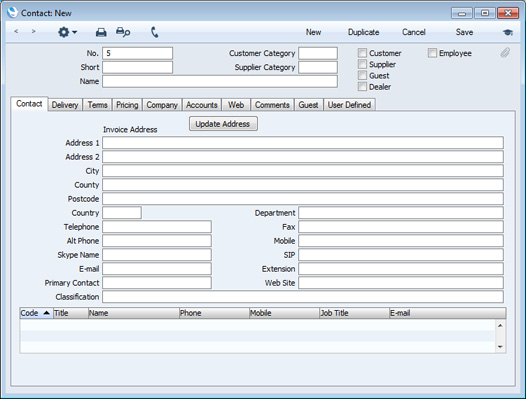
In this chapter:
- Entering the first Customers, Suppliers and Contact Persons
- Naming Address Fields
- Contact Persons
- VAT and Zones
- Home page for Starting Work manual
- Home page for Enterprise by HansaWorld manual
Contact Persons
Customers, Suppliers and Contact Persons are all stored in the Contact register. In this section, we describe linking Contact Persons to the company they work for.- The first step is to enter a Contact record representing the company. Mark the company as a Customer or Supplier or both, as appropriate. Ensure you save this record before moving to step 2.
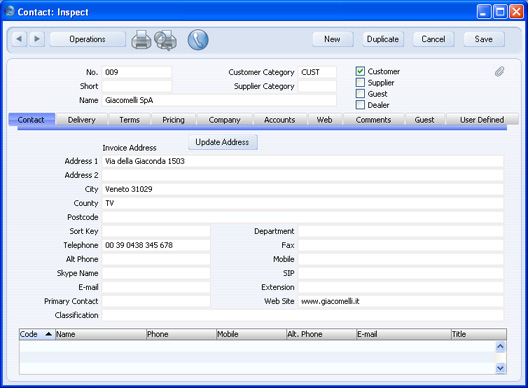
- The next step is to enter a Contact record representing a person working for the company (i.e. a Contact Person). Choose 'Create Contact' from the Operations menu. A new record will be created in the Contact register and will be opened in a new window entitled 'Contact: Inspect'. This means the record has already been saved and is being opened to allow you to enter the Contact Person's name and contact details if these are different to those of the parent company:
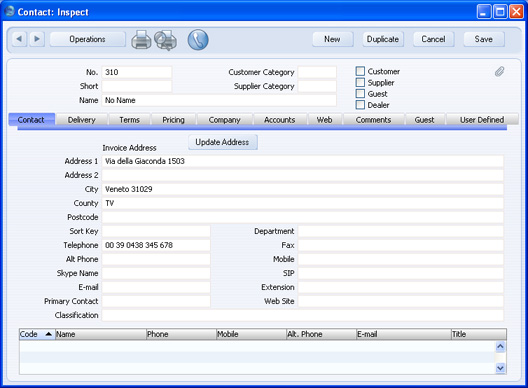
- The address details, telephone and fax will be copied from the parent company. Enter the Contact Person's name and appropriate contact information. As the Contact Person works for a company that has been marked as a Customer or a Supplier, you should not check these boxes in the Contact Person record.
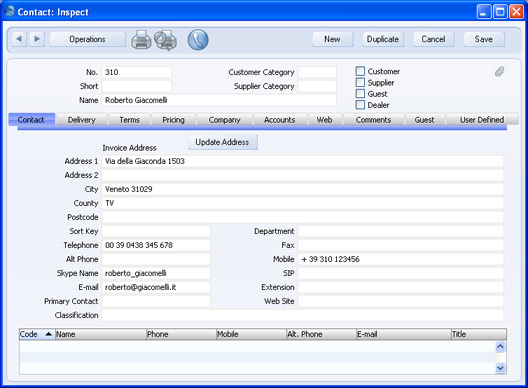
- Save the Contact Person and close the record by clicking the close box. The Contact Person is now included in the list at the bottom of the 'Contact' card of the parent company's Contact record:
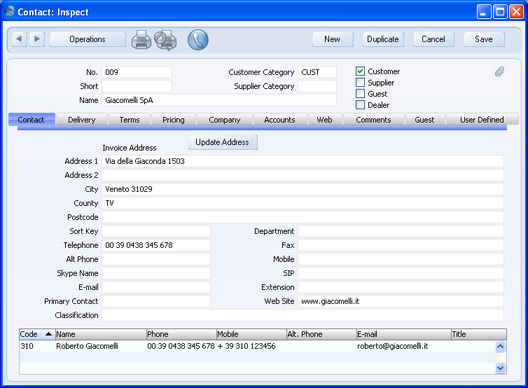
- This list will contain all the Contact Persons working for the Customer or Supplier. As with all lists in HansaWorld Enterprise, you can sort this one by clicking on a column heading. If you need to open the Contact record of a Contact Person, double-click a line in this list.
---
In this chapter:
VAT and Zones
When you sell or purchase an Item, the calculation of VAT will be controlled by two factors: the VAT Code and the Zone of the Customer or Supplier. Whenever you specify a VAT Code (e.g. in an Item record or when setting overall defaults in the Account Usage S/L and Account Usage P/L settings), you should do so for each Zone.When you sell an Item, the correct VAT Code for the Zone of the Customer will be placed in the Quotation, Order or Invoice automatically. VAT will then be calculated as follows, depending on the Zone:
- Domestic, Inside EU (Post VAT), Outside EU (Post VAT)
- VAT will be calculated according to the percentage in the VAT Codes setting. In the Nominal Ledger Transaction resulting from the Invoice, VAT will be credited to the Output Account from the VAT Code and debited to the Debtor Account.
- Inside EU, Outside EU
- VAT will not be calculated, even if the VAT Code is not zero-rated. The Nominal Ledger Transaction resulting from the Invoice will not include a VAT element.
- Domestic, Inside EU (Post VAT), Outside EU (Post VAT)
- VAT will be calculated according to the percentage in the VAT Codes setting. In the Nominal Ledger Transaction resulting from the Purchase Invoice, VAT will be debited to the Input Account from the VAT Code and credited to the Creditor Account.
- Inside EU
- Invoices received from other countries in the EU do not carry VAT. However, depending on the nature of the Invoice, VAT can be payable.
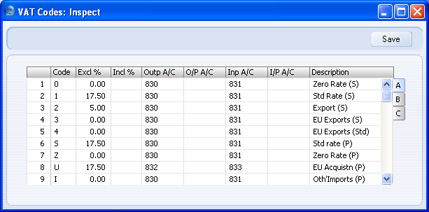
- VAT will be calculated according to the percentage in the VAT Codes setting. In the Nominal Ledger Transaction resulting from the Purchase Invoice, VAT will be debited to the Input Account from the VAT Code and credited to the Output Account from the VAT Code. Therefore, you may need to use a dedicated VAT Code for VAT on EU Acquisitions, with an Output Account that is not used in any other VAT Code (VAT Code "U" in the illustration below).
- VAT will be calculated according to the percentage in the VAT Codes setting. In the Nominal Ledger Transaction resulting from the Purchase Invoice, VAT will be debited to the Input Account from the VAT Code and credited to the Output Account from the VAT Code. Therefore, you may need to use a dedicated VAT Code for VAT on EU Acquisitions, with an Output Account that is not used in any other VAT Code (VAT Code "U" in the illustration below).
- Outside EU
- VAT will not be calculated. The Nominal Ledger Transaction resulting from the Invoice will not include a VAT element.
---
In this chapter: