Menus

Not all menu items are available at all times. Disabled items are grey or dimmed.
Please click the links below for details about each menu:
File Menu

---
In this chapter:
- File menu, including:
- Edit menu
- Record menu
- Window menu
- About HansaWorld
File Menu - Company
This command was removed from the File menu in HansaWorld Enterprise version 5.2. For information about using a multi-Company database, refer to the Working with Companies page.---
In this chapter:
- File menu, including:
- Edit menu
- Record menu
- Window menu
- About HansaWorld
File Menu - Master Control
This function brings the Master Control panel to the front. This will be necessary if you wish to use the HansaWorld Enterprise Mail functions or run a Maintenance function as the Master Control panel provides the only means of accessing these.---
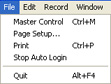
In this chapter:
- File menu, including:
- Master Control
- Page Setup
- Print
- Stop Auto Login
- Quit
- Master Control
- Edit menu
- Record menu
- Window menu
- About HansaWorld
File Menu - Exports
This command was removed from the File menu in HansaWorld Enterprise version 5.2. Please refer to the Exports page for details about exporting information from your HansaWorld Enterprise database.---
In this chapter:
- File menu, including:
- Edit menu
- Record menu
- Window menu
- About HansaWorld
File Menu - Imports
This command was removed from the File menu in HansaWorld Enterprise version 5.2. Please refer to the Imports page for details about importing information into your HansaWorld Enterprise database.---
In this chapter:
- File menu, including:
- Edit menu
- Record menu
- Window menu
- About HansaWorld
File Menu - Maintenance
This command was removed from the File menu in HansaWorld Enterprise version 5.2. Please refer to the Maintenance page for details about running Maintenance function (batch processing routines).---
In this chapter:
- File menu, including:
- Edit menu
- Record menu
- Window menu
- About HansaWorld
File Menu - Reports
This command was removed from the File menu in HansaWorld Enterprise version 5.2. Please refer to the Reports page for details about producing reports.---
In this chapter:
- File menu, including:
- Edit menu
- Record menu
- Window menu
- About HansaWorld
File Menu - Documents
This command was removed from the File menu in HansaWorld Enterprise version 5.2. Please refer to the Documents page for details about printing documents.---
In this chapter:
- File menu, including:
- Edit menu
- Record menu
- Window menu
- About HansaWorld
File Menu - Settings
This command was removed from the File menu in HansaWorld Enterprise version 5.2. Please refer to the Settings page for details about settings and preferences.---
In this chapter:
- File menu, including:
- Edit menu
- Record menu
- Window menu
- About HansaWorld
File Menu - Page Setup
This function is available when the active (top) window on the screen contains a list of reports or documents.When you print a report or document, one copy is usually produced, using a standard page size. If you need to print more than one copy, or to use a non-standard page size or magnification, highlight the desired report or document in the list and then select 'Page Setup' from the File menu to make these changes. Once this has been done, double-click the item in the list to carry on with the printing process.
You can set the number of copies, page size and/or magnification individually for each document or report. These settings will remain in place for a particular document or report until you choose 'Page Setup' for that document or report once again.
Windows users can also use this function to choose the printer on which the report or document is to be printed.
---
In this chapter:
- File menu, including:
- Master Control
- Page Setup
- Print
- Stop Auto Login
- Quit
- Master Control
- Edit menu
- Record menu
- Window menu
- About HansaWorld
File Menu - Print
This function is available when the active (top) window on the screen contains something that can be printed directly (a screen report or a record that has a connected document).When you select 'Print', the transaction or the report is printed directly to the selected printer.
This menu item duplicates the functions of the Printer icon in the Button Bar of the active window.
---
In this chapter:
- File menu, including:
- Edit menu
- Record menu
- Window menu
- About HansaWorld
File Menu - Send Fax
This function allows you to send faxes via PamFax.To configure this feature, follow these steps:
- Create a PamFax account.
- Open the Fax Settings setting in the Technics module and enter the following information:
- Username
- Enter your PamFax user name.
- Password
- Enter your PamFax password.
- PamFax server
- Choose an option as follows:
- Local
- Choose this option if you have a fax server set up on your computer.
- Live
- Choose this option when you are ready to send faxes.
- Sandbox
- This option allows you to send test faxes using the PamFax sandbox feature.
- Local
- Username
- Ensure you have specified fax numbers in your Contact records. When you send a fax, the fax number will be taken from the relevant Contact record. If you try to send a fax to a Contact that does not have a fax number, a dialogue box will open, allowing you to insert one.
- Open a printable record (i.e. a record with Print and Preview icons, with a document defined, such as an Invoice). To send it by fax, select 'Send Fax' from the File menu.
The fax will be sent to the relevant fax number via PamFax. You will be able to see the progress of the fax in the PamFax environment.
In this chapter:
- File menu, including:
- Master Control
- Page Setup
- Print
- Send Fax
- Stop Auto Login
- Quit
- Master Control
- Edit menu
- Record menu
- Window menu
- About Enterprise by HansaWorld
- Home page for Working Environment manual
- Home page for Enterprise by HansaWorld manual
File Menu - Stop Auto Login
When you create the first user in a new database and log in as that user, you will be asked if you want HansaWorld Enterprise to remember your password, so that you do not have to enter it yourself each time you log in.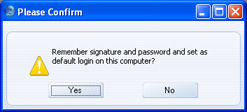
If you choose to have your password remembered, you will be logged in automatically each time you start HansaWorld Enterprise on the same client machine, although you will still need to choose a Company if you have more than one. Each time you change your password, the first time you log in using a new one you will be asked if you want it to be remembered. If you decide you no longer want your password to be remembered, you can proceed in two ways. Choosing 'Stop Auto Login' from the File menu will turn off the feature temporarily: the next time you log in, you will be asked once again if you want your password to be remembered. Turning off the Don't ask for Storing Auto Login Information option in the Login Options setting will turn off the feature more permanently.
---
In this chapter:
- File menu, including:
- Master Control
- Page Setup
- Print
- Stop Auto Login
- Quit
- Master Control
- Edit menu
- Record menu
- Window menu
- About HansaWorld
File Menu - Print Queue
This feature was removed from HansaWorld Enterprise in version 4.2.---
In this chapter:
- File menu, including:
- Edit menu
- Record menu
- Window menu
- About HansaWorld
File Menu - Quit
Quits HansaWorld Enterprise. Remember to take a safety back-up of your work before you quit!Mac OS X users can find the 'Quit' command on the HansaWorld menu.
---
In this chapter:
- File menu, including:
- Edit menu
- Record menu
- Window menu
- About HansaWorld
Edit Menu
---
In this chapter:
- File menu
- Edit menu, including:
- Record menu
- Window menu
- About HansaWorld
Edit Menu - Undo
Select 'Undo' to undo your last action.There are a few actions in HansaWorld Enterprise that you cannot undo, e.g. deleting a record with the 'Delete' command on the Record menu or removing an Attachment using the 'Clear' command in the Edit menu.
---
In this chapter:
- File menu
- Edit menu, including:
- Undo
- Cut
- Copy
- Paste
- Clear
- Select All
- Select Row
- Undo
- Record menu
- Window menu
- About HansaWorld
Edit Menu - Cut
'Cut' removes the data you have selected (highlighted) and puts a copy in the Clipboard. The Clipboard is a special part of the computer's memory, used to store a single piece of data temporarily. This data can then be inserted (Pasted) into another place, once or several times, until you 'Cut' or 'Copy' something else. That will replace the old contents in the Clipboard.In certain fields, e.g. the Account Number fields in a Transaction that has already been saved, you may not remove the data, and thus not use 'Cut'. If you want to make a copy of the field's contents, use the 'Copy' command instead.
---
In this chapter:
- File menu
- Edit menu, including:
- Record menu
- Window menu
- About HansaWorld
Edit Menu - Copy
Use 'Copy' to copy text or numbers from one field to another without removing the data from the original field. The copy is put in the Clipboard. Then you can 'Paste' the copy in as many other locations as required. The copy remains in the Clipboard until you 'Cut' or 'Copy' something else.Note that you can only use 'Copy' (and 'Cut') to copy text from a single field at a time. If you want to copy a whole record in a file, use the 'Duplicate' command on the Record menu (or the [Duplicate] button in the Button Bar).
---
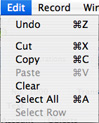
In this chapter:
- File menu
- Edit menu, including:
- Undo
- Cut
- Copy
- Paste
- Clear
- Select All
- Select Row
- Undo
- Record menu
- Window menu
- About HansaWorld
Edit Menu - Paste
With this command you can insert text or a value that has been cut or copied to the Clipboard. The clipping is inserted at the insertion mark. If you select several characters in the destination field, 'Paste' will replace the selected text with the contents of the Clipboard.---
In this chapter:
- File menu
- Edit menu, including:
- Undo
- Cut
- Copy
- Paste
- Clear
- Select All
- Select Row
- Undo
- Record menu
- Window menu
- About HansaWorld
Edit Menu - Clear
'Clear' removes the characters you have selected (highlighted) without copying them to the Clipboard.The 'Clear' command removes text or values within a single field. If you wish to remove an entire record, use the 'Delete' command on the Record menu.
---
In this chapter:
- File menu
- Edit menu, including:
- Undo
- Cut
- Copy
- Paste
- Clear
- Select All
- Select Row
- Undo
- Record menu
- Window menu
- About HansaWorld
Edit Menu - Select All
Use this command to select the entire contents of a field. You can use it when you are editing a field and want to replace the whole contents with new data.---
In this chapter:
- File menu
- Edit menu, including:
- Record menu
- Window menu
- About HansaWorld
Edit Menu - Select Row
You can use this command in windows that contain rows of information, divided into separate columns (or 'fields'), for example the Invoice and Transaction windows. It allows you to select a whole row. When you choose 'Select Row', the row in which the cursor is placed is selected. Clicking the number identifier of the row (on the left) has the same effect.---
In this chapter:
- File menu
- Edit menu, including:
- Record menu
- Window menu
- About HansaWorld
Record Menu
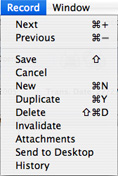
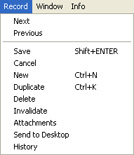
Almost all these commands can also be executed using the buttons in the Button Bar. In addition, there are keyboard shortcuts available for most of them. Commands that cannot be used at a certain point are dimmed in the menu.
! | You cannot use 'Undo' to reverse Record menu commands. |
---
In this chapter:
- File menu
- Edit menu
- Record menu, including:
- Window menu
- About HansaWorld
Record Menu - Next
- When you work in a record window, showing an individual record in a register, 'Next' will take you forward to the next record in that register.
It will also save all changes you have made in the record you have just left.
In this situation, the 'Next' command has the same effect as clicking the [Next Record] button in the Button Bar.
- When you work in a browse window, 'Next' will move forward to the next group (page) of records.
- When you work with a Report, 'Next' will scroll to the next page of the report.
In this chapter:
- File menu
- Edit menu
- Record menu, including:
- Window menu
- About HansaWorld
Record Menu - Previous
This command works in the same way as 'Next', but moves backwards instead of forwards. As with 'Next', when working in a record window, 'Previous' saves all changes you have made in the record you are leaving.In record windows, the 'Previous' command has the same effect as clicking the [Previous Record] button in the Button Bar.
---
In this chapter:
- File menu
- Edit menu
- Record menu, including:
- Window menu
- About HansaWorld
Record Menu - Save
This command is equivalent to pressing the [Save] and [Run] buttons in the Button Bar (depending on context). When you used this command in a record window, it closes the record on screen and saves all changes. When you use it in a browse window, it opens the selected (highlighted) record for editing. In a specification window, it prints the report or document or activates the Maintenance function.---
In this chapter:
- File menu
- Edit menu
- Record menu, including:
- Window menu
- About HansaWorld
Record Menu - Cancel
Closes the record on screen without saving any changes. It is equivalent to the [Cancel] button in the Button Bar.Windows of all types can also be closed using the close box or Ctrl-F4 (Windows and Linux) or ⌘-W (Mac OS X). When using these methods, you will be asked if you wish to save changes.
---
In this chapter:
- File menu
- Edit menu
- Record menu, including:
- Window menu
- About HansaWorld
Record Menu - New
Use this command when you need to create a new record. You can only use it after you have opened a register using the one of the buttons in the bottom row of the Master Control panel or the equivalent keyboard shortcut.This function opens a blank window into which you can enter the new record. If you click [Save], the record will be saved into the register concerned. If you click [New] again, the record will be saved and a new blank window opened, enabling you to enter another new record in the same register. If you click [Cancel], the record will be closed but not saved.
---
In this chapter:
- File menu
- Edit menu
- Record menu, including:
- Window menu
- About HansaWorld
Record Menu - Duplicate
This function creates a new record by duplicating an existing one. The duplicate is opened in a window marked 'New'. In many cases, dates in the new record will be changed to show the current date.You can duplicate a record either from a record window containing the record to be duplicated, or from a browse window, in which you have highlighted the record to be duplicated by clicking with the mouse.
---
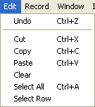
In this chapter:
- File menu
- Edit menu
- Record menu, including:
- Next
- Previous
- Save
- Cancel
- New
- Duplicate
- Delete
- Invalidate
- Attachments
- Send To Desktop
- History
- Next
- Window menu
- About HansaWorld
Record Menu - Delete
Use this command to delete, i.e. remove, an existing record. The record must be of a type that you can remove - you cannot remove records such as Invoices and Nominal Ledger Transactions once completed, and you cannot remove Customers or Items once you have used them in Invoices or in stock transactions. You must open a record in the record window to be able to delete it. The only exception to this rule is that Mails must be deleted from the browse window.When you delete a record, the next record in the register is displayed.
! | Remember that you cannot undo the deletion of a record. |
When you use the 'Delete' command, you are usually not asked if you are sure you want to go ahead with the deletion. If you would like such a warning to appear, switch on the Prompt When Deleting option in the Local Machine setting in the User Settings module. This option is specific to each client machine.
---
In this chapter:
- File menu
- Edit menu
- Record menu, including:
- Window menu
- About HansaWorld
Record Menu - Invalidate
You can use this function when an Invoice or Purchase Invoice is open in a record window, when you need to remove an Invoice from the Sales Ledger or a Purchase Invoice from the Purchase Ledger. Any associated Nominal Ledger Transaction will be removed from the Nominal Ledger as well. As illustrated below, an invalidated Invoice is easily distinguished because all fields have red lines drawn through them. You can invalidate many other records including Payments, Goods Receipts, Cash Transactions, Asset Disposals, Activities, Expenses and Personnel Payments in the same way.In the case of Sales Invoices, the function is designed for use in situations where Invoice Numbers are pre-determined (perhaps through being printed on Invoice stationery) and where it is not desirable to raise a Credit Note. It is not recommended for use where the cancelling of an Invoice has implications for the stock system. In these circumstances, you should issue a Credit Note, and receive the goods back into stock using the Goods Receipt or Returned Goods registers. These issues are fully described here.
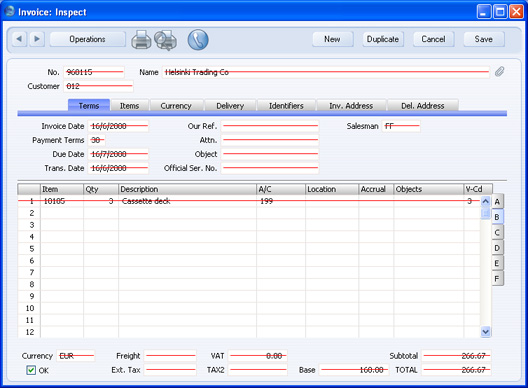
! | You cannot reverse the invalidation of a record. |
In multi-user systems, you can prevent certain users from invalidating records using Access Groups. To do this, deny access to the relevant Action. For example, to prevent a user invalidating Invoices, deny them access to the 'Invalidating Sales Invoices' Action. Access Groups are described here.
---
In this chapter:
- File menu
- Edit menu
- Record menu, including:
- Next
- Previous
- Save
- Cancel
- New
- Duplicate
- Delete
- Invalidate
- Attachments
- Send To Desktop
- History
- Next
- Window menu
- About HansaWorld
Record Menu - Attachments
This menu command allows you to connect files, notes or other records to any record in HansaWorld Enterprise. These connected objects are known as "Attachments". Please refer to the Attachments and Personal Desktop page for full details.A record must be open in a record window and must have been saved at least once before you can attach objects to it.
---
In this chapter:
- File menu
- Edit menu
- Record menu, including:
- Next
- Previous
- Save
- Cancel
- New
- Duplicate
- Delete
- Invalidate
- Attachments
- Send To Desktop
- History
- Next
- Window menu
- About HansaWorld
Record Menu - Workflow
When you are looking at any record in a record window, the 'Workflow' command will open the Workflow Manager where you can create Activities from that record, and where you can review those Activities at any time. Please refer to the Workflow Manager page for full details. You must have saved a record at least once before you can attach Activities to it.
---
In this chapter:
- File menu
- Edit menu
- Record menu, including:
- Next
- Previous
- Save
- Cancel
- New
- Duplicate
- Delete
- Invalidate
- Attachments
- Workflow
- Send To Desktop
- History
- Next
- Window menu
- About Standard ERP
- Home page for Working Environment manual
- Home page for Standard ERP manual
Record Menu - Send to Desktop
Use this function if you would like the current record (the one currently open in a record window) to appear in your Personal Desktop (on the right-hand side of your Master Control panel). This will allow you to open the record at any time without having to change module and without having to find it in a browse window. Please refer to the Personal Desktop page for full details.---
In this chapter:
- File menu
- Edit menu
- Record menu, including:
- Next
- Previous
- Save
- Cancel
- New
- Duplicate
- Delete
- Invalidate
- Attachments
- Send To Desktop
- History
- Next
- Window menu
- About HansaWorld
Record Menu - History
This function allows you to view the change history of a particular record.To use this function, you must first instruct HansaWorld Enterprise to store the change histories of records. To do this, follow these steps:
- Select 'Technics' using the [Module] button in the Master Control panel. In multi-user systems, you can do this on the server machine or on a client. In both cases, no other user should be logged in.
If you are working on the server machine, to gain access to the Master Control panel, select 'Quit, Remove Autoserver' from the File menu and restart HansaWorld Enterprise.
If 'Technics' is not available in the list that opens when you click the [Module] button, this will probably be because you have not granted yourself access to the Server module in the Configuration setting (single-user) or to the Technics module in the Access Groups setting (multi-user).
- Click the [Settings] button in the Master Control panel, or use the Ctrl-S/⌘-S keyboard shortcut. In the 'Settings' list, double-click 'Logging Control'.
- The 'Logging Control: Inspect' window opens:
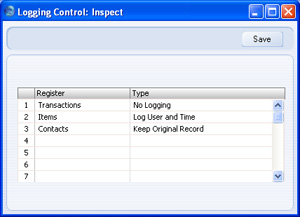
- In the Register column, use 'Paste Special' to select the registers for which histories are to be kept. No history will be kept for registers not listed in the grid. Note that maintaining record histories will cause the size of the database to grow quickly.
- In the Type column, use 'Paste Special' to select an option, as follows:
- No Logging
- No change history will be kept.
- Log User and Time
- Whenever a record in the register is created or modified, the history will show the date and time this happened and the initials of the Person responsible.
- Keep Original Record
- Again, the history will show the date and time each record was created or modified and the initials of the Person responsible. In addition, every modification of each record will be recorded.
- No Logging
- Click the [Save] button in the Button Bar to save the Logging Control setting.
- Quit and restart HansaWorld Enterprise.
---
In this chapter:
- File menu
- Edit menu
- Record menu, including:
- Window menu
- About HansaWorld
Registers Menu
This menu was removed in HansaWorld Enterprise version 4.3. Use the buttons in the 'Registers' section of the Master Control panel or their keyboard equivalents to open registers.---
In this chapter:
- File menu
- Edit menu
- Record menu
- Window menu
- About HansaWorld
Modules Menu
This menu was removed in HansaWorld Enterprise version 4.3. Please refer to the Modules and Registers page for details about working in different modules.---
In this chapter:
- File menu
- Edit menu
- Record menu
- Window menu
- About HansaWorld
Operations Menu
The Operations menu was moved from the main menu bar to record and browse windows in HansaWorld Enterprise version 4.3. Please refer to the browse and record window pages for details.---
In this chapter:
- File menu
- Edit menu
- Record menu
- Window menu
- About HansaWorld
Window Menu
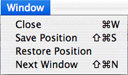
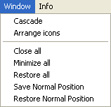
Although the 'Close All' function is not available to Mac OS X users, clicking the close box of a window while holding down the Alt key will have the same effect.
In multi-user systems, each user can use the 'Save Normal Position'/'Save Position' functions to save their own window positions, sizes and sort orders. This information is stored on the client machine, so it will not be included in the normal daily back-up file made from the server. To back up this information, use the 'Client Text Backup' option.
---
In this chapter:
- File menu
- Edit menu
- Record menu
- Window menu
- About HansaWorld
About HansaWorld
This command on the Info menu (Windows and Linux) and the HansaWorld menu (Mac OS X) shows the copyright information for HansaWorld Enterprise. The version of the program and information about the owner of the program licence are also shown here. Return to the program by clicking [OK].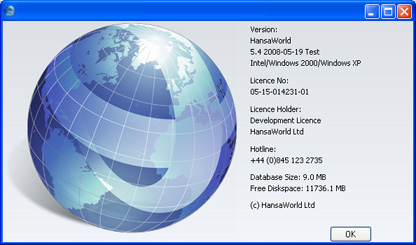
This window also shows the size of your HansaWorld Enterprise database and the amount of disk space available on the hard disk on which it is stored. In multi-user systems, these figures refer to the server.
---
In this chapter:
- File menu
- Edit menu
- Record menu
- Window menu
- About HansaWorld