Introduction to Settings in the Purchase Ledger
The Purchase Ledger module contains the following settings: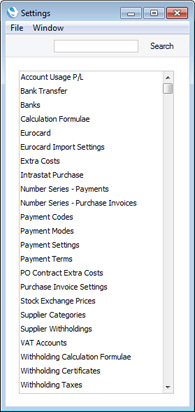
---
Please click the links below for details about each setting:
- Introduction
- Account Usage P/L
- Bank Transfer
- Banks
- Calculation Formulae
- Intrastat Purchase
- Number Series - Payments
- Number Series - Purchase Invoices
- Payment Codes
- Payment Modes
- Payment Settings
- Payment Terms
- Purchase Invoice Settings
- Supplier Categories
- Supplier Withholdings
- VAT Accounts
- VAT Corrections P/L
- Withholding Calculation Formulae
- Withholding Certificates
- Withholding Taxes
Go back to:
- Home page for Purchase Ledger manual
- Home page for HansaWorld Enterprise manual
Account Usage P/L
You should use the Account Usage P/L setting to choose the Accounts and VAT Codes that will be used as defaults in your Purchase Ledger transactions (i.e. Purchase Invoices and Payments). These defaults will be used in the absence of Accounts or VAT Codes being specified elsewhere (for example, in the Items, Item Groups, Suppliers or Supplier Categories used in the transactions). Please click for complete descriptions of how Accounts and VAT Codes will be selected in Purchase Invoices and Payments. The Accounts that you use here must exist in the Account register, otherwise Enterprise by HansaWorld will not be able to create transactions.If you have imported the sample Chart of Accounts supplied with Enterprise by HansaWorld, you will find that most of the fields in the Account Usage P/L setting contain suggested values. If you have modified this Chart of Accounts or have used your own, you must ensure that you replace these values with the correct Accounts.
To open the Account Usage P/L setting, ensure you are in the Purchase Ledger and then click the [Settings] button in the Master Control panel. Double-click 'Account Usage P/L' in the 'Settings' list. Fill in the fields as described on the pages that are linked below. Then, to save changes and close the window, click the [Save] button. To close the window without saving changes, click the close box.
The Account Usage P/L setting is spread over three cards. To view specific cards, click one of the three named tabs:

- 'Creditors' card
- 'VAT' card
- 'Rate' card
Settings in the Purchase Ledger:
- Introduction
- Account Usage P/L
- Bank Transfer
- Banks
- Calculation Formulae
- Intrastat Purchase
- Number Series - Payments
- Number Series - Purchase Invoices
- Payment Codes
- Payment Modes
- Payment Settings
- Payment Terms
- Purchase Invoice Settings
- Supplier Categories
- Supplier Withholdings
- VAT Accounts
- VAT Corrections P/L
- Withholding Calculation Formulae
- Withholding Certificates
- Withholding Taxes
Go back to:
- Home page for Purchase Ledger manual
- Home page for HansaWorld Enterprise manual
Account Usage P/L - Creditors Card
This page describes the 'Creditors' card of the Account Usage P/L setting. Please click the following links for descriptions of the other cards:- Introduction
- 'Creditors' card
- 'VAT' card
- 'Rate' card
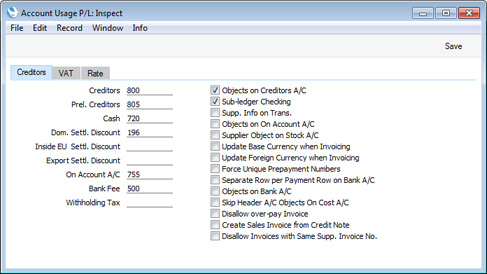
Account Fields
Each of these fields requires you to enter an Account Number. In each case, you can use the 'Paste Special' function (Ctrl-Return or ⌘-Return) to help you choose the correct Account.
- Creditors
- When you approve a Purchase Invoice (i.e. post it to the Nominal Ledger), its value including VAT will be credited to a Creditor Account. When you approve a Payment, its value will be debited to the same Account. This Account therefore shows how much your company owes at a particular time.
- Specify here the Account that you wish to be used as your main default Creditor Account. This Account will be overridden if you have specified a separate Creditor Account for a Supplier or in the Supplier or Customer Category to which it belongs.
- Specify here the Account that you wish to be used as your main default Creditor Account. This Account will be overridden if you have specified a separate Creditor Account for a Supplier or in the Supplier or Customer Category to which it belongs.
- Prel. Creditors
- You can post a Purchase Invoice to a preliminary Account when you first receive it, and subsequently move the posting to the normal Creditor Account when you approve it. If you need to use this feature, which allows for the late amendment of the Cost Accounts used in Purchase Invoices, specify the preliminary Account to be credited here.
- Cash
- The Account entered here will be credited whenever you approve a cash purchase (Cash Note), instead of the Creditor Account. Please refer to the Cash Notes page for more details.
- This Cash Account will be overridden if you have specified a separate Cash Account in the Payment Term used in a Cash Note.
- This Cash Account will be overridden if you have specified a separate Cash Account in the Payment Term used in a Cash Note.
- Dom. Settl. Discount, Inside EU Settl. Discount, Export Settl. Discount
- In the event of a Purchase Invoice attracting a settlement discount when you pay it on time, the Account specified here will be credited with the discount amount in the Nominal Ledger Transaction resulting from the Payment.
- The appropriate Settlement Discount Account for the Zone of the Purchase Invoice being paid will be used.
- Use the Payment Terms setting to configure settlement discounts.
- The appropriate Settlement Discount Account for the Zone of the Purchase Invoice being paid will be used.
- On Account A/C
- If you issue Prepayments or On Account Payments to Suppliers without reference to specific Invoices (usually before you have received those Invoices), you can enter them to the Payment register with a Prepayment Number on flip D of the Payment row (a "Prepayment") or without a Prepayment Number (an "On Account" Payment).
- When you enter and approve a Prepayment or On Account Payment, its value will be debited to the Account that you specify here. Usually this Account should be one that acknowledges that issuing a deposit creates an asset.
- When you enter a Prepayment or On Account Payment, the On Account A/C will be chosen in this order:
- The Cred. On Acc. A/C specified on the 'Accounts' card of the Contact record for the Supplier will be used.
- The On Account A/C in the Supplier Category to which the Supplier belongs will be used.
- The Creditors On Account A/C in the Customer Category to which the Supplier belongs will be used, but only if the Supplier does not belong to a Supplier Category.
- This On Account A/C in the Account Usage P/L setting will be used.
- When you enter and approve a Prepayment or On Account Payment, its value will be debited to the Account that you specify here. Usually this Account should be one that acknowledges that issuing a deposit creates an asset.
- Bank Fee
- Specify here the Account that you want to be debited by any bank charges you may incur when issuing Payments. Please refer here for details about including Bank Fees in Payments.
- Withholding Tax
- If you enter a Purchase Invoice that is subject to Withholding Tax, you will enter the Withholding Tax amount in the Withh. Tax field in the footer (or have it calculated automatically). When you approve the Purchase Invoice, the Withholding Tax amount will be credited to the Account specified here. Please refer to the first example on the page for more details.
Check Boxes
- Objects on Creditors A/C
- This option has three effects:
- When you choose the Supplier in a Purchase Invoice, this option will cause any Purch. Object(s) specified in the Contact record for the Supplier to be copied to Objects field on the 'Terms' card of the Purchase Invoice.
- When you approve and save a Purchase Invoice, this option will cause the Objects specified on the 'Terms' card to be assigned to the credit posting to the Creditor Account in the resulting Nominal Ledger Transaction.
If you are not using the Skip Header A/C Objects on Cost A/C option below, these Objects will be assigned to the debit posting(s) to the Purchase Account(s) as well.
- When you specify a Purchase Invoice Number in a Payment, this option will cause the Objects specified on the 'Terms' card of the Purchase Invoice to be copied to the Objects field on flip F of the Payment row. From there, they will be assigned to the debit posting to the Creditor Account.
- When you choose the Supplier in a Purchase Invoice, this option will cause any Purch. Object(s) specified in the Contact record for the Supplier to be copied to Objects field on the 'Terms' card of the Purchase Invoice.
- Sub-ledger Checking
- Check this box if you want to use the sub-ledger checking feature in the Purchase Ledger. This feature will prevent you from posting to specified control Accounts (such as Creditor Accounts) by journal from the Nominal Ledger (i.e. from Nominal Ledger Transactions that you enter yourself). This prevents you posting to control Accounts by mistake, and thus helps ensure the balances of control Accounts remain accurate.
- If you try to post to a control Account directly from a Nominal Ledger Transaction, you will be given the message "Account is protected by sub-ledger control".
- To specify the control Accounts that you want to be protected by the sub-ledger checking feature (i.e. the Accounts that are not to be used in the Transaction register), use the Sub-ledger Control Accounts setting in the Nominal Ledger and the System module.
- If you are using this feature, you will still be able to enter Payments by journal in the Nominal Ledger. For details of this process, please refer to the description of flip E of the Transaction window on this page.
- Using this feature also means that wherever you need to specify a Creditor Account (e.g. in this setting, in Supplier Categories, in Contact records for Suppliers and in Purchase Invoices), you must specify a recognised control Account (i.e. one listed in the Sub-ledger Control Accounts setting). This therefore ensures that you must use a control Account where necessary, and that you don't use one by mistake in any other circumstance.
- Note that this feature controls the sub-ledger checking feature on the purchase side only (i.e. it protects Creditor Accounts). There is a similar check box in the Account Usage S/L setting that performs an equivalent function on the sales side (i.e. for Debtor Accounts).
- If you try to post to a control Account directly from a Nominal Ledger Transaction, you will be given the message "Account is protected by sub-ledger control".
- Supp. Info. on Trans.
- When Nominal Ledger Transactions are generated automatically from Purchase Invoices, Payments and Cash Out records, this option will cause the Invoice Number, Due Date and Supplier (in the case of Invoices), the Payment Number, Payment Date and Supplier (in the case of Payments) or the Invoice Number (depending on the Type of the Cash Out row), Date and Supplier (in the case of Cash Out records) to be copied to flip E of the Transaction row posting to the Creditor Account.
- You should use this option if you want to use the Creditors Account report in the Nominal Ledger. This report lists debit and credit postings to the Creditor Account, organised by Supplier. In order to provide this analysis, the report needs the Supplier Number to be copied to flip E of each posting to the Creditor Account.
- You can change this setting in an individual Purchase Invoice, Payment or Cash Out record.
- You should use this option if you want to use the Creditors Account report in the Nominal Ledger. This report lists debit and credit postings to the Creditor Account, organised by Supplier. In order to provide this analysis, the report needs the Supplier Number to be copied to flip E of each posting to the Creditor Account.
- Objects on On Account A/C
- When you enter a Payment, the Objects for the debit posting to the Creditor Account will be taken from the 'Terms' card of the Purchase Invoice being paid (these Objects will usually represent the Supplier). In the case of an On Account Payment or a Prepayment, there is no Purchase Invoice to supply the default Objects. Instead, if you are using this option, the default Objects will be taken from the 'Accounts' card of the Contact record for the Supplier (in the case of an On Account Payment and a Prepayment that is not connected to a Purchase Order) or from the 'Terms' card of the Purchase Order (in the case of a Prepayment that is connected to a Purchase Order). If you are not using this option, no default Objects will be offered in On Account Payments and Prepayments.
- Supplier Object on Stock A/C
- When you enter a Goods Receipt, the Objects on the 'Terms' card will be taken from the Contact record for the Supplier (Purch. Objects).
- By default, these Objects will be assigned to the credit posting to the Purchase Accruals Account when a Nominal Ledger Transaction is generated from the Goods Receipt. Check this box if you would like them to be assigned to the debit posting to the Stock Account as well.
- If you are using the Skip Header A/C Objects on Cost A/C option below, these Objects will not be assigned to either posting in the Transaction, irrespective of whether you are using this Supplier Object on Stock A/C option.
- Objects are not shown in a Returned Goods to Supplier record, but those in the originating Purchase Order or Goods Receipt (on the 'Date' or 'Comment' cards respectively, representing the Supplier) will be assigned to the debit posting to the Purchase Accruals or Returned Goods to Supplier Account. If you are using this option, they will be assigned to the credit posting to the Stock Account as well (again, providing you are not using the Skip Header A/C Objects on Cost A/C option below).
- By default, these Objects will be assigned to the credit posting to the Purchase Accruals Account when a Nominal Ledger Transaction is generated from the Goods Receipt. Check this box if you would like them to be assigned to the debit posting to the Stock Account as well.
- Update Base Currency when Invoicing, Update Foreign Currency when Invoicing
- When you create a Purchase Invoice from a Purchase Order, these check boxes control the Base and Exchange Rates on the 'Currency' card of the Invoice. If you are not using these options, the Base and Exchange Rates will be copied from the Order. If you are using them, the latest Base and Exchange Rates will be used in the Purchase Invoice, although the prices in Currency will not be changed. This means you will still be charged the agreed price, but the value of the Invoice in the home Currency (and therefore in the Nominal Ledger) will be different to that of the Order.
- If you do not use these options, the Base and Exchange Rates in the Purchase Invoice will be determined by the Purchase Invoice Rate options in the Purchase Invoice Settings setting.
- Similarly, when you create a Purchase Invoice from a Goods Receipt, the Base and Exchange Rates will be copied from the Goods Receipt to the Purchase Invoice if you are not using these options. If you are using them, the latest Base and Exchange Rates will be used in the Purchase Invoice. In this situation, however, no reference will be made to the Purchase Invoice Rate options in the Purchase Invoice Settings setting.
- If you do not use these options, the Base and Exchange Rates in the Purchase Invoice will be determined by the Purchase Invoice Rate options in the Purchase Invoice Settings setting.
- Force Unique Prepayment Numbers
- Check this box if you would like to ensure that you always use unique Prepayment Numbers when entering Prepayment Payments (using the Prepayment No. field on flip D of a Payment row ).
- You should use this option if you are using First Event Purchases, a feature that is only available if the VAT Law in the Company Info setting is "Ukrainian".
- You should use this option if you are using First Event Purchases, a feature that is only available if the VAT Law in the Company Info setting is "Ukrainian".
- Separate Row per Payment Row on Bank A/C
- When you enter a Payment with several rows, the resulting Nominal Ledger Transaction will usually contain a single credit posting to the Bank Account. Check this box if you would like such Transactions to contain separate credit postings for each Payment row. The Description in each credit posting will show the Purchase Invoice Number and Supplier Name, so you should use this option if you want this information to appear in the Account Reconciliation register (used for bank reconciliation).
- Objects on Bank A/C
- When you approve and save a Payment, any Objects specified on flip F (i.e. Objects usually representing the Supplier) will be assigned to the debit posting to the Creditor Account in the resulting Nominal Ledger Transaction. If you are using this option, they will be assigned to the credit posting to the Bank or Cash Account as well.
- If you are not using the Separate Row per Payment Row on Bank A/C option above and you enter a Payment with several rows, the resulting Nominal Ledger Transaction will contain separate Bank Account postings for each Object combination.
- If you are not using the Separate Row per Payment Row on Bank A/C option above and you enter a Payment with several rows, the resulting Nominal Ledger Transaction will contain separate Bank Account postings for each Object combination.
- Skip Header A/C Objects on Cost A/C
- You usually cannot specify more than one Object belonging to a particular Object Type in a Purchase Invoice. For example, if there is an Object belonging to Object Type A on the 'Terms' card of an Invoice, you will not be able to use any Object belonging to the same Type in any of the rows.
- This option, which is provided to meet a requirement of Estonian state companies, bypasses this check by disabling the assignment of header Objects to certain postings in Nominal Ledger Transactions, as follows:
- From a Purchase Invoice, this option will prevent header Objects being assigned to the postings to the Purchase Accounts. Header Objects will still be assigned to the posting to the Creditor Account if you are using the Objects on Creditors A/C option above and to the VAT Input Account if you are using the Objects on VAT Account option on the 'VAT' card.
- From a Goods Receipt, this option will prevent header Objects being assigned to the postings to the Purchase Accruals Accounts and, if you are using the Supplier Object on Stock A/C option above, to the postings to the Stock Account.
- From a Returned Goods record, this option will prevent header Objects being assigned to the postings to the Cost of Sales or Returned Goods Accounts.
- From a Returned Goods to Supplier record, this option will prevent header Objects being assigned to the postings to the Purchase Accruals or Returned Goods to Supplier Accounts and, if you are using the Supplier Object on Stock A/C option above, to the postings to the Stock Account.
- From a Stock Revaluation record, this option will prevent header Objects being assigned to all postings.
- In a Purchase Order, using this option will mean that the check for Objects belonging to the same Type will not take place.
- This option, which is provided to meet a requirement of Estonian state companies, bypasses this check by disabling the assignment of header Objects to certain postings in Nominal Ledger Transactions, as follows:
- Disallow over-pay Invoice
- Use this option if you want to prevent Purchase Invoices from being overpaid. When you pay a Purchase Invoice using a Payment or a Cash Out record or using flip E of a Nominal Ledger Transaction, this option will prevent you from paying an amount that is greater than the outstanding amount. If you credit a Purchase Invoice, it will prevent the Credit Note having a value greater than the outstanding amount on the Invoice.
- As well as being a security measure, this option can prevent you overpaying a Purchase Invoice twice by mistake. This mistake can occur if you duplicate a Payment and then do not change the Invoice Numbers.
- This option should be used in countries where an overpayment must be treated as a Prepayment, not as a negative posting to the Creditor Account.
- As well as being a security measure, this option can prevent you overpaying a Purchase Invoice twice by mistake. This mistake can occur if you duplicate a Payment and then do not change the Invoice Numbers.
- Disallow Invoices with Same Supp. Invoice No.
- The Supp. Inv. No. is the number assigned to a Purchase Invoice by the Supplier.
- When you save a Purchase Invoice, a check will be made that you have not already used the Supp. Inv. No. with the same Supplier in a previous Purchase Invoice or Expense record (in the Document No. field on flip C). If you have, you will be warned "Invoice with this Supplier Invoice No. already exists", but the record will still be saved. Use this option if you want to prevent saving such a Purchase Invoice altogether. This will help reduce the risk of entering the same document more than once, as a Purchase Invoice and/or as part of an Expense claim.
Settings in the Purchase Ledger:
- Introduction
- Account Usage P/L, including:
- Bank Transfer
- Banks
- Calculation Formulae
- Intrastat Purchase
- Number Series - Payments
- Number Series - Purchase Invoices
- Payment Codes
- Payment Modes
- Payment Settings
- Payment Terms
- Purchase Invoice Settings
- Supplier Categories
- Supplier Withholdings
- VAT Accounts
- VAT Corrections P/L
- Withholding Calculation Formulae
- Withholding Certificates
- Withholding Taxes
Go back to:
- Home page for Purchase Ledger manual
- Home page for HansaWorld Enterprise manual
Account Usage P/L - VAT Card
This page describes the 'VAT' card of the Account Usage P/L setting. Please click the following links for descriptions of the other cards:- Introduction
- 'Creditors' card
- 'VAT' card
- 'Rate' card
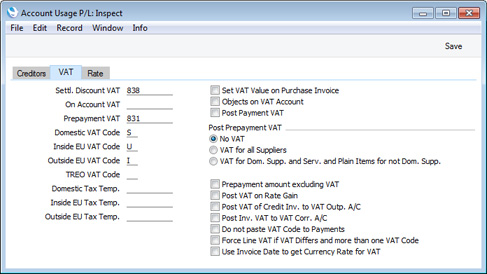
Account and Tax Fields
- Settl. Discount VAT
- Paste Special
Account register, Nominal Ledger/System module
- If you enter a Payment with a settlement discount, that discount will be credited to the Settlement Discount Account specified on the 'Creditors' card of this setting.
- In some countries, the entire settlement discount should not be credited to the Settlement Discount Account. Instead, the settlement discount less VAT should be credited to that Account, and the VAT element should be credited to this Settlement Discount VAT Account. If you need to divide the settlement discount in this way, specify a Settlement Discount VAT Account here. The VAT element will be calculated using the following formula:
Settlement Discount * Purchase Invoice VAT Total Purchase Invoice Total (including VAT) - Please refer to your financial adviser for more advice on this subject.
- In some countries, the entire settlement discount should not be credited to the Settlement Discount Account. Instead, the settlement discount less VAT should be credited to that Account, and the VAT element should be credited to this Settlement Discount VAT Account. If you need to divide the settlement discount in this way, specify a Settlement Discount VAT Account here. The VAT element will be calculated using the following formula:
- On Account VAT
- Paste Special
Account register, Nominal Ledger/System module
- The Account specified here will be used when the Nominal Ledger Transactions from Prepayment Payments are to include a VAT element (i.e. if you are using one of the Post Prepayment VAT options described below). This is the case in Russia, for some users in Latvia and for users of the Cash VAT scheme in the UK where VAT can be claimable on Prepayment Payments. Two options are available for posting Prepayment Payment VAT to the Nominal Ledger:
- Using the default option, the full Prepayment amount including VAT will be debited to the On Account A/C, and the VAT Value will be credited to the On Account VAT Account and debited to the I/P Account for the HW0203SETTINGS_VAT_Codes_Flip_A,VAT Code) (or the Prepayment VAT Account specified below if there is no I/P Account).
- If you are using the Prepayment amount excluding VAT option below, the Prepayment amount excluding VAT will be debited to the On Account A/C and the VAT Value will be debited to the I/P Account for the VAT Code (or the Prepayment VAT Account if there is no I/P Account). There will be no posting to the On Account VAT Account.
- Using the default option, the full Prepayment amount including VAT will be debited to the On Account A/C, and the VAT Value will be credited to the On Account VAT Account and debited to the I/P Account for the HW0203SETTINGS_VAT_Codes_Flip_A,VAT Code) (or the Prepayment VAT Account specified below if there is no I/P Account).
- Prepayment VAT
- Paste Special
Account register, Nominal Ledger/System module
- The Post Payment VAT and/or Post Prepayment VAT options described below allow you to account for VAT based on Payments. When you approve a Payment, VAT will be moved from a temporary VAT Input Account to the final one. Usually, the final Input Account will be the I/P Account specified in the VAT Codes setting. If a particular VAT Code does not have an I/P Account, the VAT amount will be debited to this Account instead.
- Domestic VAT Code, Inside EU VAT Code, Outside EU VAT Code
- Paste Special
VAT Codes setting, Nominal Ledger
- The VAT Code will determine the Input VAT Account that will be debited when you post a Purchase Invoice to the Nominal Ledger and the rate at which VAT will be charged.
- The default VAT Code offered in each Purchase Invoice row will be chosen as follows:
- The Purch. VAT Code for the Supplier will be used.
- It will be taken from the Account record.
- This VAT Code in the Account Usage P/L setting will be used.
- You can change this default in a particular Purchase Invoice row if necessary.
- If you would like the VAT in Credit Notes to be posted to different Input VAT Accounts, you can specify those Input VAT Accounts on flip D in the VAT Codes setting.
- You can change the names of two of these fields if they are not suitable. Using the VAT Zone Label setting in the Sales Ledger, you can replace the string "EU" with your own string (for example "SACU" in South Africa).
- The default VAT Code offered in each Purchase Invoice row will be chosen as follows:
- TREO VAT Code
- Paste Special
VAT Codes setting, Nominal Ledger
- TREO (Tax Remission Export Office) Orders are used in Kenya and other East African countries. If a manufacturing company receives a Sales Order from an export Customer, then any components purchased for manufacturing the Items on the Sales Order will be exempt from tax and customs duties.
- To this end, when you enter a Purchase Order for such components, you can mark the relevant rows as TREO rows (on flip D). When you mark a Purchase Order row as a TREO row, the VAT Code specified here will be copied to that row instead of the normal VAT Code for the Item.. Usually this will be a zero-rated VAT Code.
- To this end, when you enter a Purchase Order for such components, you can mark the relevant rows as TREO rows (on flip D). When you mark a Purchase Order row as a TREO row, the VAT Code specified here will be copied to that row instead of the normal VAT Code for the Item.. Usually this will be a zero-rated VAT Code.
- Domestic Tax Temp., Inside EU Tax Temp., Outside EU Tax Temp.
- Paste Special
Tax Templates setting, Nominal Ledger
- In some countries, Tax Templates are used instead of VAT Codes. VAT Codes should be used where each sales and purchase transaction is taxed at a single rate, while Tax Templates should be used where different taxes and/or several tax rates are applied to one transaction.
- If you need to use Tax Templates, you should first choose the Use Tax Templates for Tax Calculation option in the Transaction Settings setting in the Nominal Ledger. Wherever a VAT Code field would appear, this option will cause a Tax Template field to appear instead. Having done so and having entered your Tax Templates in the Tax Templates setting also in the Nominal Ledger, you should specify the Tax Templates that are to be used as defaults in Purchase Invoices here.
- The default Tax Template offered in each Purchase Invoice row will be chosen as follows:
- The Purch. Tax Temp. for the Supplier will be used.
- It will be taken from the Account record.
- This Tax Template in the Account Usage P/L setting will be used.
- You can change this default in a particular Purchase Invoice row if necessary.
- You can change the names of two of these fields if they are not suitable. Using the VAT Zone Label setting in the Sales Ledger, you can replace the string "EU" with your own string (for example "SACU" in South Africa).
- If you need to use Tax Templates, you should first choose the Use Tax Templates for Tax Calculation option in the Transaction Settings setting in the Nominal Ledger. Wherever a VAT Code field would appear, this option will cause a Tax Template field to appear instead. Having done so and having entered your Tax Templates in the Tax Templates setting also in the Nominal Ledger, you should specify the Tax Templates that are to be used as defaults in Purchase Invoices here.
Check Boxes
- Set VAT Value on Purchase Invoice
- When you enter a Purchase Invoice and add rows to it the Calculated VAT field in the footer of the Purchase Invoice will be updated with the total VAT value, calculated using the Amounts and VAT Codes in each row.
- If the total VAT amount on the Supplier's Invoice is different to the figure in the Calculated VAT field, you should enter the Supplier's figure in the VAT field in the header of the Purchase Invoice.
- In the resulting Nominal Ledger Transaction, the total figure posted to the Input VAT Account(s) will be the figure in the VAT field in the header or, if this field is empty, the figure in the Calculated VAT field in the footer.
- If there is more than one VAT Code in the Invoice, the amounts posted to each Input Account will be calculated using the Amounts and VAT Codes in each row. If you have entered a figure in the VAT field in the Purchase Invoice header, an adjustment will be made to the amount posted to the first Input Account to ensure the total value of VAT posted is correct.
- If you know the VAT value of each row, this calculated adjustment might not be sufficiently accurate. In this case, you can enter the appropriate VAT values in the VAT field on flip C of each row. You can only enter a figure in the VAT field if you are using this Set VAT Value on Purchase Invoice option. As you enter figures in this field in each row, the VAT field in the header will be updated. Therefore you must use this field in every row (or none) in order for the Purchase Invoice to balance.
- If the total VAT amount on the Supplier's Invoice is different to the figure in the Calculated VAT field, you should enter the Supplier's figure in the VAT field in the header of the Purchase Invoice.
- Objects on VAT Account
- When you approve and save a Purchase Invoice, this option will cause the Objects specified on the 'Terms' card of the Invoice to be assigned to the debit posting(s) to the Input VAT Account(s) in the resulting Nominal Ledger Transaction.
- When you approve and save a Payment and if you are using the Post Payment VAT and/or Post Prepayment VAT options below, this option will cause the Objects specified on flip F of a Payment row to be assigned to all VAT postings in the resulting Nominal Ledger Transaction.
- When you approve and save a Payment and if you are using the Post Payment VAT and/or Post Prepayment VAT options below, this option will cause the Objects specified on flip F of a Payment row to be assigned to all VAT postings in the resulting Nominal Ledger Transaction.
- Post Payment VAT
- This option allows you to post VAT from Payments and On Account Payments. An On Account Payment is a Payment with no Purchase Invoice Number or Prepayment Number. This is, a requirement in Latvia and for users of the Cash VAT scheme in the UK. If you need to use this option, you should enter I/P Accounts for all your VAT Codes entered using the setting in the Nominal Ledger, or at least a Prepayment VAT Account in the field above. Please refer to the description of the VAT Codes setting for full details about the Post Payment VAT feature.
- UK Cash VAT users only should also switch on the Post Receipt VAT option on the 'VAT / Tax' card of the Account Usage S/L setting and specify O/P Accounts for all VAT Codes. Users in Poland can also use this option and the Post Receipt VAT option in the Sales Ledger, but should not use the Post Prepayment VAT options.
- The exact calculation and posting of VAT from Payments will be controlled by the Do not paste VAT Code to Payments option below.
- UK Cash VAT users only should also switch on the Post Receipt VAT option on the 'VAT / Tax' card of the Account Usage S/L setting and specify O/P Accounts for all VAT Codes. Users in Poland can also use this option and the Post Receipt VAT option in the Sales Ledger, but should not use the Post Prepayment VAT options.
- Post Prepayment VAT
- These options allow the posting of VAT from Prepayment Payments, a requirement for users of the Cash VAT scheme in the UK and for some users in Latvia and Russia. A Prepayment Payment is a Payment row without a Purchase Invoice Number but with a Prepayment Number specified on flip D. If you are using these options, you should also specify On Account VAT and Prepayment VAT Accounts in the fields to the left
- As well as signifying that you want to post VAT from Prepayment Payments, these options also control how VAT will be calculated in Prepayment Payments connected to Purchase Orders. When you enter a Purchase Order Number in the Order No. field on flip D of a Payment row, the VAT Code and VAT Value will be brought in automatically from the Order and shown on flip E (the VAT Code comes from the first row of the Order). The VAT Value will be calculated as follows:
- No VAT
- VAT will be calculated and shown on flip E, but will not be included in the Nominal Ledger Transaction.
- VAT for all Suppliers
- VAT will be calculated on Prepayment Payments connected to Purchase Orders issued to Suppliers in the Domestic, Inside EU (Post VAT) and Outside EU (Post VAT) Zones.
- VAT for Dom. Supp. and Serv. and Plain Items for not Dom. Supp.
- VAT will be calculated on Prepayment Payments connected to Purchase Orders issued to Suppliers in the Domestic Zone, and on Plain and Service Items only in Purchase Orders issued to Suppliers in the Inside EU (Post VAT) and Outside EU (Post VAT) Zones.
- If you are using the second or third options, the posting of Prepayment Payment VAT in the Nominal Ledger will depend on the Prepayment amount excluding VAT option immediately below.
- As well as signifying that you want to post VAT from Prepayment Payments, these options also control how VAT will be calculated in Prepayment Payments connected to Purchase Orders. When you enter a Purchase Order Number in the Order No. field on flip D of a Payment row, the VAT Code and VAT Value will be brought in automatically from the Order and shown on flip E (the VAT Code comes from the first row of the Order). The VAT Value will be calculated as follows:
- Prepayment amount excluding VAT
- If you use one of the options above to post VAT from Prepayments, by default the full Prepayment amount including VAT will be debited to the On Account A/C, and the VAT Value will be credited to the On Account VAT Account and debited to the I/P Account for the VAT Code (or the Prepayment VAT Account if there is no I/P Account).
- Use this option if you would like the Prepayment amount excluding VAT to be debited to the On Account A/C and the VAT Value to be debited to the I/P Account for the VAT Code (or the Prepayment VAT Account if there is no I/P Account). There will be no posting to the On Account VAT Account.
- Do not use this option if you are not posting VAT from Prepayments.
- Use this option if you would like the Prepayment amount excluding VAT to be debited to the On Account A/C and the VAT Value to be debited to the I/P Account for the VAT Code (or the Prepayment VAT Account if there is no I/P Account). There will be no posting to the On Account VAT Account.
- Post VAT of Credit Inv. to VAT Outp. A/C
- When you create a Credit Note from a Purchase Invoice, the Nominal Ledger Transaction will usually reverse the postings of the original Purchase Invoice, so that the Creditors Account will be debited and the Cost and Input VAT Accounts will be credited. Use this option if you would like Output VAT Accounts to be credited instead.
- Do not paste VAT Code to Payments
- When you choose to pay a Purchase Invoice, the VAT Code (from the first row of the Invoice) and the VAT Value will be shown on flip E of the Payment row.
- If you are using the Post Payment VAT option above, VAT will be posted from the Payment, crediting the Input VAT Account from the VAT Code (i.e. from the VAT Code in the first row of the Invoice) and debiting the I/P Account.
- If the Purchase Invoice being paid contains rows with different VAT Codes (possibly with different Input VAT and I/P Accounts), you may need this to be reflected in the VAT posting from the Payment. If so, you can remove the VAT Code and VAT Value from flip E of the Payment, or you can use this option to have these fields left blank in every Payment. If these fields are empty, there will be separate postings for each VAT Code used in the Purchase Invoice being paid.
- This option does not apply to Prepayments. So, if you specify a Purchase Order Number on flip D of a Payment row, the VAT Code (from the first row of the Order) and the VAT Value will still be shown on flip E, and, if you are using one of the Post Prepayment VAT options, that VAT Code will determine the I/P Account. Removing the VAT Code and VAT Value from flip E will mean that VAT will not be posted.
- If you are using the Post Payment VAT option above, VAT will be posted from the Payment, crediting the Input VAT Account from the VAT Code (i.e. from the VAT Code in the first row of the Invoice) and debiting the I/P Account.
- Force Line VAT if VAT Differs and more than one VAT Code
- If you are using the Set VAT Value on Purchase Invoice option above, you will have a choice whether to use the VAT field on flip C of the matrix in a particular Purchase Invoice. As mentioned in the description of that option, if you do decide to use it, you will need to do so in every row. If you would like to make the use of the VAT field on flip C mandatory in every Purchase Invoice in which you have used more than one VAT Code, select this option. You should not use this option if any of the VAT Codes you are likely to use are zero-rated.
Settings in the Purchase Ledger:
- Introduction
- Account Usage P/L, including:
- 'Creditors' card
- 'VAT' card
- 'Rate' card
- 'Creditors' card
- Bank Transfer
- Banks
- Calculation Formulae
- Intrastat Purchase
- Number Series - Payments
- Number Series - Purchase Invoices
- Payment Codes
- Payment Modes
- Payment Settings
- Payment Terms
- Purchase Invoice Settings
- Supplier Categories
- Supplier Withholdings
- VAT Accounts
- VAT Corrections P/L
- Withholding Calculation Formulae
- Withholding Certificates
- Withholding Taxes
Go back to:
- Home page for Purchase Ledger manual
- Home page for HansaWorld Enterprise manual
Account Usage P/L - Rate Card
This page describes the 'Rate' card of the Account Usage P/L setting. Please click the following links for descriptions of the other cards:- Introduction
- 'Creditors' card
- 'VAT' card
- 'Rate' card
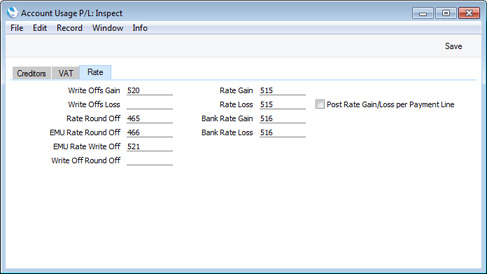
- Write Off Round Off, Rate Round Off, EMU Rate Round Off, EMU Rate Write Off
- These Accounts will be used in the situation where a Purchase Invoice is to be treated as fully paid if the amount sent is slightly different to that outstanding, providing that difference is within an allowable margin. The difference will be posted to one of these Accounts on the following basis:
- Write Off Round Off
- if the Sent Currency is the same as the Invoice Currency, and it is not a member of the EMU;
- Rate Round Off
- if the Sent Currency is different to the Invoice Currency, and the Sent Currency is not a member of the EMU;
- EMU Rate Round Off
- if the Sent Currency is different to the Invoice Currency, and the Sent Currency is a member of the EMU;
- EMU Rate Write Off
- if the Sent Currency is the same as the Invoice Currency, and it is a member of the EMU.
- If you need to use this feature, you should set an allowable margin for each Currency, using the Automatic Round Off Limit and Automatic Write Off Limit fields on the ‘Round Off’ card of each Currency record. If you do this in the record representing your home Currency, you can also use this feature as an easy way of automatically writing off small outstanding amounts in domestic Invoices (i.e. those in your home Currency).
- Please refer to the pages describing the 'EMU' and 'Round Off' cards of the Currency record for more details about using this feature.
- If the difference between the amount sent and the outstanding amount is caused by a change in Exchange Rate, it will not be posted to one of these Accounts, but to the Rate Gain or Loss Accounts described below.
- Write Off Round Off
- Rate Gain, Rate Loss
- These Accounts will be used when you receive a Currency Invoice and the Exchange Rate changes before you issue the payment. When this happens, the amount paid, when converted to your home Currency, will no longer be the same as the outstanding amount. Any difference will be posted from the Payment to one of these Accounts, depending on whether a gain or loss is involved.
- Bank Rate Gain, Bank Rate Loss
- These Accounts will be used when the amount paid from the bank against a Purchase Invoice is not the same as the outstanding amount, because the exchange rate levied by the bank is different to the rate offered to the Payment (i.e. because you change the Bank Amount in a Payment). Any difference will be posted from the Payment to one of these Accounts, depending on whether a gain or loss is involved.
- Post Rate Gain/Loss per Payment Line
- When you enter a Payment in which more than one row will post an exchange rate difference, the resulting Nominal Ledger Transaction will usually contain a single posting to the relevant Account (i.e to the Rate Gain or Loss Accounts and/or the Bank Rate Gain or Loss Accounts described immediately above). Use this option if you would like such Transactions to contain separate exchange rate difference postings for each Payment row. The Description in each posting will include the Purchase Invoice Number.
Settings in the Purchase Ledger:
- Introduction
- Account Usage P/L, including:
- 'Creditors' card
- 'VAT' card
- 'Rate' card
- 'Creditors' card
- Bank Transfer
- Banks
- Calculation Formulae
- Intrastat Purchase
- Number Series - Payments
- Number Series - Purchase Invoices
- Payment Codes
- Payment Modes
- Payment Settings
- Payment Terms
- Purchase Invoice Settings
- Supplier Categories
- Supplier Withholdings
- VAT Accounts
- VAT Corrections P/L
- Withholding Calculation Formulae
- Withholding Certificates
- Withholding Taxes
Go back to:
- Home page for Purchase Ledger manual
- Home page for HansaWorld Enterprise manual
Bank Transfer
In many countries it is common practice to pay Suppliers by electronic credit transfer.One method included in Enterprise by HansaWorld that you can use to instruct your bank to make payments is the 'Banking File' Export function in the Purchase Ledger. This creates text files that you can send to your bank.
The Bank Transfer setting contains various options that you can use to control operation of the 'Banking File' function.
To open the Bank Transfer setting, ensure you are in the Purchase Ledger and click the [Settings] button in the Master Control panel to open the 'Settings' list. Double-click 'Bank Transfer' in the list. The 'Bank Transfer: Inspect' window opens. Make any changes as necessary and, when the record is complete, click the [Save] button in the Button Bar to save changes and close the window, or click the close box if you don't want to save changes.

Settings in the Purchase Ledger:
- Introduction
- Account Usage P/L
- Bank Transfer, including:
- Header
- 'Sweden/Denmark' card
- 'Norway' card
- 'OCR' card
- Header
- Banks
- Calculation Formulae
- Intrastat Purchase
- Number Series - Payments
- Number Series - Purchase Invoices
- Payment Codes
- Payment Modes
- Payment Settings
- Payment Terms
- Purchase Invoice Settings
- Supplier Categories
- Supplier Withholdings
- VAT Accounts
- VAT Corrections P/L
- Withholding Calculation Formulae
- Withholding Certificates
- Withholding Taxes
Go back to:
- Home page for Purchase Ledger manual
- Home page for HansaWorld Enterprise manual
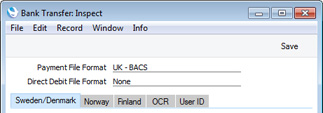
- Payment File Format
- Paste Special
Choices of possible entries
- The 'Banking File' Export function is capable of creating files in many different formats suitable for sending to many different banks. Use this field to choose the format that you need. Beginning here, details about each Payment File Format are provided.
- If you will not use the 'Banking File' function to issue payment instructions to your bank but instead will use the E-Payments Cloud Service, you should not choose the Payment File Format here. Instead, you should set it in the Bank record(s) representing your Bank(s) (i.e. in the Bank records used in Payment Modes). The E-Payments Cloud Service is a chargeable service that can only be used in Estonia and Latvia.
- If you are in Norway and will need to use the 'Debt Collection to Predator' Export function in the Sales Ledger, you must choose one of the Norwegian banks as your Payment File Format.
- If you will not use the 'Banking File' function to issue payment instructions to your bank but instead will use the E-Payments Cloud Service, you should not choose the Payment File Format here. Instead, you should set it in the Bank record(s) representing your Bank(s) (i.e. in the Bank records used in Payment Modes). The E-Payments Cloud Service is a chargeable service that can only be used in Estonia and Latvia.
- Direct Debit File Format
- Paste Special
Choices of possible entries
- You can use the 'Export Direct Debit' function on the Operations menu of the 'Receipts: Browse' window to create files containing direct debit instructions for your bank. Use this field to choose the format that you need. At the time of writing, the only format supported for this feature is Australia - ABA.
Settings in the Purchase Ledger:
- Introduction
- Account Usage P/L
- Bank Transfer, including:
- Header
- 'Sweden/Denmark' card
- 'Norway' card
- 'OCR' card
- Header
- Banks
- Calculation Formulae
- Intrastat Purchase
- Number Series - Payments
- Number Series - Purchase Invoices
- Payment Codes
- Payment Modes
- Payment Settings
- Payment Terms
- Purchase Invoice Settings
- Supplier Categories
- Supplier Withholdings
- VAT Accounts
- VAT Corrections P/L
- Withholding Calculation Formulae
- Withholding Certificates
- Withholding Taxes
Go back to:
- Home page for Purchase Ledger manual
- Home page for HansaWorld Enterprise manual
Bank Transfer - Sweden/Denmark Card
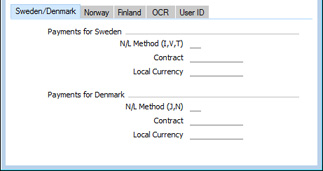
- N/L Method (I, V, T), Contract
- These fields will be used by the 'Banking File' Export function when the Payment File Format is Sweden - Handelsbanken and when you use the Foreign Country Payment option in the specification window. If you have entered "T" in the N/L Method field, the Contract will be included in the export files created by the function in RT6 positions 45-54. Otherwise positions 45-54 will be empty. The N/L Method itself will be exported in RT6 position 80.
Settings in the Purchase Ledger:
- Introduction
- Account Usage P/L
- Bank Transfer, including:
- Banks
- Calculation Formulae
- Intrastat Purchase
- Number Series - Payments
- Number Series - Purchase Invoices
- Payment Codes
- Payment Modes
- Payment Settings
- Payment Terms
- Purchase Invoice Settings
- Supplier Categories
- Supplier Withholdings
- VAT Accounts
- VAT Corrections P/L
- Withholding Calculation Formulae
- Withholding Certificates
- Withholding Taxes
Go back to:
- Home page for Purchase Ledger manual
- Home page for HansaWorld Enterprise manual
Bank Transfer - Norway Card
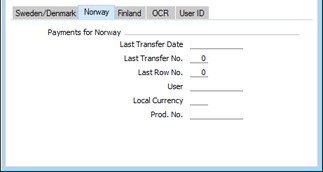
- Last Transfer Date, Last Transfer No., Last Row No.
- These fields will be used by the 'Banking File' Export function when the Payment File Format is one of the Norwegian banks. They will be updated automatically each time you run the Export function and shouldn't be changed.
- The Last Transfer No. and Last Row No. will also be updated automatically if the Payment File Format is Finland - SEPA, and the Last Transfer No. by Hungary - HVB.
- The Last Transfer No. and Last Row No. will also be updated automatically if the Payment File Format is Finland - SEPA, and the Last Transfer No. by Hungary - HVB.
- User
- The User specified here will be included in the header section of Export files created when the Payment File Format is one of the Norwegian banks (second header line, positions 35-46).
- Prod. No.
- If you specify a Production Number here, it will be used as the default value in the Prod. No. field in the specification window for the 'Banking File' Export function.
- If the Payment File Format is one of the Norwegian banks, you should enter the division code (branch code) for your bank branch in this field, to be included in positions 60-70 in the first line of each export file.
- If the Payment File Format is Sweden - PlusGirot, enter a single-digit Production Number, to be exported as character 13 in the first line of each export file.
- If the Payment File Format is one of the Norwegian banks, you should enter the division code (branch code) for your bank branch in this field, to be included in positions 60-70 in the first line of each export file.
Settings in the Purchase Ledger:
- Introduction
- Account Usage P/L
- Bank Transfer, including:
- Header
- 'Sweden/Denmark' card
- 'Norway' card
- 'OCR' card
- Header
- Banks
- Calculation Formulae
- Intrastat Purchase
- Number Series - Payments
- Number Series - Purchase Invoices
- Payment Codes
- Payment Modes
- Payment Settings
- Payment Terms
- Purchase Invoice Settings
- Supplier Categories
- Supplier Withholdings
- VAT Accounts
- VAT Corrections P/L
- Withholding Calculation Formulae
- Withholding Certificates
- Withholding Taxes
Go back to:
- Home page for Purchase Ledger manual
- Home page for HansaWorld Enterprise manual
Bank Transfer - Finland Card

- Export Supplier Invoice Number
- This option will be used by the 'Banking File' Export function if the Payment File Format is Finland - SEPA or Spain - SEPA and a Payment is exported on a "Per Supplier" basis (i.e. "Per Supplier" is the Payment Format on the 'Bank' card of the Payment or you select the One Payment per Supplier option in the 'Specify Banking File' window).
- When a Payment is exported on a "Per Supplier" basis, all rows paying the same Supplier will be treated as a single payment in the export file. The <Ustrd> tag will contain a long text string made up of references to each Purchase Invoice being paid. Usually, the Bank Reference from flip H of each Payment row will be exported in this tag in the format RFS//Bank Reference 1/Bank Reference 2. If there is no Bank Reference, use this option if you need the Supp. Inv. No. of the Purchase Invoice being paid to be exported instead (e.g. RFS//Supp. Inv. No. 1/Bank Reference 2). If you are not using this option, the text "TRANSFER" will be exported (e.g. RFS//TRANSFER/Bank Reference 2).
Settings in the Purchase Ledger:
- Introduction
- Account Usage P/L
- Bank Transfer, including:
- Header
- 'Sweden/Denmark' card
- 'Norway' card
- 'Finland' card
- 'OCR' card
- Header
- Banks
- Calculation Formulae
- Intrastat Purchase
- Number Series - Payments
- Number Series - Purchase Invoices
- Payment Codes
- Payment Modes
- Payment Settings
- Payment Terms
- Purchase Invoice Settings
- Supplier Categories
- Supplier Withholdings
- VAT Accounts
- VAT Corrections P/L
- Withholding Calculation Formulae
- Withholding Certificates
- Withholding Taxes
- Home page for Purchase Ledger manual
- Home page for HansaWorld Enterprise manual
Bank Transfer - OCR Card
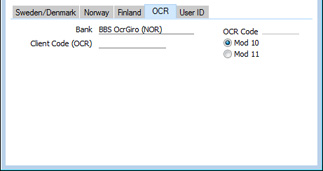
- Bank
- Paste Special
Choices of possible entries
- The 'Banking File' Import function in the Sales Ledger is capable of importing files in many different formats received from many different banks. Use this field to choose the format that you need.
- For use in Norway and Sweden, please refer to the next paragraphs.
- For use in Norway and Sweden, please refer to the next paragraphs.
- Bank, Client Code (OCR), OCR Code
- These fields are used in Norway for the calculation of KID Codes and in Sweden for the calculation of OCR Codes.
- Use 'Paste Special' to choose an entry for the Bank field. If your bank is not listed, choose "BBS OcrGiro (NOR)" (renamed "Nets OcrGiro (NOR)" in Enterprise by HansaWorld version 7.2 131107) as this is the most-used standard. If you will use the 'Invoices for Factoring' Export function in the Sales Ledger and the Factoring Bank chosen in the Factoring Export setting is "SG Finans (NOR)", then you should also choose "SG Finans (NOR)" here. This will ensure the KID Codes in the export files will be in the correct format.
- Enter the Client Code used in your contract with your bank, and choose the OCR Code option that represents the modulus that is also specified in your contract. The modulus will determine the number of the digits in the KID/OCR Code and the calculation of the check digit.
- Use 'Paste Special' to choose an entry for the Bank field. If your bank is not listed, choose "BBS OcrGiro (NOR)" (renamed "Nets OcrGiro (NOR)" in Enterprise by HansaWorld version 7.2 131107) as this is the most-used standard. If you will use the 'Invoices for Factoring' Export function in the Sales Ledger and the Factoring Bank chosen in the Factoring Export setting is "SG Finans (NOR)", then you should also choose "SG Finans (NOR)" here. This will ensure the KID Codes in the export files will be in the correct format.
Settings in the Purchase Ledger:
- Introduction
- Account Usage P/L
- Bank Transfer, including:
- Header
- 'Sweden/Denmark' card
- 'Norway' card
- 'OCR' card
- Header
- Banks
- Calculation Formulae
- Intrastat Purchase
- Number Series - Payments
- Number Series - Purchase Invoices
- Payment Codes
- Payment Modes
- Payment Settings
- Payment Terms
- Purchase Invoice Settings
- Supplier Categories
- Supplier Withholdings
- VAT Accounts
- VAT Corrections P/L
- Withholding Calculation Formulae
- Withholding Certificates
- Withholding Taxes
Go back to:
- Home page for Purchase Ledger manual
- Home page for HansaWorld Enterprise manual
Banks
Use this setting to register the names and addresses of banks used by your Customers and Suppliers.You will usually need to enter separate records in this setting for your Bank or Banks and for the Banks used by your Suppliers. This Bank information will be used by the 'Banking File' Export function and/or the E-Payments Cloud Service, both of which you can use to instruct your bank to make payments by credit transfer. "Your" Bank in this context is the paying Bank, usually the Bank specified in the Payment Mode used in a Payment (occasionally also the Bank specified in the Company Info setting in the System module). The payee Banks i.e. the Banks used by your Suppliers will be the Banks specified in the Account Operator field in the Contact records for each Supplier.
On first selecting the setting, the 'Banks: Browse' window is displayed, showing all Banks previously entered. Click [New] to bring up the 'Bank: New' window.
---
Settings in the Purchase Ledger:
- Introduction
- Account Usage P/L
- Bank Transfer
- Banks, including:
- Header
- 'Misc' card
- 'Address' card
- 'Banking File' card
- Header
- Calculation Formulae
- Intrastat Purchase
- Number Series - Payments
- Number Series - Purchase Invoices
- Payment Codes
- Payment Modes
- Payment Settings
- Payment Terms
- Purchase Invoice Settings
- Supplier Categories
- Supplier Withholdings
- VAT Accounts
- VAT Corrections P/L
- Withholding Calculation Formulae
- Withholding Certificates
- Withholding Taxes
Go back to:
- Home page for Purchase Ledger manual
- Home page for HansaWorld Enterprise manual
Banks - Header
- Code
- Enter the unique Code by which the bank record is to be identified from elsewhere in Enterprise by HansaWorld. The Code can consist of up to ten characters.
Settings in the Purchase Ledger:
- Introduction
- Account Usage P/L
- Bank Transfer
- Banks, including:
- Header
- 'Misc' card
- 'Address' card
- 'Banking File' card
- Header
- Calculation Formulae
- Intrastat Purchase
- Number Series - Payments
- Number Series - Purchase Invoices
- Payment Codes
- Payment Modes
- Payment Settings
- Payment Terms
- Purchase Invoice Settings
- Supplier Categories
- Supplier Withholdings
- VAT Accounts
- VAT Corrections P/L
- Withholding Calculation Formulae
- Withholding Certificates
- Withholding Taxes
Go back to:
- Home page for Purchase Ledger manual
- Home page for HansaWorld Enterprise manual
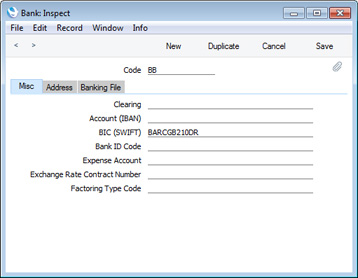
Banks - Misc Card

- Clearing
- Enter the Clearing Code for the Bank.
- You will usually need to specify a Clearing Code if a Bank is located outside the EU. A Clearing Code will usually consist of a five-character country code and a bank identifier. For a list of country codes, refer to the "5-ClearingSystemIdentification" sheet of the External Code Sets spreadsheet available from http://www.iso20022.org/external_code_list.page.
- The Clearing Codes of Suppliers' Banks that are outside the EU will be included in Banking File export files when you are using the following Payment File Formats:
It will also be included in Banking File export files when you are using the following Payment File Formats and when you use the Foreign Country Payment option in the 'Specify Banking File' window:
- $MAILLIN(HW0202EXPORTS_Banking_File_Lithuania,Lithuania - LITAS-ESIS 1.1)
- Sweden - Handelsbanken
- Sweden - Nordea
- Sweden - SE-Banken
- Sweden - Swedbank
- You will usually need to specify a Clearing Code if a Bank is located outside the EU. A Clearing Code will usually consist of a five-character country code and a bank identifier. For a list of country codes, refer to the "5-ClearingSystemIdentification" sheet of the External Code Sets spreadsheet available from http://www.iso20022.org/external_code_list.page.
- Account (IBAN)
- Used as default in
Payment Modes (Bank A/C No. field)
- If the Bank record represents your own Bank, enter your bank account number in this field, using the correct IBAN (International Bank Account Number) format including two-character country prefix. This will be needed by and exported in Banking Files when you are using the following Payment File Formats:
Your bank account number will also be taken from this field and included in Banking File export files when you are using the following Payment File Formats and when you use the Foreign Country Payment option in the 'Specify Banking File' window:
You will usually not need to use this field in Bank records representing the Banks used by your Suppliers, because doing so will mean you will need to enter separate Bank records for each Supplier. However, Suppliers' bank account numbers will be taken from this field when you are using the following Payment File Formats and when you use the Foreign Country Payment option in the 'Specify Banking File' window:
- BIC (SWIFT)
- Enter the BIC or SWIFT code for the Bank here.
- The BIC (SWIFT) code of your Bank will be needed by and exported in Banking Files when you are using the following Payment File Formats:
The BIC (SWIFT) codes of the Banks used by your Suppliers will be taken from this field and included in all Banking File export files when you are using the following Payment File Formats:
In addition, the BIC (SWIFT) codes of your Suppliers' Banks will be included in Banking File export files when you are using the following Payment File Formats and when you use the Foreign Country Payment option in the 'Specify Banking File' window:
- Lithuania - LITAS-ESIS 1.1
- All Norwegian Banks
- Sweden - Handelsbanken
- Sweden - Nordea
- Sweden - SE-Banken
- Sweden - Swedbank
- Estonia - SEB
- Estonia - Swedbank Gateway
- Latvia - Telehansa
- The BIC (SWIFT) code of your Bank will be needed by and exported in Banking Files when you are using the following Payment File Formats:
- Bank ID Code
- If you will use the 'Banking File' Export function with the Finland - SEPA Payment File Format, enter your customer number in this field in the Bank record representing your Bank. This Bank ID Code will be included in export files in the <BkPtyId> tag. If this field is blank, the Bank Customer ID specified in the Company Info setting will be used.
- Exchange Rate Contract Number
- If you will use the 'Banking File' Export function with the Finland - SEPA Payment File Format, an Exchange Rate Contract Number should be included in export files in the <CtrctId> tag (inside <XchgRateInf>) for non-Euro payments. Specify the Exchange Rate Contract Number here.
- Factoring Type Code
- The Factoring Type Code will be included in files created by the 'Invoices for Factoring' Export function in the Sales Ledger, when the Factoring Bank in the Factoring Export setting is Finvoice (FIN). It will be included in the <FactoringTypeCode> tag and will be taken from the Bank specified in the Factoring Export setting.
Settings in the Purchase Ledger:
- Introduction
- Account Usage P/L
- Bank Transfer
- Banks, including:
- Header
- 'Misc' card
- 'Address' card
- 'Banking File' card
- Header
- Calculation Formulae
- Intrastat Purchase
- Number Series - Payments
- Number Series - Purchase Invoices
- Payment Codes
- Payment Modes
- Payment Settings
- Payment Terms
- Purchase Invoice Settings
- Supplier Categories
- Supplier Withholdings
- VAT Accounts
- VAT Corrections P/L
- Withholding Calculation Formulae
- Withholding Certificates
- Withholding Taxes
Go back to:
- Home page for Purchase Ledger manual
- Home page for HansaWorld Enterprise manual
Banks - Address Card
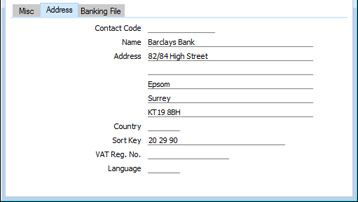
- Contact Code
- Paste Special
Customers, Suppliers and Contact Persons in Contact register
- If you specify the Code of a record in the Contact register here, the Name, Address, Route, VAT Reg. No., Country and Language will be copied from the Contact record to the corresponding fields in the Bank record (the Route from the Contact record will be copied to the Sort Key field in the Bank record).
- If you will use the 'Invoices for Factoring' Export function in the Sales Ledger, you should specify a Contact in the Bank that is specified in the Factoring Export setting. This Contact record will supply the ANA Code that will be exported in the <eb:PartyId> tag for the Receiver (inside the <eb:To> tag).
- If you will use the 'Invoices for Factoring' Export function in the Sales Ledger, you should specify a Contact in the Bank that is specified in the Factoring Export setting. This Contact record will supply the ANA Code that will be exported in the <eb:PartyId> tag for the Receiver (inside the <eb:To> tag).
- Name
- The Name of the Bank.
- Address
- The Address of the Bank.
- Country
- Paste Special
Countries setting, System module
- Use the two-character ISO 3166 format to specify the country where the Bank is located.
- If a Supplier's Bank has a Clearing Code on the 'Misc.' card (i.e. the Bank is outside the EU), this Country will be included in Banking File export files when you are using the following Payment File Format:
- If a Supplier's Bank has a Clearing Code on the 'Misc.' card (i.e. the Bank is outside the EU), this Country will be included in Banking File export files when you are using the following Payment File Format:
- Sort Key
- The sort code or branch code of the Bank.
The Sort Key will be needed by and exported in Banking Files when you are using the following Payment File Formats:
- Australia - ABA
- Enter your APCA User Number in the Bank record representing your Bank (note that this is the same field as the Payments field on the 'Banking File' card).
- Czech - CITI bank
- Enter bank branch codes in the Bank records for the Suppliers' Banks.
- New Zealand banks
- If the Payment File Format is New Zealand - ANZ or New Zealand - BNZ, enter your: Subscriber ID in the Bank record representing your Bank.
- All Norwegian banks
- Enter division codes (bank branch codes) in the Bank records for the Suppliers' Banks. These codes will be exported in Banking Files when you create them using the Foreign Country Payment option in the specification window.
- Australia - ABA
- VAT Reg. No.
- The Bank's VAT Registration Number will be included in files created by the 'Invoices for Factoring' Export function in the Sales Ledger, when the Factoring Bank in the Factoring Export setting is Finvoice (FIN).It will be included in the <FactoringPartyIdentifier> tag and will be taken from the Bank specified in the Factoring Export setting.
- Language Paste Special Languages setting, System module
- The Language that you specify here will be copied to any Own Cheque records that you connect to the Bank. From there, the Language will determine the Form that will be used when you print the Own Cheques.
Settings in the Purchase Ledger:
- Introduction
- Account Usage P/L
- Bank Transfer
- Banks, including:
- Header
- 'Misc' card
- 'Address' card
- 'Banking File' card
- Header
- Calculation Formulae
- Intrastat Purchase
- Number Series - Payments
- Number Series - Purchase Invoices
- Payment Codes
- Payment Modes
- Payment Settings
- Payment Terms
- Purchase Invoice Settings
- Supplier Categories
- Supplier Withholdings
- VAT Accounts
- VAT Corrections P/L
- Withholding Calculation Formulae
- Withholding Certificates
- Withholding Taxes
Go back to:
- Home page for Purchase Ledger manual
- Home page for HansaWorld Enterprise manual
Banks - Banking File Card
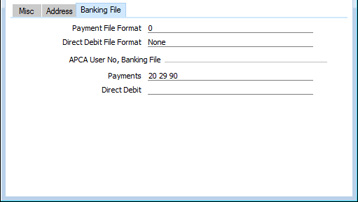
- Payment File Format
- Paste Special
Choices of possible entries
- If you will issue payment instructions to your bank using the 'Banking File' Export function, the Payment File Format will usually be determined by the Bank Transfer setting. However, if the Payment File Format in that setting is New Zealand - ANZ or BNZ, you should also set the Payment File Format in the Bank record(s) representing your Bank(s) (i.e. in the Bank records used in Payment Modes).
- If you will issue payment instructions to your bank using the E-Payments Cloud Service, the Bank Transfer setting will not determine the Payment File Format. Instead, you should set it here, in the Bank record(s) representing your Bank(s) (i.e. in the Bank records used in Payment Modes). The E-Payments Cloud Service is a chargeable service that can only be used in Estonia and Latvia.
- If you will issue payment instructions to your bank using the E-Payments Cloud Service, the Bank Transfer setting will not determine the Payment File Format. Instead, you should set it here, in the Bank record(s) representing your Bank(s) (i.e. in the Bank records used in Payment Modes). The E-Payments Cloud Service is a chargeable service that can only be used in Estonia and Latvia.
- APCA User No, Banking File
- If you will use the 'Banking File' Export function with the Australia - ABA Payment File Format, enter your APCA User Number in the Payments field. Note that this is the same field as the Sort Key field on the 'Address' card.
- If you will use the 'Export Direct Debit' function on the Operations menu of the 'Receipts: Browse' window and the Direct Debit File Format specified in the Bank Transfer setting is Australia - ABA, enter your APCA User Number in the Direct Debit field.
Settings in the Purchase Ledger:
- Introduction
- Account Usage P/L
- Bank Transfer
- Banks, including:
- Calculation Formulae
- Intrastat Purchase
- Number Series - Payments
- Number Series - Purchase Invoices
- Payment Codes
- Payment Modes
- Payment Settings
- Payment Terms
- Purchase Invoice Settings
- Supplier Categories
- Supplier Withholdings
- VAT Accounts
- VAT Corrections P/L
- Withholding Calculation Formulae
- Withholding Certificates
- Withholding Taxes
Go back to:
- Home page for Purchase Ledger manual
- Home page for HansaWorld Enterprise manual
Calculation Formulae
Please click here for full details of this setting.---
Settings in the Purchase Ledger:
- Introduction
- Account Usage P/L
- Bank Transfer
- Banks
- Calculation Formulae
- Intrastat Purchase
- Number Series - Payments
- Number Series - Purchase Invoices
- Payment Codes
- Payment Modes
- Payment Settings
- Payment Terms
- Purchase Invoice Settings
- Supplier Categories
- Supplier Withholdings
- VAT Accounts
- VAT Corrections P/L
- Withholding Calculation Formulae
- Withholding Certificates
- Withholding Taxes
Go back to:
- Home page for Purchase Ledger manual
- Home page for HansaWorld Enterprise manual
Intrastat Purchase
If your business is situated in an EU country and its trade with companies in other EU countries is greater than a statutory threshold value, you will need to send an Intrastat report periodically to the relevant authorities. You can produce this report using the Intrastat P/L document. This document should include the country of origin of each Item you have purchased. The Intrastat Purchase setting determines where this information (i.e. the country of origin of an Item) will be taken from.To open the setting, ensure you are in the Purchase Ledger and click the [Settings] button in the Master Control panel or use the Ctrl-S/⌘-S keyboard shortcut. Double-click 'Intrastat Purchase' in the 'Settings' list to open the 'Intrastat Purchase: Inspect' window. After making any changes to the setting, click [Save] to save and close the window. Click the close box to close without saving changes.
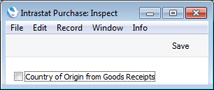
- Country of Origin from Goods Receipts
- Use this option if you would like the country of origin of each Item when printed in the "Country of Origin" field in the Intrastat P/L document to be taken from the Country of O. field on flip F of the relevant Goods Receipt row.
- If you are using this option, you must also use the Transfer Each Row Separately and Invoices Based on Goods Receipts options in the Purchase Invoice Settings setting if you will create Purchase Invoices from Purchase Orders. This will ensure that Purchase Invoice rows are correctly connected to Goods Receipt rows, enabling the correct countries of origin to be reported. Purchase Invoices created from Goods Receipts do not need you to use the Invoices Based on Goods Receipts option in order to have the correct connections in place.
- If you do not use this option, the country of origin of an Item will be taken from the third line of the Address in the Source record that is specified as the Default Source in the Item record. You must therefore ensure that each Item has a correctly configured Default Source.
- Note that this option only affects the "Country of Origin" field in the Intrastat P/L document. The same field in the Intrastat S/L document will always take the country of origin of each Item from the third line of the Address in its Default Source record, as will the following export functions in the Purchase and Sales Ledgers: Intrastat P/L (Estonia); Intrastat S/L (Estonia); Intrastat S/L (Finland); Intrastat P/L (Germany); Intrastat S/L (Germany) and Intrastat S/L (Sweden IDEP-SCB). The Intrastat P/L (Finland) export will take the country of origin from the Country of Origin field in an Item's Default Purchase Item. If that is blank or an Item does not have a Default Purchase Item, the country of origin will again be taken from the third line of the Address in the Item's Default Source.
- If you are using this option, you must also use the Transfer Each Row Separately and Invoices Based on Goods Receipts options in the Purchase Invoice Settings setting if you will create Purchase Invoices from Purchase Orders. This will ensure that Purchase Invoice rows are correctly connected to Goods Receipt rows, enabling the correct countries of origin to be reported. Purchase Invoices created from Goods Receipts do not need you to use the Invoices Based on Goods Receipts option in order to have the correct connections in place.
Settings in the Purchase Ledger:
- Introduction
- Account Usage P/L
- Bank Transfer
- Banks
- Calculation Formulae
- Intrastat Purchase
- Number Series - Payments
- Number Series - Purchase Invoices
- Payment Codes
- Payment Modes
- Payment Settings
- Payment Terms
- Purchase Invoice Settings
- Supplier Categories
- Supplier Withholdings
- VAT Accounts
- VAT Corrections P/L
- Withholding Calculation Formulae
- Withholding Certificates
- Withholding Taxes
Go back to:
- Home page for Purchase Ledger manual
- Home page for HansaWorld Enterprise manual
Number Series - Payments
Each Payment has its own unique identifying number, based on a sequential series. When you enter a new Payment, the next number in the sequence will be used. If required, you can have a number of such sequences running concurrently, perhaps representing different years or different departments.Use this setting to define these sequences, or Number Series. The different series should not overlap. If you leave the setting empty, Payment Numbers will start at 1 and continue consecutively.
Once you have defined number sequences for Payments, you can allocate a specific sequence to an individual user using the Payment No. field on the 'Number Series' card of the user's Person record in the System module. When that user enters a new Payment, its Payment Number will be the first unused number in that specific sequence. You can also set a universal default sequence in the Number Series Defaults setting, also in the System module. If you do not allocate a specific sequence to a particular user or set a universal default, Payment Numbers will be taken from the first valid Number Series in this setting. For a particular Payment, any user can change to the first unused number in any other valid Number Series using 'Paste Special'.
For each number sequence, you have a measure of control over whether Nominal Ledger Transactions will be generated automatically when you approve Payments in that sequence. Using 'Paste Special' from the N/L field brings up a selection list containing two options: "GenTrans" and "Do Not GenTrans". Select the first option if Nominal Ledger Transactions are to be generated and the second if they are not. In effect, this feature is an exclusionary one in that you can only choose to not have Nominal Ledger Transactions created for a particular number sequence. If the overall preference (set in the Sub Systems setting in the Nominal Ledger) is to not have such transactions created, you cannot decide to have them created for a single sequence.
When you double-click 'Number Series - Payments' in the 'Settings' list, the following window appears:
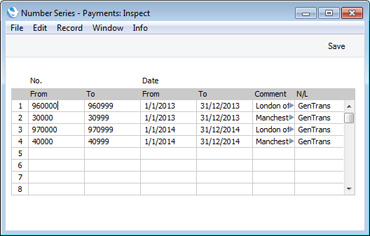
Note that you can also define separate Number Series for each Payment Mode: please refer to the page describing the Payment Modes setting for details. If you are using the Common Number Series option in the Cash Book Settings setting in the Cash Book module, the number sequences in Payment Modes must be different to those entered here.
---
Settings in the Purchase Ledger:
- Introduction
- Account Usage P/L
- Bank Transfer
- Banks
- Calculation Formulae
- Intrastat Purchase
- Number Series - Payments
- Number Series - Purchase Invoices
- Payment Codes
- Payment Modes
- Payment Settings
- Payment Terms
- Purchase Invoice Settings
- Supplier Categories
- Supplier Withholdings
- VAT Accounts
- VAT Corrections P/L
- Withholding Calculation Formulae
- Withholding Certificates
- Withholding Taxes
- Home page for Purchase Ledger manual
- Home page for HansaWorld Enterprise manual
Number Series - Purchase Invoices
Each Purchase Invoice has its own unique identifying number, based on a sequential series. When you enter a new Purchase Invoice, the next number in the sequence will be used. If required, you can have a number of such sequences running concurrently, perhaps representing different years or different departments.Use this setting to define these sequences, or Number Series. The different series should not overlap. If you leave the setting empty, Purchase Invoice Numbers will start at 1 and continue consecutively.
Once you have defined number sequences for Purchase Invoices, you can allocate a specific sequence to an individual user using the Purch. Inv. No. field on the 'Number Series' card of the user's Person record in the System module. When that user enters a new Purchase Invoice, its Purchase Invoice Number will be the first unused number in that specific sequence. You can also set a universal default sequence in the Number Series Defaults setting, also in the System module. If you do not allocate a specific sequence to a particular user or set a universal default, Purchase Invoice Numbers will be taken from the first valid Number Series in this setting. For a particular Invoice, any user can change to the first unused number in any other valid Number Series using 'Paste Special'.
For each number sequence, you have a measure of control over whether Nominal Ledger Transactions will be generated automatically when you approve Purchase Invoices in that sequence. Using 'Paste Special' from the N/L field brings up a selection list containing two options: "GenTrans" and "Do Not GenTrans". Select the first option if Nominal Ledger Transactions are to be generated and the second if they are not. In effect, this feature is an exclusionary one in that you can only choose to not have Nominal Ledger Transactions created for a particular number sequence. If the overall preference (set in the Sub Systems setting in the Nominal Ledger) is to not have such transactions created, you cannot decide to have them created for a single sequence.
When you double-click 'Number Series - Purchase Invoices' in the 'Settings' list, the following window appears:
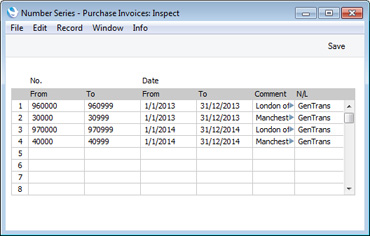
If you are using the Common Number Series option in the Cash Book Settings setting in the Cash Book module and you have entered at least one number sequence on flip C of the Payment Modes setting, the number sequences that you enter in this setting must be different to the number sequences in the Payment Modes setting.
---
Settings in the Purchase Ledger:
- Introduction
- Account Usage P/L
- Bank Transfer
- Banks
- Calculation Formulae
- Intrastat Purchase
- Number Series - Payments
- Number Series - Purchase Invoices
- Payment Codes
- Payment Modes
- Payment Settings
- Payment Terms
- Purchase Invoice Settings
- Supplier Categories
- Supplier Withholdings
- VAT Accounts
- VAT Corrections P/L
- Withholding Calculation Formulae
- Withholding Certificates
- Withholding Taxes
Go back to:
- Home page for Purchase Ledger manual
- Home page for HansaWorld Enterprise manual
Payment Codes
Payment Codes are used in Sweden, where every payment to a beneficiary domiciled outside Sweden (in a foreign currency or in Swedish kronor) that exceeds a counter value stipulated by the National Tax Board (Riksskatteverket) must be reported to the Tax Board by the intermediary bank. Included in the report should be a Payment Code, a three-digit code representing a category (i.e. export/import, services etc.).You should specify Payment Codes in the Contact records for Suppliers located outside Sweden. A Supplier's Payment Code will be transferred to any Purchase Invoices ('Accounts' card) and Payments (flip H) entered in their name. From there, the Payment Code will be included in Banking File exports if you produce them using the Foreign Country Payment option and if the Payment File Format you have specified in the Bank Transfer setting in the Purchase Ledger is Sweden - Handelsbanken.
Using the Payment Codes setting can help reduce errors when selecting Payment Codes in Contact records for Suppliers. Once you have listed Payment Codes in this setting, you will be able to use the 'Paste Special' function from the Payment Code field in a Contact record. This will help ensure the correct Payment Code (with the correct spelling) will be used. A complete list of Payment Codes can be found in the pdf file available at www.skatteverket.se .
To work with Payment Codes, first open the 'Settings' list by clicking the [Settings] button in the Master Control panel or using the Ctrl-S/⌘-S keyboard shortcut. Double-click 'Payment Codes' in the list. The 'Payment Codes: Browse' window is displayed, showing all Payment Codes previously entered. Double-click a record in the list to edit it, or add a new record by clicking the [New] button in the Button Bar. When the record is complete, save it by clicking the [Save] button in the Button Bar or by clicking the close box and choosing to save changes. To close it without saving changes, click the close box.
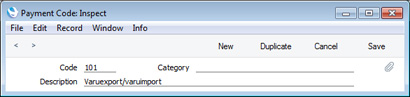
---
Settings in the Purchase Ledger:
- Introduction
- Account Usage P/L
- Bank Transfer
- Banks
- Calculation Formulae
- Intrastat Purchase
- Number Series - Payments
- Number Series - Purchase Invoices
- Payment Codes
- Payment Modes
- Payment Settings
- Payment Terms
- Purchase Invoice Settings
- Supplier Categories
- Supplier Withholdings
- VAT Accounts
- VAT Corrections P/L
- Withholding Calculation Formulae
- Withholding Certificates
- Withholding Taxes
Go back to:
- Home page for Purchase Ledger manual
- Home page for HansaWorld Enterprise manual
Payment Modes
Please click here for full details of this setting.---
Settings in the Purchase Ledger:
- Introduction
- Account Usage P/L
- Bank Transfer
- Banks
- Calculation Formulae
- Intrastat Purchase
- Number Series - Payments
- Number Series - Purchase Invoices
- Payment Codes
- Payment Modes
- Payment Settings
- Payment Terms
- Purchase Invoice Settings
- Supplier Categories
- Supplier Withholdings
- VAT Accounts
- VAT Corrections P/L
- Withholding Calculation Formulae
- Withholding Certificates
- Withholding Taxes
Go back to:
- Home page for Purchase Ledger manual
- Home page for HansaWorld Enterprise manual
Payment Settings
This setting contains some parameters that control the behaviour of the Payment register and the 'Banking File' Export function.
- Export Path for Autonamed Backups
- Use this field to specify where you would like files created by the 'ASG Labels' and 'Winedi' Export functions in the Stock module to be saved.
- You can do this using a relative path:
- Backup/
- Windows
- c:/samplefolder1/samplefolder2/Backup/
- Mac OS X
- /samplefolder1/samplefolder2/Backup/
- If you make a mistake (for example, you make a syntax error or specify a non-existent folder) the export files will not be created.
- In the case of ASG Labels, this path will be used if you do not specify a path in the specification window.
- In the case of Winedi, this path will be used if you do not specify a path in the specification window. You can set a default path for the specification window using the Winedi setting in the Stock module.
- If you do not specify a path anywhere, the files will be saved in the folder containing the Enterprise by HansaWorld application.
- You can do this using a relative path:
- Bank Fees
- Choose the Bank Fee option that you want to be used by default whenever you run the 'Banking File' Export function.
- Do not allow Payment rows with different Sent Currencies
- Use this option if you need to ensure every row in a Payment has the same Sent Currency.
- Always pay on Due Date
- Select this option if you would like the Pay on Due Date option to be selected by default whenever you run the 'Banking File' Export function.
- DOS Flag
- Select this option if you would like the DOS Format option to be selected by default whenever you run the 'Banking File' Export function.
- Batch Booking
- Select this option if you would like the Batch Booking option to be selected by default whenever you run the 'Banking File' Export function.
Settings in the Purchase Ledger:
- Introduction
- Account Usage P/L
- Bank Transfer
- Banks
- Calculation Formulae
- Intrastat Purchase
- Number Series - Payments
- Number Series - Purchase Invoices
- Payment Codes
- Payment Modes
- Payment Settings
- Payment Terms
- Purchase Invoice Settings
- Supplier Categories
- Supplier Withholdings
- VAT Accounts
- VAT Corrections P/L
- Withholding Calculation Formulae
- Withholding Certificates
- Withholding Taxes
Go back to:
- Home page for Purchase Ledger manual
- Home page for HansaWorld Enterprise manual
Payment Terms
Please click here for full details of this setting.---
Settings in the Purchase Ledger:
- Introduction
- Account Usage P/L
- Bank Transfer
- Banks
- Calculation Formulae
- Intrastat Purchase
- Number Series - Payments
- Number Series - Purchase Invoices
- Payment Codes
- Payment Modes
- Payment Settings
- Payment Terms
- Purchase Invoice Settings
- Supplier Categories
- Supplier Withholdings
- VAT Accounts
- VAT Corrections P/L
- Withholding Calculation Formulae
- Withholding Certificates
- Withholding Taxes
Go back to:
- Home page for Purchase Ledger manual
- Home page for HansaWorld Enterprise manual
Purchase Invoice Settings
This setting contains some miscellaneous options controlling the behaviour of Purchase Invoices.
- Signer Required
- Use this option if you do not want to be able to approve Purchase Invoices when the Signers field on the 'Terms' card is empty.
- Warn On Unusual Amount
- When you define Accounts using the Account register (available in the System module and the Nominal Ledger), you should specify whether each Account will normally be used on the credit side of a transaction, the debit side or both. In the case of Accounts that will normally be used on one side only (for example, credit), you can have a warning message appear if you try to use them on the other side (in the example, if you try to debit an Account from a Purchase Invoice). The warning will not prevent the posting from taking place. If you would like this warning to appear, use this option.
- Require Receiving Date
- The Receiving Date of a Purchase Invoice is the date you receive it into your possession. In some countries (e.g. Slovenia), VAT can be reclaimed based on Invoice Receiving Dates rather than on Invoice or Payment Dates.
- Use this option if you need it to be mandatory to enter a Receiving Date in each Purchase Invoice.
- Use this option if you need it to be mandatory to enter a Receiving Date in each Purchase Invoice.
- Disallow Invoice Date after Transaction Date
- In a Purchase Invoice, it is possible to specify different Invoice and Transaction Dates. However, in some countries, it is not legal for the Invoice Date to be later than the Transaction Date, as it should not be possible to register a Purchase Invoice in the Nominal Ledger with a date earlier than the date of issue. Use this option if you need to prevent the Invoice Date being later than the Transaction Date in all Purchase Invoices.
- Purchase Order Item Transfer Control
- These options control the behaviour of the 'Create Purchase Invoice' function on the Operations menu of the Purchase Orders screen, used to create Purchase Invoices from Purchase Orders, and the 'Create Purchase Invoice' function on the Operations menu of the Goods Receipt screen, used to create Purchase Invoices from Goods Receipts.
- If you need to use the Intrastat reporting feature and you will be creating Purchase Invoices from Purchase Orders or Goods Receipts, you should choose the second or third options (you must use the third option if you will also be using the Invoice Based on Goods Receipts option). The Intrastat P/L document lists the Items that have been purchased from Suppliers in other EU countries. This document takes Item information from the fields on flip B of the relevant Purchase Invoice rows. If you are using the second or third option, these fields will contain the necessary information in Invoices created from Purchase Orders and Goods Receipts.
- Similarly, if you will be using the Purchase Order Accruals report or the Accrued and Accrued by Nominal Code options of the Purchase Order Status report, you should choose the second or third options.
- Finally, if you will be using the Price Variances feature, you should choose the third option.
- Consolidate Items to Supplier Cost Account
- If you are using this option and you create a Purchase Invoice from a Purchase Order, all the Items on the Purchase Order will be grouped together on a single row on the Invoice indicating that they are to be posted to the same Cost Account (the Cost Account on the 'Accounts' card of the Contact record for the Supplier). If the Items on the Purchase Order have different VAT Codes, there will be a separate row on the Invoice for each VAT Code. Objects specified in Purchase Order rows will not be transferred to the Invoice.
- If you are not using the Always use Full Qty from Purch. Ord. option (below), only received Items on the Purchase Order (i.e. those on approved Goods Receipts) will be included on the Purchase Invoice.
- Take care when using this option if you ever need to create partial Goods Receipts and Invoices from a Purchase Order, or if you anticipate having to change Purchase Invoices once you have created them. Because all Purchase Order rows are consolidated to a single Purchase Invoice row, any changes to that Invoice cannot be fed back to the Purchase Order, because it cannot be established which Purchase Order rows should be affected. Crediting that Purchase Invoice also cannot be fed back to the originating Purchase Order, for similar reasons.
- If the Supplier does not have a Cost Account, you will not be able to create a Purchase Invoice.
- If you are using this option and you create a Purchase Invoice from a Goods Receipt, all the Items on the Goods Receipt will be grouped together on a single row on the Invoice indicating that they are to be posted to the same Cost Account (taken from the Purchase Accrual Account on flip E of the first Goods Receipt row). If the Items on the Goods Receipt have different VAT Codes, there will be a separate row on the Invoice for each VAT Code, with the Cost Accounts being taken from the first Goods Receipt rows with each VAT Code. Objects specified in Goods Receipt rows will not be transferred to the Invoice.
- If you are not using the Always use Full Qty from Purch. Ord. option (below), only received Items on the Purchase Order (i.e. those on approved Goods Receipts) will be included on the Purchase Invoice.
- Consolidate by Items and Project
- If you are using this option and you create a Purchase Invoice from a Purchase Order, the Purchase Invoice will feature a separate row for each Item/Project combination on the Purchase Order. The Cost Account in each case will be the Purchase Accruals Account for the Item Group to which the Item belongs (if you are using the Use Item Groups for Cost Accounts option in the Cost Accounting setting in the Stock module) or that in the Account Usage Stock setting, or the Cost Account on the 'Accounts' card of the Contact record for the Supplier. The Object(s) in each case will be taken from the first Purchase Order row featuring the Item/Project combination. The Item Numbers, Projects and Quantities will be copied from the Purchase Order rows to the appropriate fields in the corresponding Purchase Invoice rows. If the entire Purchase Order has been assigned to a Project (on the 'Terms' card), this will also be copied to each row on the Purchase Invoice (except where a Purchase Order row has a different Project).
- If you are not using the Always use Full Qty from Purch. Ord. option (below), only received Stocked Items on the Purchase Order (i.e. those on approved Goods Receipts) will be included on the Purchase Invoice. However, all Plain Items (whether or not they have been received) will be included on the first Invoice raised from the Purchase Order.
- If the Supplier does not have a Cost Account, you will not be able to create a Purchase Invoice.
- If you are using this option and you create a Purchase Invoice from a Goods Receipt, the Purchase Invoice will feature a separate row for each Item on the Goods Receipt. The Cost Account in each case will be taken from the Purchase Accrual Account on flip E of the first Goods Receipt row for an Item. Object(s) specified in Goods Receipt rows will not be transferred to the Invoice. The Item Numbers and Quantities will be copied from the Goods Receipt rows to the appropriate fields in the corresponding Purchase Invoice rows. Goods Receipt rows do not carry Project information, so this will not be transferred to the Purchase Invoice, and Project Transactions will not be created from the Purchase Invoice.
- If you are not using the Always use Full Qty from Purch. Ord. option (below), only received Stocked Items on the Purchase Order (i.e. those on approved Goods Receipts) will be included on the Purchase Invoice. However, all Plain Items (whether or not they have been received) will be included on the first Invoice raised from the Purchase Order.
- Transfer Each Row Separately
- If you are using this option and you create a Purchase Invoice from a Purchase Order, each Item (i.e. each row) on the Purchase Order will have its own row on the Invoice, enabling postings to different Cost Accounts. These Accounts will be the Purchase Control Account on flip B of the Purchase Order, the Purchase Accruals Account for the Item Groups to which the Items belong (if you are using the Use Item Groups for Cost Accounts option in the Cost Accounting setting in the Stock module) or that in the Account Usage Stock setting, or the Cost Account on the 'Accounts' card of the Contact record for the Supplier. The Item Numbers, Projects, Objects and Quantities from the Purchase Order rows will be copied to the appropriate fields in the corresponding Purchase Invoice rows. If the entire Purchase Order has been assigned to a Project (on the 'Terms' card), this will also be copied to each row on the Purchase Invoice (except where a Purchase Order row has a different Project). Any Objects from the Project(s) will also be transferred to the relevant rows in the Invoice.
- If you are not using the Always use Full Qty from Purch. Ord. option (below), only received Stocked Items on the Purchase Order (i.e. those on approved Goods Receipts) will be included on the Purchase Invoice. However, all Plain Items (whether or not they have been received) will be included on the first Invoice raised from the Purchase Order.
- If you are using this option and you create a Purchase Invoice from a Goods Receipt, each row on the Goods Receipt will have its own row in the Purchase Invoice. Purchase Accrual Accounts in the Goods Receipt rows will be copied to the Cost Account fields in the corresponding Invoice rows, and Objects specified in Goods Receipt rows will be transferred to the corresponding rows in the Invoice. As with the other options, Project information will not be transferred to the Purchase Invoice, and Project Transactions will not be created from the Purchase Invoice.
- If you are not using the Always use Full Qty from Purch. Ord. option (below), only received Stocked Items on the Purchase Order (i.e. those on approved Goods Receipts) will be included on the Purchase Invoice. However, all Plain Items (whether or not they have been received) will be included on the first Invoice raised from the Purchase Order.
- Always use Full Qty from Purch. Ord.
- Usually, you must have created at least one approved Goods Receipt from a Purchase Order before you can create an Invoice from that Order. So, an Item cannot be included in a Purchase Invoice until you have received it into stock. If you would like to include all ordered Items in Purchase Invoices, irrespective of whether they have been received (even if the Purchase Order has no related Goods Receipt at all), check this box. This will apply whichever of the three options above has been chosen.
- This applies to all Items: Stocked, Plain and Service. The Received figure on flip C of the Purchase Order will not be updated when you create a Purchase Invoice, allowing you to include the Items in a Goods Receipt when you receive them. You should still enter Goods Receipts, to ensure stock levels are updated: this option merely allows you to enter Purchase Invoices before you have received the goods.
- If you would like to be able to create a Purchase Invoice for Plain and Service Items without a Goods Receipt but require a Goods Receipt for Stocked Items, leave this option switched off and switch on the Automatic receiving of Service and Plain Items box in the Stock Settings setting in the Stock module. In this case, the Received figure for Plain and Service Items on the Purchase Order will be updated when you create a Purchase Invoice, so no Goods Receipt will be necessary.
- The Purchase Invoices before Goods Receipt option in the Stock Settings setting also allows you to create Purchase Invoices from Purchase Orders before creating Goods Receipts. The Always use Full Qty from Purch. Ord. option will also create a Purchase Invoice for the full order value if there is a partial Goods Receipt, while the Purchase Invoices before Goods Receipt option will create a Purchase Invoice for the value of the partial Goods Receipt.
- This applies to all Items: Stocked, Plain and Service. The Received figure on flip C of the Purchase Order will not be updated when you create a Purchase Invoice, allowing you to include the Items in a Goods Receipt when you receive them. You should still enter Goods Receipts, to ensure stock levels are updated: this option merely allows you to enter Purchase Invoices before you have received the goods.
- If you need to use the Intrastat reporting feature and you will be creating Purchase Invoices from Purchase Orders or Goods Receipts, you should choose the second or third options (you must use the third option if you will also be using the Invoice Based on Goods Receipts option). The Intrastat P/L document lists the Items that have been purchased from Suppliers in other EU countries. This document takes Item information from the fields on flip B of the relevant Purchase Invoice rows. If you are using the second or third option, these fields will contain the necessary information in Invoices created from Purchase Orders and Goods Receipts.
- Invoice Based on Goods Receipts
- When you use an Item that requires Serial Numbers in a Purchase Order, you can use a single Purchase Order row with the correct Quantity. When you create the Goods Receipt, it will contain the appropriate number of rows each with a Quantity of one, allowing you to enter Serial Numbers individually. On returning to the Order, only the Serial Number of the last Item will be visible.
- When the time comes to create a Purchase Invoice from such a Purchase Order, the Invoice can mirror the Order (i.e. with a single row for the Serial Numbered Item with the Quantity from the Order and containing only the first Serial Number) or it can mirror the Goods Receipt (i.e. with a number of rows each with a Quantity of one, showing each Serial Number on flip D). Check this box if you wish to use the latter option.
- This option will to an extent overrule whichever Purchase Order Item Transfer Control option you have chosen above, as it will ensure Purchase Invoices will have the same number of rows as in the connected Goods Receipts. The Cost Account in each Purchase Invoice row will be taken from the Purchase Accrual Account field in the corresponding Goods Receipt row. However, the Purchase Order Item Transfer Control options will be obeyed to the extent that Item Numbers, Objects and Serial Numbers will only be copied to Purchase Invoice rows if you are using the Transfer Each Row Separately option.
- As Project information is not stored in Goods Receipts, it cannot be transferred to Purchase Invoices created when using this option. As a result, Project Transactions will not be created from those Purchase Invoices. Therefore you should not use this option if you have Purchase Orders and Purchase Invoices connected to Projects.
- On the other hand, if you are using the Country of Origin from Goods Receipts option in the Intrastat Purchase setting, you must also use this option (and the Transfer Each Row Separately option) if you will create Purchase Invoices from Purchase Orders. This will ensure that Purchase Invoice rows are correctly connected to Goods Receipt rows, enabling the correct countries of origin to be reported in the Intrastat P/L document. Purchase Invoices created from Goods Receipts do not need you to use this option in order to have the correct connections in place, but you must still be using the Transfer Each Row Separately option.
- If you are using this option, you cannot also use the Purchase Invoices before Goods Receipt option in the Stock Settings setting. The Purchase Invoices before Goods Receipt option will be treated as being off.
- When the time comes to create a Purchase Invoice from such a Purchase Order, the Invoice can mirror the Order (i.e. with a single row for the Serial Numbered Item with the Quantity from the Order and containing only the first Serial Number) or it can mirror the Goods Receipt (i.e. with a number of rows each with a Quantity of one, showing each Serial Number on flip D). Check this box if you wish to use the latter option.
- Enter & Return
- When the insertion point is in the A/C field in a Purchase Invoice row, it will usually move to the Object field and then to the Description field when you press the Enter or Return key. Use one or both of these options if you would like the insertion point to skip these fields (going to the Amount field if you are using both options as it will always skip the Short. field). You will still be able to move the insertion point into those fields using the mouse or the Tab key if necessary.
- Calculate VAT
- Check the Calculate VAT box if you want the VAT amount in a Purchase Invoice to be calculated automatically when you enter a figure in the TOTAL field (in the Purchase Invoice header). The calculation will use the percentage entered in the VAT Rate field (below).
- This feature is a useful time saving device in countries with a single standard VAT rate when you need to enter several Purchase Invoices at once. You can quickly enter the TOTAL in each Invoice and a VAT calculation will then be performed automatically. In the occasional instance of a Purchase Invoice containing a line not subject to standard rate VAT, you can change the result of the calculation manually.
- The result of the calculation will be placed in the VAT field in the Purchase Invoice header. The purpose of this field is to provide a control figure. When you save the Purchase Invoice, the VAT total from the Invoice rows (shown in the Calc. VAT field in the footer) should be the same as this control figure. You will not be able to save the Purchase Invoice if this is not the case.
- This feature is a useful time saving device in countries with a single standard VAT rate when you need to enter several Purchase Invoices at once. You can quickly enter the TOTAL in each Invoice and a VAT calculation will then be performed automatically. In the occasional instance of a Purchase Invoice containing a line not subject to standard rate VAT, you can change the result of the calculation manually.
- VAT Rate
- Enter here the figure to be used in the VAT calculation if you are using the Calculate VAT option (above) is switched on.
- The figure entered should be the percentage of the TOTAL that represents the VAT. You can obtain this figure using the formula:
- Standard Rate VAT x 100
- (100 + Standard Rate VAT)
- For example, if standard rate VAT is 20.0%, the formula gives 2000/120, which is 16.6667, the figure that you should enter in this field.
- The figure entered should be the percentage of the TOTAL that represents the VAT. You can obtain this figure using the formula:
- Calculate Withholding Tax
- Use this option if you would like Withholding Tax to be calculated automatically in Purchase Invoices. Please refer to the first example on the page for details about how to configure the Withholding Tax calculation and an example.
- Purchase Invoice Rate
- These options control how the Base and Exchange Rates will be set in a new Purchase Invoice when it is created in the following circumstances:
- Purchase Invoice created from Purchase Order
- If you are using the From Purchase Order option, the Base and Exchange Rates will be copied from the Purchase Order. Otherwise, the latest Base and Exchange Rates will be used in the Purchase Invoice, although the prices in Currency will not be changed. This means you will still be charged the agreed price, but the value of the Invoice in the home Currency (and therefore in the Nominal Ledger) will be different to that of the Order.
- If you are using the Update Base Currency when Invoicing and/or Update Foreign Currency when Invoicing options in the Account Usage P/L setting, the latest Base and/or Exchange Rates will be used, irrespective of the option that you choose here.
- If you are using the Update Base Currency when Invoicing and/or Update Foreign Currency when Invoicing options in the Account Usage P/L setting, the latest Base and/or Exchange Rates will be used, irrespective of the option that you choose here.
- Purchase Invoice created from Electronic Purchase Invoice
- If you are using the From Purchase Order option and there is a valid Purchase Order Number in the Our Order No. field in the Electronic Purchase Invoice, the Base and Exchange Rates will be copied from the Purchase Order. Otherwise, the latest Base and Exchange Rates will be used in the Purchase Invoice.
- Purchase Invoice connected to Prepayment
- If you are using either of the first two options, the Base and Exchange Rates that are already in a Purchase Invoice will be retained when you connect it to a Prepayment. If you are using either of the last two options, the Base and Exchange Rates in the Purchase Invoice will be changed to those in the Prepayment.
- Note: the third option is intended for use in Ukraine. Elsewhere, if you need Prepayment Base and Exchange Rates to be copied to Purchase Invoices, use the fourth option.
- Purchase Invoice created from Purchase Order
Settings in the Purchase Ledger:
- Introduction
- Account Usage P/L
- Bank Transfer
- Banks
- Calculation Formulae
- Intrastat Purchase
- Number Series - Payments
- Number Series - Purchase Invoices
- Payment Codes
- Payment Modes
- Payment Settings
- Payment Terms
- Purchase Invoice Settings
- Supplier Categories
- Supplier Withholdings
- VAT Accounts
- VAT Corrections P/L
- Withholding Calculation Formulae
- Withholding Certificates
- Withholding Taxes
Go back to:
- Home page for Purchase Ledger manual
- Home page for HansaWorld Enterprise manual
Supplier Categories
Please click here for full details of this setting.---
Settings in the Purchase Ledger:
- Introduction
- Account Usage P/L
- Bank Transfer
- Banks
- Calculation Formulae
- Intrastat Purchase
- Number Series - Payments
- Number Series - Purchase Invoices
- Payment Codes
- Payment Modes
- Payment Settings
- Payment Terms
- Purchase Invoice Settings
- Supplier Categories
- Supplier Withholdings
- VAT Accounts
- VAT Corrections P/L
- Withholding Calculation Formulae
- Withholding Certificates
- Withholding Taxes
Go back to:
- Home page for Purchase Ledger manual
- Home page for HansaWorld Enterprise manual
Supplier Withholdings
Please click here for details about this setting.---
Settings in the Purchase Ledger:
- Introduction
- Account Usage P/L
- Bank Transfer
- Banks
- Calculation Formulae
- Intrastat Purchase
- Number Series - Payments
- Number Series - Purchase Invoices
- Payment Codes
- Payment Modes
- Payment Settings
- Payment Terms
- Purchase Invoice Settings
- Supplier Withholdings
- VAT Accounts
- VAT Corrections P/L
- Withholding Calculation Formulae
- Withholding Certificates
- Withholding Taxes
Go back to:
- Home page for Purchase Ledger manual
- Home page for HansaWorld Enterprise manual
VAT Accounts
This setting is used by the P/L VAT Report in Latvia.The P/L VAT Report contains two sections: one displaying the VAT paid on domestic purchases; and one the VAT paid on imported goods. The second section calculates VAT and turnover for the Account that is entered in this setting. This Account must be a VAT Account i.e. one specified in the VAT Codes setting.
Please refer to your local HansaWorld representative for more details.
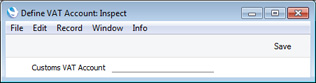
Settings in the Purchase Ledger:
- Introduction
- Account Usage P/L
- Bank Transfer
- Banks
- Calculation Formulae
- Intrastat Purchase
- Number Series - Payments
- Number Series - Purchase Invoices
- Payment Codes
- Payment Modes
- Payment Settings
- Payment Terms
- Purchase Invoice Settings
- Supplier Categories
- Supplier Withholdings
- VAT Accounts
- VAT Corrections P/L
- Withholding Calculation Formulae
- Withholding Certificates
- Withholding Taxes
Go back to:
- Home page for Purchase Ledger manual
- Home page for HansaWorld Enterprise manual
VAT Corrections P/L
This setting is only available if the VAT Law in the Company Info setting is set to "Croatian", "Polish", "Serbian", "Slovenian" or "Ukrainian". Please refer to the description of the 'Create VAT Correction P/L' function on the Operations menu of the Purchase Invoice record for details about this setting.---
Settings in the Purchase Ledger:
- Introduction
- Account Usage P/L
- Bank Transfer
- Banks
- Calculation Formulae
- Intrastat Purchase
- Number Series - Payments
- Number Series - Purchase Invoices
- Payment Codes
- Payment Modes
- Payment Settings
- Payment Terms
- Purchase Invoice Settings
- Supplier Categories
- Supplier Withholdings
- VAT Accounts
- VAT Corrections P/L
- Withholding Calculation Formulae
- Withholding Certificates
- Withholding Taxes
Go back to:
- Home page for Purchase Ledger manual
- Home page for HansaWorld Enterprise manual
Withholding Calculation Formulae
Please click here for details about this setting.---
Settings in the Purchase Ledger:
- Introduction
- Account Usage P/L
- Bank Transfer
- Banks
- Calculation Formulae
- Intrastat Purchase
- Number Series - Payments
- Number Series - Purchase Invoices
- Payment Codes
- Payment Modes
- Payment Settings
- Payment Terms
- Purchase Invoice Settings
- Supplier Categories
- Supplier Withholdings
- VAT Accounts
- VAT Corrections P/L
- Withholding Calculation Formulae
- Withholding Certificates
- Withholding Taxes
Go back to:
- Home page for Purchase Ledger manual
- Home page for HansaWorld Enterprise manual
Withholding Certificates
Please click here for details about this setting.---
Settings in the Purchase Ledger:
- Introduction
- Account Usage P/L
- Bank Transfer
- Banks
- Calculation Formulae
- Intrastat Purchase
- Number Series - Payments
- Number Series - Purchase Invoices
- Payment Codes
- Payment Modes
- Payment Settings
- Payment Terms
- Purchase Invoice Settings
- Supplier Categories
- Supplier Withholdings
- VAT Accounts
- VAT Corrections P/L
- Withholding Calculation Formulae
- Withholding Certificates
- Withholding Taxes
Go back to:
- Home page for Purchase Ledger manual
- Home page for HansaWorld Enterprise manual
Withholding Taxes
Please click here for details about this setting.---
Settings in the Purchase Ledger:
- Introduction
- Account Usage P/L
- Bank Transfer
- Banks
- Calculation Formulae
- Intrastat Purchase
- Number Series - Payments
- Number Series - Purchase Invoices
- Payment Codes
- Payment Modes
- Payment Settings
- Payment Terms
- Purchase Invoice Settings
- Supplier Categories
- Supplier Withholdings
- VAT Accounts
- VAT Corrections P/L
- Withholding Calculation Formulae
- Withholding Certificates
- Withholding Taxes
Go back to:
- Home page for Purchase Ledger manual
- Home page for HansaWorld Enterprise manual