Introduction to the Purchase Order Register
The Purchase Order register contains records for each Purchase Order issued.Before you start entering Purchase Orders, make sure you have defined your sequence of Purchase Order Numbers using the Number Series - Purchase Orders setting.
Entering a Purchase Order
To open the Purchase Order register, first ensure you are in the Stock module, click the [Purchase Orders] button in the Master Control panel. The 'Purchase Orders: Browse' window is opened, showing Purchase Orders already entered.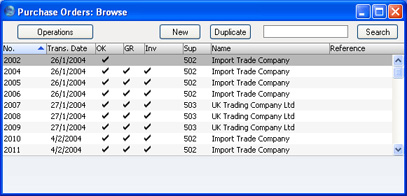
Also shown are indications that the Purchase Order has been approved, that the ordered goods have been received and approved in their entirety (in the 'GR' or 'Goods Received' column) and that a Purchase Invoice has been received and approved (in the 'Inv' column), and the Supplier number and name.
The functions on the Operations menu are described here.
FirstOffice provides several shortcuts to simplify your work with entering Purchase Orders. You can for example use the 'Paste Special' function (Ctrl-Enter or ⌘-Enter) to bring a current date into a date field or to enter of Item Numbers, Customer Numbers, Payment Terms etc.
To enter a new Purchase Order, click [New] in the Button Bar or use the Ctrl-N (Windows and Linux) or ⌘-N (Macintosh) keyboard shortcut. Alternatively, highlight a Purchase Order similar to the one you want to enter and click [Duplicate] on the Button Bar.
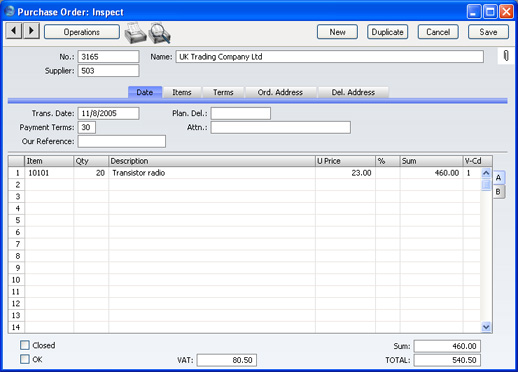
The 'Purchase Order: New' window is opened, empty if you clicked [New] or containing a duplicate of the highlighted Purchase Order.
! | You are not bound by the values suggested by FirstOffice as defaults. For most fields you can change the pre-set values into something that suits you better. Changes made here are valid only for this particular Purchase Order. |
Since the amount of information stored about each Purchase Order will not fit on a single screen, the Purchase Order window has been divided into five cards. At the top of each is the header. This contains the Purchase Order Number, the Supplier Number and Name. There are five named buttons ('tabs') in the header.

Entering a Purchase Order - Header
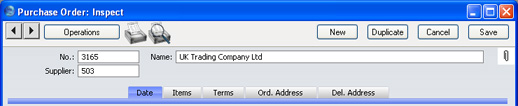
- No.
- Paste Special
Select from another Number Series
- When creating a new Purchase Order, FirstOffice will enter the next unused number from the first number sequence entered in the Number Series - Purchase Orders setting. You may change this number, but not to one that has already been used.
- Supplier
- Paste Special
Suppliers in Customer register
- Enter the Supplier Number or use the 'Paste Special' function. When you press Return, the Supplier's name, address and other information will be entered into the appropriate fields.
- Name
- The Supplier Name is entered after you have entered the Supplier Number.
Entering a Purchase Order - Date Card

- Trans. Date
- Paste Special
Choose date
- The date the Purchase Order is to be issued. FirstOffice enters the current date as a default.
- Plan. Del.
- Paste Special
Choose date
- Specify here the date on which you need to receive the goods into stock. The format of this field is determined by the Planned Delivery setting in the Sales Support module. Available options are free text, date, week number or year-week (4 characters). You can use the Purchase Order Stock report to list Purchase Orders with a particular Planned Delivery Date.
- Payment Terms
- Paste Special
Payment Terms setting, Sales/Purchase Ledger
- Default taken from Customer (Purch. Pay. Terms)
- Payment Terms entered here will be transferred to any Purchase Invoices raised from the Order. In addition simply to ensuring the correct Payment Terms appear on Purchase Orders (in the Language of the Supplier if necessary), using the correct Payment Terms will result in FirstOffice looking after the implications of an early settlement discount, if appropriate.
- Payment Terms entered here will be transferred to any Purchase Invoices raised from the Order. In addition simply to ensuring the correct Payment Terms appear on Purchase Orders (in the Language of the Supplier if necessary), using the correct Payment Terms will result in FirstOffice looking after the implications of an early settlement discount, if appropriate.
- Attn.
- Default taken from
Customer
- Record here your contact at the Supplier company.
- Our Ref
- Use this field if you need to identify the Purchase Order by means other than the Purchase Order Number.
Entering a Purchase Order - Items Card
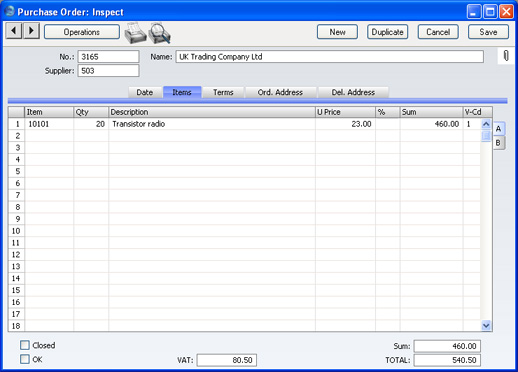

You can also bring Items into a Purchase Order by opening the 'Items: Browse' window, selecting a range of Items by clicking while holding down the Shift key, and then dragging them to the Item field in the first empty Purchase Order row.
Flip A
- Item
- Paste Special
Item register
- With the cursor in this field, enter the Item Number or Bar Code for each Item ordered. If the Item has a related Purchase Item in the name of the Supplier of the Purchase Order, pricing, descriptive and other information will be brought in from there. Otherwise, it will be taken from the Item record. If you leave this field blank, you can enter any text in the Description field, perhaps using the row for additional comments to be printed on Purchase Order documentation.
- Qty
- Enter the number of units ordered. Press Return to calculate the Sum, and the cursor will move to the Item field on the next row.
- This figure refers to the main Unit of the Item (the Unit you use to sell the Item, shown on the Item card of the Item record). This may not be the Unit used by the Supplier. For example, your firm might sell an Item in single units, but the Supplier might sell in boxes of 12. If so, "12" should be entered to the Unit Conversion field of the Purchase Item. Then, if you need to order 240 of the Item, enter "240" here as the Quantity. The Sup. Qty field on flip B will be calculated to show "20", i.e. the order quantity from the Supplier's point of view (Quantity divided by Unit Conversion).
- This figure refers to the main Unit of the Item (the Unit you use to sell the Item, shown on the Item card of the Item record). This may not be the Unit used by the Supplier. For example, your firm might sell an Item in single units, but the Supplier might sell in boxes of 12. If so, "12" should be entered to the Unit Conversion field of the Purchase Item. Then, if you need to order 240 of the Item, enter "240" here as the Quantity. The Sup. Qty field on flip B will be calculated to show "20", i.e. the order quantity from the Supplier's point of view (Quantity divided by Unit Conversion).
- Description
- If the Item has a related Purchase Item in the name of the Supplier of the Purchase Order, the Description will be taken from that Purchase Item record. Any text entered on the 'Texts' card of the Purchase Item will also be brought in, taking up as many Purchase Order rows as necessary.
- In other circumstances, the Description will be taken from the Item record.
- In other circumstances, the Description will be taken from the Item record.
- Unit Price
- If the Item has a related Purchase Item in the name of the Supplier of the Purchase Order, the Unit Price will be taken from that Purchase Item record.
- If the Purchase Item has a Unit Conversion and a Supplier Unit, then this figure will be the Unit Price per Supplier Unit. For example, your firm might sell an Item in single units, but the Supplier might sell in boxes of 12. If so, "12" should be entered to the Unit Conversion field of the Purchase Item and "Dozen" to the Supplier Unit field. The figure here will be the price per dozen.
- If there is no suitable Purchase Item, the Unit Price will be taken from the 'Costs' card of the Item record.
- If the Purchase Item has a Unit Conversion and a Supplier Unit, then this figure will be the Unit Price per Supplier Unit. For example, your firm might sell an Item in single units, but the Supplier might sell in boxes of 12. If so, "12" should be entered to the Unit Conversion field of the Purchase Item and "Dozen" to the Supplier Unit field. The figure here will be the price per dozen.
- %
- A discount percentage.
- Sum
- The total for the row: Supplier Quantity (from flip B) multiplied by Unit Price less Discount. Changing this figure will cause the Discount Percentage to be recalculated.
- Even if the Unit Price has been taken from the Purchase Item record, the Sum will take any Price Factor entered for the Item into account.
- Even if the Unit Price has been taken from the Purchase Item record, the Sum will take any Price Factor entered for the Item into account.
- V-Cd
- Paste Special
VAT Codes setting, Nominal Ledger
- When you create a Purchase Invoice from this Order, the VAT Code entered here will determine the rate at which VAT will be charged on this Item and the Input VAT Account to be debited. A default is offered, taken from the Purch. VAT Code field in the Customer record for the Supplier, in the Item record, the Item Group or from the 'VAT' card of the Account Usage P/L setting. In the last three cases, the appropriate VAT Code for the Zone of the Supplier will be used. You can change this default in a particular Order row if necessary.
- Objects
- Paste Special
Object register, Nominal Ledger
- You can assign up to 20 Objects, separated by commas, to this row and all transactions generated from it. You might define separate Objects to represent different departments, cost centres or product types. This provides a flexible method of profit centre analysis that can be used in Nominal Ledger reports.
- If you are using the Transfer Each Row Separately option in the Purchase Invoice Settings setting, the Objects specified here will be copied to the corresponding row of the Purchase Invoice when it is created from this Order. In the resulting Nominal Ledger Transaction, these Objects will be assigned to the debit posting to the Purchase Account. This assignment will merge these Objects with those of the parent Order (shown on the 'Date' card).
- When a Goods Receipt is created from this Purchase Order, the Object specified here will be assigned to both the debit and credit postings in the Nominal Ledger Transaction resulting from the corresponding Goods Receipt row.
- If you are using the Transfer Each Row Separately option in the Purchase Invoice Settings setting, the Objects specified here will be copied to the corresponding row of the Purchase Invoice when it is created from this Order. In the resulting Nominal Ledger Transaction, these Objects will be assigned to the debit posting to the Purchase Account. This assignment will merge these Objects with those of the parent Order (shown on the 'Date' card).
- Received
- The quantity received for each Purchase Order row will be updated automatically when you create Goods Receipts using the 'Create Goods Receipt' function on the Operations menu (you will need to close the Order and re-open it to see the updated figure). Only quantities on approved Goods Receipts are included in the figure. This feature makes it easy to follow up on part shipments.
- Invoiced
- The quantity invoiced for each Order row will be updated automatically when you raise Invoices using the 'Create Purchase Invoice' function on the Operations menu (you will need to close the Order and re-open it to see this). The quantity usually includes both approved and unapproved Invoices. Invoices cannot be raised until Goods Receipts have been made and approved. In the case of partial Goods Receipts, Invoices can only be raised for the quantity received.
- Note: The quantity shown in this field will not include unapproved Invoices if you are using the Consolidate Items to Supplier Cost Account option in the Purchase Invoice Settings setting. In this case, take care if you need to return to the Purchase Order to create a second Invoice before the first one has been approved.
- Note: The quantity shown in this field will not include unapproved Invoices if you are using the Consolidate Items to Supplier Cost Account option in the Purchase Invoice Settings setting. In this case, take care if you need to return to the Purchase Order to create a second Invoice before the first one has been approved.
- Sup. Qty
- This shows the number of Items the Supplier needs to despatch to fulfil your Purchase Order and is dependent on the Unit Conversion field in the Purchase Item record. For example, your firm might sell an Item in single units, but the Supplier might sell in boxes of 12. If so, "12" should be entered to the Unit Conversion field of the Purchase Item. Then, if you need to order 240 of the Item, enter "240" as the Quantity on flip A. The Sup. Qty field will be calculated to show "20", i.e. the order quantity from the Supplier's point of view (Quantity divided by Unit Conversion). This figure is shown as the Quantity on the Purchase Order document.
- Altering this figure will cause the Quantity field to be amended appropriately (i.e. Sup. Qty multiplied by Unit Conversion).
- If the Purchase Item does not have a Unit Conversion, or there is no Purchase Item, then this figure will be the same as the Quantity on flip A.
- Altering this figure will cause the Quantity field to be amended appropriately (i.e. Sup. Qty multiplied by Unit Conversion).

- Closed
- Check this box when all deliveries and Purchase Invoices for this Purchase Order have been received. Any remaining quantities that have not been received will be cancelled and will no longer appear in reports as being outstanding.
- If a Purchase Order is marked as Closed, you will not be able to create Goods Receipts from it. However, you will still be able to create Purchase Invoices for earlier Goods Receipts.
- If a Purchase Order is marked as Closed, you will not be able to create Goods Receipts from it. However, you will still be able to create Purchase Invoices for earlier Goods Receipts.
- OK
- You can approve the Purchase Order by clicking this check box. Once you have done this and have saved the Purchase Order, it will no longer be modifiable. If you do need to change an approved Purchase Order, first remove the check from the OK box and save.
- You do not have to approve a Purchase Order to receive goods to be received against it, or for its Items to be included in the Purchase Order total displayed by the 'Item Status' function. Nevertheless, once you have finalised a Purchase Order, you may find it beneficial to approve it for security reasons. You can use Access Groups to control who can approve Purchase Orders, who can unapprove Purchase Orders, who if anyone can create Goods Receipts from unapproved Purchase Orders and who if anyone can issue Prepayments from unapproved Purchase Orders. To do this, deny access to the 'OKing Purchase Orders', 'UnOK Purchase Orders', 'Disallow Goods Receipt from not OKed Purchase Order' and 'Disallow Prepayment for not OKed Purchase Order' Actions respectively. The 'Goods Receipt from Purchase Order' Action allows you to control the creation of Goods Receipts from both approved and unapproved Purchase Orders.
- References in these web pages to approved Purchase Orders are to those whose OK check box has been switched on.
!
Note that an approved Purchase Order cannot be altered.
- You do not have to approve a Purchase Order to receive goods to be received against it, or for its Items to be included in the Purchase Order total displayed by the 'Item Status' function. Nevertheless, once you have finalised a Purchase Order, you may find it beneficial to approve it for security reasons. You can use Access Groups to control who can approve Purchase Orders, who can unapprove Purchase Orders, who if anyone can create Goods Receipts from unapproved Purchase Orders and who if anyone can issue Prepayments from unapproved Purchase Orders. To do this, deny access to the 'OKing Purchase Orders', 'UnOK Purchase Orders', 'Disallow Goods Receipt from not OKed Purchase Order' and 'Disallow Prepayment for not OKed Purchase Order' Actions respectively. The 'Goods Receipt from Purchase Order' Action allows you to control the creation of Goods Receipts from both approved and unapproved Purchase Orders.
- VAT
- The VAT total for the Purchase Order.
- This figure is rounded up or down according to rounding rules set in the Round Off setting in the System module.
- This figure is rounded up or down according to rounding rules set in the Round Off setting in the System module.
- Sum
- The total for the Purchase Order, excluding VAT.
- TOTAL
- The total for the Purchase Order, including VAT.
- This figure is rounded up or down according to rounding rules set in the Round Off setting in the System module.
Entering a Purchase Order - Terms Card
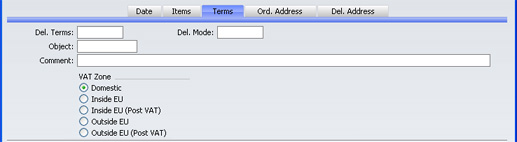
- Del. Terms
- Paste Special
Delivery Terms setting, Sales Support module
- Default taken from Customer (Purch. Del. Terms)
- Specify the Delivery Terms that you wish to be used for this Order here. You will tend to use this field for international Suppliers: examples might be Cost, Insurance, Freight or Free On Board.
- Specify the Delivery Terms that you wish to be used for this Order here. You will tend to use this field for international Suppliers: examples might be Cost, Insurance, Freight or Free On Board.
- Del. Mode
- Paste Special
Delivery Modes setting, Sales Support module
- Default taken from Customer (Purch. Del. Mode)
- Enter the mode of shipping for this order.
- If you have the Currencies, Languages and Advanced Pricing Value Pack, please click here for details about printing the Purchase Order document using different Forms depending on the Delivery Mode.
- Enter the mode of shipping for this order.
- Object
- Paste Special
Object register, Nominal Ledger
- Default taken from Customer (Purch. Objects)
- You can assign up to 20 Objects, separated by commas, to this Order and all transactions generated from it. You might define separate Objects to represent different departments, cost centres or product types. This provides a flexible method of analysis that can be used in Nominal Ledger reports.
- In any Nominal Ledger Transactions generated from Purchase Invoices raised from this Order, any Objects specified here will be assigned to the debit posting to the Purchase Account(s) and, if you are using the Objects on Creditor Account option in the Account Usage P/L setting, to the credit posting to the Creditor Account.
- Similarly, in any Nominal Ledger Transactions generated from Goods Receipts raised from this Order, any Objects specified here will be assigned to the credit posting to the Purchase Control Account.
- You can assign up to 20 Objects, separated by commas, to this Order and all transactions generated from it. You might define separate Objects to represent different departments, cost centres or product types. This provides a flexible method of analysis that can be used in Nominal Ledger reports.
- Comment
- Record here any comment about the Purchase Order.
- VAT Zone
- Default taken from
Customer
- This information is taken from the Customer record for the Supplier, and indicates the origin of the Supplier. The selection of a VAT Code for each row depends on the Zone of the Supplier. The Zone cannot be changed for an individual Purchase Order: any change should be made in the Customer register before entering Purchase Orders.
Entering a Purchase Order - Ord. Address Card

- Ordering Address
- Default taken from
Customer
- The Supplier's address to which the Purchase Order is to be sent.
Entering a Purchase Order - Del. Address Card
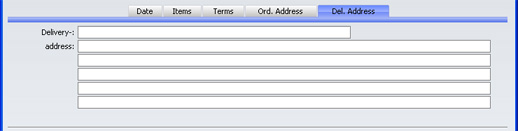
- Delivery Address
- The address to which delivery is to be made, where this differs from your main address.
Inspecting and Changing Purchase Orders
You can change a Purchase Order at any time, as long as it has not been approved (i.e. as long as the OK check box has not been switched on). To do so, click the [Purchase Orders] button in the Master Control panel in the Stock module. The 'Purchase Orders: Browse' window is opened, listing all Purchase Orders. Double-click on the Purchase Order you want to inspect or change. The window 'Purchase Order: Inspect' will appear. This is identical to the 'Purchase Order: New' window described here.If you have created Goods Receipts or Purchase Invoices from the Purchase Order, some changes may not be permitted. For example, you cannot change a Quantity to a number lower than has already been received into stock. You can add new rows at any time, but you cannot insert or remove rows after you have created at least one Goods Receipt from the Purchase Order, even if no Goods Receipt has been made from the row in question.
Printing Purchase Orders
There are two ways to print a Purchase Order.- While entering or inspecting a Purchase Order, click the Printer icon in the Button Bar or select 'Print' from the File menu. If you want to print to screen, click the Preview icon.
- Click the [Documents] button in the Master Control panel or select 'Documents' from the File menu. Double-click 'Purchase Orders' in the 'Documents' list window or highlight it and press the Enter key. Indicate the Purchase Order Number (or range of Purchase Order Numbers) to be printed and press [Run].
- Using the Form register in the System module, design the purchase order and name it "PURCHASE_ORDER". Use the 'Properties' function on the Operations menu to assign a Document Type of "Purchase Order". A sample Purchase Order Form is supplied with FirstOffice: this can be modified to suit your requirements. Full instructions for using the Form register can be found here.
- Change to the Stock module using the [Select Module] button in the Master Control panel.
- Click [Documents] in the Master Control panel or select 'Documents' from the File menu. The 'Documents' list window is opened: highlight 'Purchase Orders'.
- Select 'Define Document' from the Operations menu.
- In the subsequent window, enter "PURCHASE_ORDER" in the Form field of the first row (you can use 'Paste Special' to ensure the spelling is correct).
- Click [Save] to save the Purchase Order Form definition. From now on, the purchase order form that you have designed will be used, from the 'Documents' function and from the Printer icon.
Operations Menu
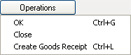
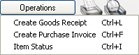
Operations Menu - OK
This command is available on the Operations menu only from the 'Purchase Orders: Browse' window. It allows you to approve a Purchase Order and is therefore the equivalent of checking the OK box in a Purchase Order record. You can also select several records in the 'Purchase Orders: Browse' window (hold down the Shift key to select a range of Purchase Orders in the list) and approve them all at once. Remember that once this action has been carried out you will no longer be able to modify those Purchase Orders.Operations Menu - Close
This command is available on the Operations menu only from the 'Purchase Orders: Browse' window. It is the equivalent of checking both the Close and the OK boxes in a Purchase Order record. You can also select several records in the 'Purchase Orders: Browse' window (hold down the Shift key to select a range of Purchase Orders in the list) and close them all at once. Remember that once this action has been carried out you will no longer be able to modify those Purchase Orders.You should close a Purchase Order when all deliveries have been received, and the Purchase Invoice has been processed. Any remaining quantities that have not been received will be cancelled.
Operations Menu - Create Goods Receipt
Use this when you need to receive goods into stock against a Purchase Order. It is available on the Operations menu both in the browse window and in the record window for an individual Purchase Order. When you run it from the browse window, highlight a single Purchase Order before selecting the function. When you run it from the record window, you must first save all changes to the Purchase Order (use the [Save] button).When you select the function, a new record is created in the Goods Receipt register (in the Stock module). It is opened in a new window, entitled 'Goods Receipt: Inspect'. This means that it has been created and saved and is being opened for amendment and approval.
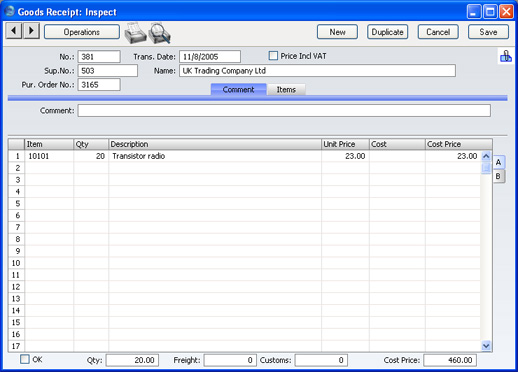
You can change the Quantity in any row in the Goods Receipt screen as appropriate. You can also remove entire rows, by clicking on the row number to the left and pressing the Backspace key. You can receive into stock a greater Quantity than was ordered.
To print Stock Labels, use the 'Print Labels' function on the Operations menu. To print a Goods Receipt Note, click the Printer icon.
When you have checked and confirmed that the Goods Receipt is correct, click the OK check box and save. This signifies that the Goods Receipt has been approved. If you have determined that Nominal Ledger Transactions are to be created (using the Sub Systems setting in the Nominal Ledger), these Transactions will now be created. You will no longer be able to modify the Goods Receipt. You will not be able to create a Purchase Invoice for the Items on the Goods Receipt until it has been approved.
Please click here for a full description of the screen, including detailed information about shipments and stock.
To close the screen and return to the Purchase Order, click the close box. You will be asked if you want to save any changes. The Received field of the Purchase Order (visible on flip B) will be updated automatically if the Goods Receipt was approved (you will need to close the Order and re-open it to see this). For any Items on the Goods Receipt that are Stocked Items, the stock balance will be updated.
If you are making use of the cost accounting facility in FirstOffice, you will want such transactions to be created on the receipt of goods as well as on their delivery. To ensure that this occurs, switch on the Goods Receipts check box in the Sub Systems setting in the Nominal Ledger. You will also need to specify Accounts for each of the fields in the Account Usage Stock setting in the Stock module. Please click here for full details.
The Purchase Order and the Goods Receipt will remain connected to each other through the Attachments facility. This allows you to open the Order quickly and easily when reviewing the Goods Receipt, or to open the Goods Receipt from the Order. When viewing the Goods Receipt or Order, click the button with the paper clip image to open a list of attachments. Then double-click an item in this list to open it.
If the function does not create a Goods Receipt, the probable causes are:
- The Purchase Order has been marked as Closed.
- All Items on the Purchase Order have already been received.
- You have logged in as a user that is not permitted to create Goods Receipts from Purchase Orders. This is controlled using Access Groups. To do this, deny access to the 'Goods Receipt from Purchase Order' and/or 'Disallow Goods Receipt from not OKed Purchase Order' Actions as appropriate.
- There is no valid record in the Number Series - Goods Receipts setting (in the Stock module). This might be a fault in the setting itself, or it might be because the default Goods Receipt Number in the Number Series Defaults setting (in the System module) is not in a valid Number Series. This problem will usually occur at the beginning of a new year.
Operations Menu - Create Purchase Invoice
To raise a Purchase Invoice from a Purchase Order, select 'Create Purchase Invoice' from the Operations menu. For the function to have any effect, you must first save all changes to the Purchase Order (use the [Save] button), and the Supplier record must have a Cost Account specified on the 'Terms' card. You must first have created an approved Goods Receipt from the Purchase Order.When you select the function, a new record will be created in the Purchase Invoice register (in the Purchase Ledger). It will be opened in a new window, entitled 'Purchase Invoice: Inspect'. This means that it has been created and saved and is being opened for amendment and approval.
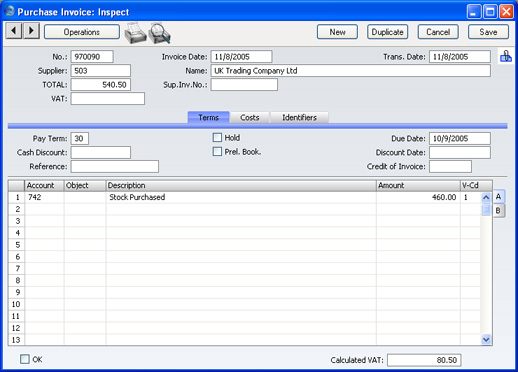
- Consolidate Items to Supplier Cost Account
- The ordered Items are grouped together on a single row on the Invoice indicating that they are to be posted to the same Cost Account (taken from the Cost Account on the 'Terms' card of the Customer record for the Supplier). If the Items on the Purchase Order have different VAT Codes, there will be a separate row on the Invoice for each VAT Code. Objects specified in Purchase Order rows will not be transferred to the Invoice.
- Consolidate by Items
- The Purchase Invoice will feature a separate row for each received Item on the Purchase Order. The Cost Account in each case will be the Purchase Control Account from the Account Usage Stock setting.
- Transfer Each Row Separately
- Each ordered Item will have its own row on the Invoice. In each case, the Cost Account will be the Purchase Control Account from the Account Usage Stock setting. The appropriate Account for the Zone of the Supplier will be used. Objects specified in Purchase Order rows will be transferred to the corresponding row in the Invoice.
You can change the Amount of one or more rows on the Invoice screen as appropriate. You can also add more rows.
When you have checked that the Purchase Invoice is correct, click the OK check box and save. This signifies that the Purchase Invoice has been approved. Associated Transactions in the Nominal Ledger will now be raised (if so defined in the Sub Systems setting in the Nominal Ledger) and you will no longer be able to modify the Invoice.
Please click here for a full description of the screen.
To close the screen and return to the Purchase Order, click the close box. You will be asked if you want to save any changes. The Invoiced field of the Order (visible on flip B) will be updated automatically (you will need to close the Purchase Order and re-open it to see this). If you are using the Consolidate Items to Supplier Cost Account option, the Invoiced field is not updated until you approve the Purchase Invoice, and therefore you will need to take care if you need to return to the Purchase Order to create a second Invoice before the first one has been approved.
The Purchase Order and the Invoice will remain connected to each other through the Attachments facility. This allows you to open the Order quickly and easily when reviewing the Invoice, or to open the Invoice from the Order. When viewing the Invoice or Order, click the button with the paper clip image to open a list of attachments. Then double-click an item in this list to open it.
If the function does not create a Purchase Invoice, the probable causes are:
- The Supplier has been marked as Closed or does not have a Cost Account specified.
- There are no Items on the Purchase Order awaiting invoicing.
- You have logged in as a user that is not permitted to create Purchase Invoices from Purchase Orders. This is controlled using Access Groups. To do this, deny access to the 'Purchase Invoice from Purchase Order' Action.
- There is no valid record in the Number Series - Purchase Invoices setting (in the Purchase Ledger). This might be a fault in the setting itself, or it might be because the default Purchase Invoice Number in the Number Series Defaults setting (in the System module) is not in a valid Number Series. This problem will usually occur at the beginning of a new year.
Operations Menu - Item Status
This function provides instant feedback for the Item shown in the Order row containing the cursor or highlighted in the 'Paste Special' window listing Items, showing in a new window the quantity in stock, the quantity on order and the quantity shippable.Please click here for full details.