Introduction to Reports in the Nominal Ledger
As with all modules, to print a report in the Nominal Ledger, select 'Reports' from the File menu or click the [Reports] button in the Master Control panel. You can also use the Ctrl-R or ⌘-R keyboard shortcuts. Then, double-click the appropriate item in the list.The following reports are available in the Nominal Ledger:
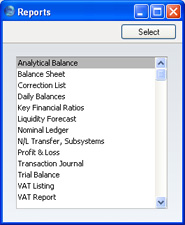
It is often possible to report on a selection range, such as a range of Accounts, or a range of Items. To do this, enter the lowest and highest values of the range, separated by a colon. For example, to report on Accounts 001 to 010, enter "001:010" in the Account field. Depending on the field, the sort used might be alpha or numeric. In the case of an alpha sort, a range of 1:2 would also include 100, 10109, etc.
Use the Media options at the bottom of the specification window to determine the print destination of the report. The default is to print to screen. You can initially print to screen and subsequently send the report to a printer by clicking the Printer icon at the top of the report window. You can also print the report to disk as a text file. This will be useful if you want to format the report in your house style before printing.
Once you have entered the reporting criteria and have chosen a print destination, click [Run].
Definition of Nominal Ledger Reports
The appearance and format of some Nominal Ledger reports can be changed to suit your specific requirements. This is known as changing the report's definition. The reports for which this facility is available are the Balance Sheet, Key Financial Ratios, Profit & Loss Report and VAT Report.To change a report definition, first select 'Settings' from the File menu and double-click 'Report Settings' in the subsequent list. Then, highlight a report name in the list on the left-hand side of the 'Report Settings' window and click the [Definition] button. The subsequent definitions windows are described on the pages describing the individual reports.
! | If you have modified the standard Chart of Accounts or imported your own, you must change the Nominal Ledger report definitions accordingly. |
Drill-down
FirstOffice has a unique drill-down feature in some of the reports when they are printed to screen. For example, when you have a Profit & Loss statement on the screen, you can click on any of the Account numbers in the report. Subject to you having the necessary access rights, the Nominal Ledger report for the same Account and period is then opened in a separate window, listing the Transactions that contribute to the account balance on the P&L statement. If you then click on one of the Transaction Numbers in the Nominal Ledger report, the Transaction record will open, showing all the details recorded for the event. This example is illustrated below: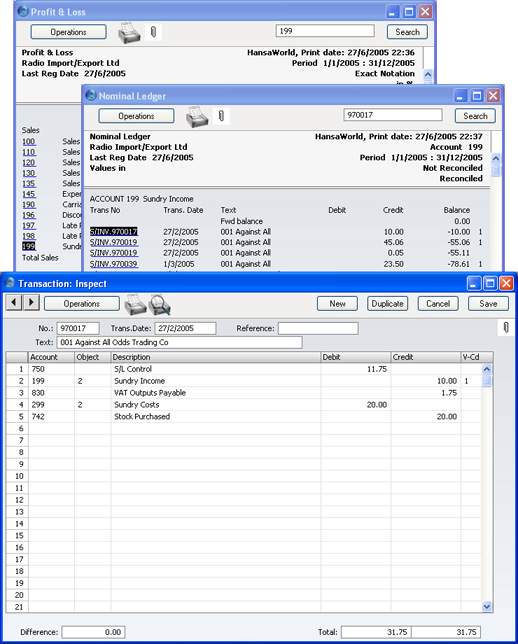
The Operations Menu
Analytical Balance
This report is similar to the Trial Balance, but with the addition of debit and credit balances for each Account. The paper printout in addition shows the accumulated balances for the financial year.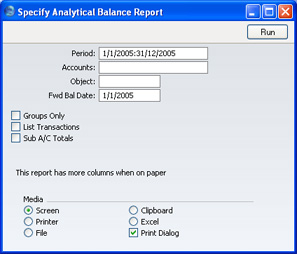
- Period
- Paste Special
Reporting Periods setting, System module
- Enter the period to be covered by the report. The default value is the first period in the Reporting Periods setting.
- Accounts
- Paste Special
Account register, Nominal Ledger/System module
- Range Reporting Alpha
- Limit the report to a single Account, or range of Accounts.
- Limit the report to a single Account, or range of Accounts.
- Object
- Paste Special
Object register, Nominal Ledger
- Enter an Object here if you want the balances in the report to be calculated from Transactions with that Object only. Unlike most Nominal Ledger reports, you can only enter a single Object here: if you enter a number of Objects separated by commas, the report will be empty.
- Fwd Bal Date
- Specify here the date for which the Forward Balances are to be calculated. The default is the first date of the period specified for the report.
- Groups Only
- With this option on, the report will only show subtotals for groups of Accounts, grouped using the first digit of the Account Code. If the option is off, balances for each Account are shown together with the group subtotals.
- List Transactions
- With this box checked, the Transaction Numbers of all Transactions that fall within the reporting period, together with debit and credit totals, will be listed at the bottom of the report.
- Sub A/C Totals
- This option takes the group totalling described for the Groups Only check box above a stage further. It displays subtotals for groups of Accounts whose three initial digits are the same. For example, the totals for Accounts 3011, 3012 and 3014 will be shown as a subtotal. The single-digit group total (for Accounts starting with 3 in the example) will be shown as well.
Balance Sheet
The Balance Sheet shows the assets, liabilities and capital of the company at a given point in time. You can use the Balance Sheet model supplied with FirstOffice, or you can define your own, possibly editing the standard definition to suit your needs.Balance Sheet - Setting up a Balance Sheet
You can define the structure of the Balance Sheet to suit your requirements. The following example illustrates the set-up process.To change the report definition of the Balance Sheet, first select 'Settings' from the File menu and double-click 'Report Settings' in the subsequent list. Then, highlight 'Balance Sheet' in the list on the left-hand side of the 'Report Settings' window and click the [Definition] button. The 'Definition of Balance Sheet: Browse' window is opened.
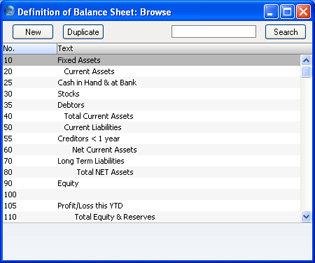
Double-click the first row, "10: Fixed Assets".
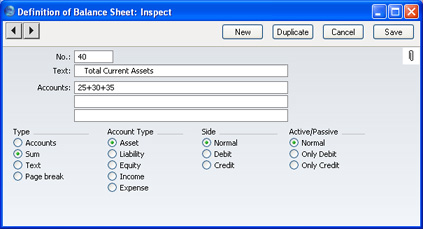
The 'Definition of Balance Sheet Definition: Inspect' window is opened, showing the current definition of the row.
The number identifies the row in the Balance Sheet, and the Text "Fixed Assets" is printed in the report as a heading for a group of Accounts.
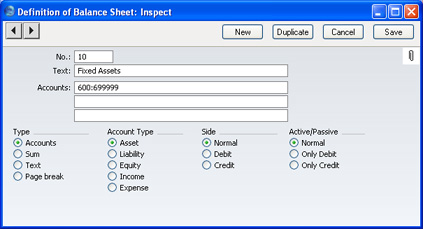
Of the four Type options, "Accounts" has been selected to indicate that each of the Accounts in the number interval will be presented individually. After the last Account in the group, a total for the group will be printed.
The Account Type is "Asset". The Account Type concept is explained on the page describing the Account register here.
The Side and Active/Passive options are described on the Special Features of the Balance Sheet page.
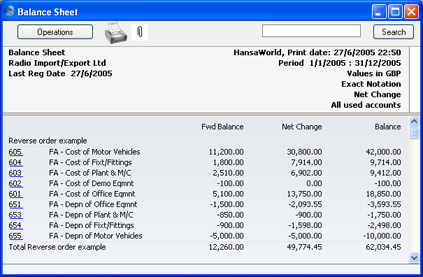
The Accounts field consists of three rows, with room for a definition 300 characters long. As alternatives to specifying a range of Accounts, you can also specify a number of individual Accounts, or ranges of Accounts, separated by commas. If you enter a range of Accounts with the highest number first, the Accounts in that range will be presented in reverse order. For example, the sequence "605:601,626,651:655" will appear as follows in the printed report:
! | If you move from record to record by clicking the [Next Record] or [Previous Record] buttons, remember that any changes you make will be saved. If you don't want to save the changes, you must use the close box, or click [Cancel]. |
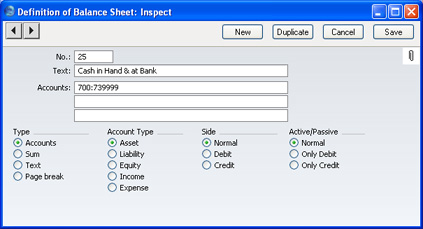
When you have finished with the last row, if you want to save your changes, click [Save], or else close the window with the close box. Then, close the list of definitions using the close box once again.
The new Balance Sheet report is now ready to print.
! | FirstOffice comes with a standard Chart of Accounts and a set of Report Definitions. This is a well-structured Chart, with systematic groupings of Accounts. It is suitable without any changes for most small or medium companies, but it is also easily modified by you or your financial adviser. |
If you stay within the structure of the Chart (e.g. avoid putting Liability Accounts among the Assets!), there is no need to alter the definitions. But remember, it is a good idea to print a test Balance Sheet to see if your definitions produce exactly what you expect.
Inserting a Row in the Balance Sheet
- Ensure you are in the Nominal Ledger, then open the 'Settings' list window and double-click 'Report Settings' in the subsequent list. Then, highlight 'Balance Sheet' in the list on the left-hand side of the 'Report Settings' window and click the [Definition] button.
The 'Definition of Balance Sheet: Browse' window is opened.
- Click [New] or highlight a row similar to the one you are creating and click [Duplicate].
An empty form or a copy of the highlighted row is opened.
- Enter the information for the new row.
Remember to give the new row a number that will insert it in the right place in the Balance Sheet. (e.g. if you want to insert a row between rows 30 and 40, you can use 35.)
- Click [Save] and close the window, or click the close box to cancel.
You will be returned to the 'Definition of Balance Sheet: Browse' window, where the new row is shown in its proper place in the list.
- Ensure you are in the Nominal Ledger, then open the 'Settings' list window and double-click 'Report Settings' in the subsequent list. Then, highlight 'Balance Sheet' in the list on the left-hand side of the 'Report Settings' window and click the [Definition] button.
The 'Definition of Balance Sheet: Browse' window is opened.
- Double-click the row you want to remove, to show its definition window.
- Select 'Delete' from the Record menu.
The row is deleted from the Balance Sheet and the definition for the following row is shown in its place.
- Close the window.
You will be returned to the 'Definition of Balance Sheet: Browse' window.
! | You cannot undo the deletion of a row in the Balance Sheet. |
Balance Sheet - Printing a Balance Sheet
Open the 'Reports' list window and double-click 'Balance Sheet'. The 'Specify Balance Sheet' window is opened.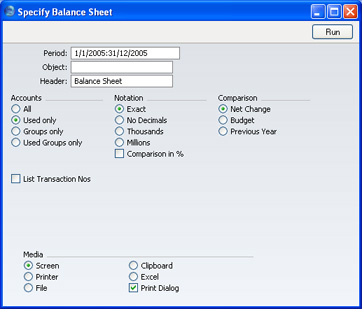
- Period
- Paste Special
Reporting Periods setting, System module
- Enter the period for the Balance Sheet you want to print. FirstOffice will suggest the first period in the Reporting Periods setting as a default.
- Object
- Paste Special
Object register, Nominal Ledger/System module
- Enter an Object Code in this field if you want to display Account balances for a certain Object. If you leave the field empty, the Account balances in the report will be calculated from all Transaction rows, with and without Objects, are included. If you enter a number of Objects separated by commas, only those Transaction rows featuring all the Objects listed will be included in the calculations.
- Header
- Specify a title for the report here.
- Accounts
- Select how you want the Accounts printed in the report.
- All
- This option will show all Accounts that have been included in the Balance Sheet definitions.
- Used only
- This option will only show Accounts that have been used. This includes Accounts that have balances brought forward from a previous period but that have not been used in the report period.
- Groups only
- This option does not show balances for individual Accounts. Instead, it simply shows an overall balance for each row as entered in the Balance Sheet definitions.
- Used Groups only
- This option only shows balances for rows as entered in the Balance Sheet definitions that have been used.
- All
- Notation
- Select the printing format for the values in the Balance Sheet.
- Exact
- Shows the balances as stored in the Transactions.
- No Decimals
- Rounds the balances up or down to the nearest whole number.
- Thousands, Millions
- Divide the balances by 1,000 or 1,000,000.
- Comparison in %
- Only valid if Budget is chosen as the Comparison option.
- Exact
- Comparison
- Choose to compare with Net Change, Budget or the previous year.
- If you are using the Budget option, Budget records will only be included in the report if they have at least one entry in the grid area of the screen complete with date.
- If you are using the Budget option, Budget records will only be included in the report if they have at least one entry in the grid area of the screen complete with date.
- List Transaction Nos
- With this box checked, the Transaction Numbers of all Transactions that fall within the reporting period, together with debit and credit totals, will be listed at the bottom of the report.
When printed to screen, the Balance Sheet has FirstOffice's Drill-down feature. Click on the Account Number of any Account in the report to open the Nominal Ledger report for the same Account and period. From the Nominal Ledger report, you can click on any Transaction Number to open an individual Transaction record.
Balance Sheet - Special Features of the Balance Sheet
This section has no relevance for those companies that practise standard western accounting conventions.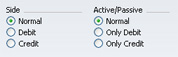
To complicate things even further, in some countries it is customary to distinguish between four different "states" of a book entry: Debit+, Debit-, Credit+ and Credit-. In modern western accounting systems, a book entry is either debit or credit, regardless of the class of the account, i.e. we have a simple arithmetic definition of balances.
In those environments where all these special rules are used, the preparation of balance reports tends to become complicated and labour consuming. These special functions of FirstOffice allow the far-reaching automation of many of these routine tasks. This is how it works.
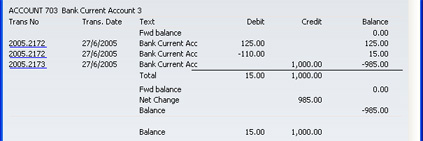
Let us start with the following Nominal Ledger report, showing the actual debit and credit balances for two Accounts.
Account 702 - Bank Current Account 2:
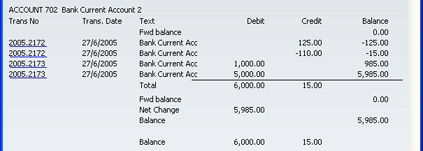
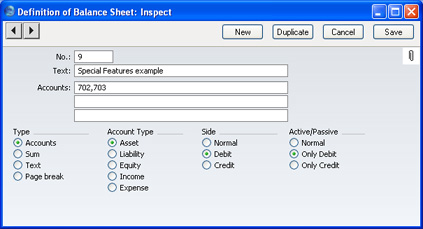


With Side:Debit and Active/Passive:Only Credit selected, once again nothing will be shown.
The combination Side:Credit and Active/Passive:Normal shows the credit column balances for both Accounts:

Correction List
The Correction List is a list of the corrections and updates made to Transactions from a specified period. You can make corrections to Transactions using the 'Correction Mark' function on the Operations menu of the Transaction window, while you can make updates using the 'Update Mark' function on the same menu. You cannot change the definition of this report.When printed to screen, the Correction List has FirstOffice's Drill-down feature. Click on any Transaction Number in the report to open an individual Transaction record.
Double-clicking 'Correction List' in the 'Reports' list opens the following window:
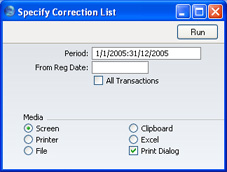
- Period
- Paste Special
Reporting Periods setting, System module
- Enter the report period in the format 01-02-05:28-02-05. If you are using four-digit years as in the illustration, the leading digits will be inserted automatically. If your report period is a single day, just enter the date once and this will be converted to a period format automatically. The first row of the Reporting Periods setting is used as a default value.
- The report will list corrections and updates made to Transactions whose Transaction Date falls in the period specified here. It can therefore include corrections and updates made later than this period.
- The report will list corrections and updates made to Transactions whose Transaction Date falls in the period specified here. It can therefore include corrections and updates made later than this period.
- From Reg. Date
- Enter a date to list updates and corrections made on or after that date.
- All Transactions
- By default, this report only lists corrections or updates made to Transactions. It shows the Transaction Number, the Transaction Date, the action (i.e. correction or update) and date of the action. If you check this box, the report will also show the registration dates of every Transaction, including those that have not been updated or corrected. You might use this option to gain an impression of the proportion of Transactions that have been changed, or to get an idea of how long it takes for updates and corrections to be made.
Daily Balances
This report provides daily debit, credit and overall balances for all used Accounts.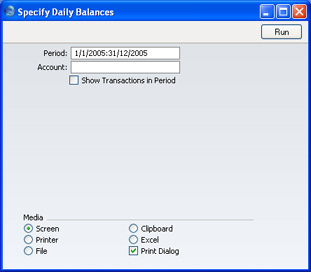
- Period
- Paste Special
Reporting Periods setting, System module
- Specify the period to be covered by the report. To obtain balances for a particular day, simply enter the date.
- If you enter a report period of greater than one day, for each Account individual daily balances are shown only for those days on which the Account was used.
- If you enter a report period of greater than one day, for each Account individual daily balances are shown only for those days on which the Account was used.
- Account
- Paste Special
Account register, Nominal Ledger/System module
- Range Reporting Alpha
- Specify the Account or range of Accounts whose balances are to be shown in the report.
- Specify the Account or range of Accounts whose balances are to be shown in the report.
- Show Transactions in Period
- With this box checked, the Transaction Numbers of all Transactions that fall within the reporting period, together with debit and credit totals, will be listed at the bottom of the report.
Key Financial Ratios
When a company, its situation and prospects are evaluated, the Key Financial Ratios report is a useful tool.FirstOffice allows you to create your own Key Ratios, to improve the analysis. Examples might be sales per sq. ft. for retail outlets, or the relation between salaries and debited time for consultants. Some Key Ratios are used in other reports: the Turnover % option in the Profit & Loss report requires that there be a Key Ratio defining 'turnover', for example.
Key Financial Ratios - Defining Key Ratios
- To change the report definition of the Key Financial Ratios report, first select 'Settings' from the File menu and double-click 'Report Settings' in the subsequent list. Then highlight 'Key Financial Ratios' in the list on the left-hand side of the 'Report Settings' window and click the [Definition] button. The 'Definition of Key Financial Ratios: Inspect' window is opened.
- Enter the definitions for your Key Ratios.
The following illustration shows a sample list of defined Ratios. In this list, all the functions available for use in defining Key Ratios are illustrated.
The fields on the screen are as follows: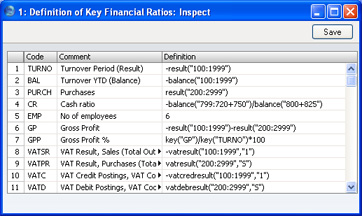
- Row
- Each Ratio is defined on its own numbered row in this window.
- Code
- A unique code identifying each Key Ratio: this can be used to refer to the Key Ratio when calculating others (see the illustration).
- Comment
- The name of the Ratio, to be shown on the report.
- Definition
- The formula used to calculate the value of this Key Ratio.
If you are an existing user of FirstOffice or Office/2 updating to version 4.1 or later, note that the syntax used in the Key Ratio formulae changed in this version. All parameters should now be enclosed in quotation marks. The order of parameters for the VATRESULT, VATBALANCE, VATCREDRESULT and VATDEBRESULT commands has been transposed.
- RESULT("Account Code")
- This command returns the net change during the period for the Account specified in the brackets. Some examples of the use of this command are as follows:
- RESULT("100")
- Returns the net change in Account 100 for the specified period.
- RESULT("100:1999")
- Returns the sum of the net changes in Accounts 100 to 1999 for the specified period. The Accounts used are determined using an alpha sort, rather than a numeric one. Thus Account 1000001 will be included in the example range, while Account 200 will not.
- -RESULT("100:1999")
- As the previous example, but the sign of the final figure is changed. This is useful when displaying figures for sales, which are stored as negative figures in FirstOffice. Prefixing the RESULT command with a minus sign will cause sales to be displayed as positive figures in the report.
- RESULT("100+120:1999")
- Takes the net change in Account 100 and adds it to the sum of the net changes in Accounts 120 to 1999.
- RESULT("100")
- CREDRESULT("Account Code")
- This command returns the total credit posting during the report period to the Account specified.
- DEBRESULT("Account Code")
- This command returns the total debit posting during the report period to the Account specified.
- BALANCE("Account Code")
- This command returns the closing balance for the Account specified. It therefore differs from the RESULT command in that balances brought forward from previous periods are taken into account.
- The command can return the sum of the balances of specified Accounts in the same manner as the RESULT command: please refer to the description of the RESULT command above for examples.
- The command can return the sum of the balances of specified Accounts in the same manner as the RESULT command: please refer to the description of the RESULT command above for examples.
- CREDBALANCE("Account Code")
- This command returns the closing credit balance for the Account specified. It therefore differs from the CREDRESULT command in that balances brought forward from previous periods are taken into account.
- DEBBALANCE("Account Code")
- This command returns the closing debit balance for the Account specified. It therefore differs from the DEBRESULT command in that balances brought forward from previous periods are taken into account.
- KEY("Code")
- The value of another Key Ratio can be included in the calculation. The Key Ratio referred to must already have been defined. If not, a zero value is used. Therefore, in the example illustration, the GPP line must appear below the GP and TURNO lines.
- Note that although the KEY command itself is not case sensitive, the reference to another Key Ratio is. Thus, in the example illustration, key("TURNO") and KEY("TURNO") are relevant, but key("turno") is not.
- Note that although the KEY command itself is not case sensitive, the reference to another Key Ratio is. Thus, in the example illustration, key("TURNO") and KEY("TURNO") are relevant, but key("turno") is not.
- OBJRESULT("Account Code","Object Code")
- This command is similar to RESULT, but in calculating the net change during the period for the Account specified, only postings with the specified Object Code are taken into account.
- The reference to the Object Code is not case sensitive.
- The command can return the sum of the balances of specified Accounts in the same manner as the RESULT command: please refer to the description of the RESULT command above for examples.
- The reference to the Object Code is not case sensitive.
- OBJCREDRESULT("Account Code","Object Code")
- This command returns the total credit posting to the Account specified during the period, taking only transactions with the specified Object Code into account.
- OBJDEBRESULT("Account Code","Object Code")
- This command returns the total debit posting to the Account specified during the period, taking only transactions with the specified Object Code into account.
- VATRESULT("Account Code","VAT Code")
- This command is similar to RESULT, but in calculating the net change during the period for the Account specified, only postings with the specified VAT Code are taken into account.
- The reference to the VAT Code is not case sensitive.
- The command can return the sum of the balances of specified Accounts in the same manner as the RESULT command: please refer to the description of the RESULT command above for examples.
- The reference to the VAT Code is not case sensitive.
- VATBALANCE("Account Code","VAT Code")
- This command returns the closing balance for the Account specified, with only Transactions with the specified VAT Code taken into account. It therefore differs from the VATRESULT command in that balances brought forward from previous periods are taken into account.
- VATCREDRESULT("Account Code","VAT Code")
- This command returns the total credit posting to the Account specified during the period, taking only transactions with the specified VAT Code into account.
- VATDEBRESULT("Account Code","VAT Code")
- This command returns the total debit posting to the Account specified during the period, taking only transactions with the specified VAT Code into account.
- Row
- When you have finished defining Key Ratios, click [Save].
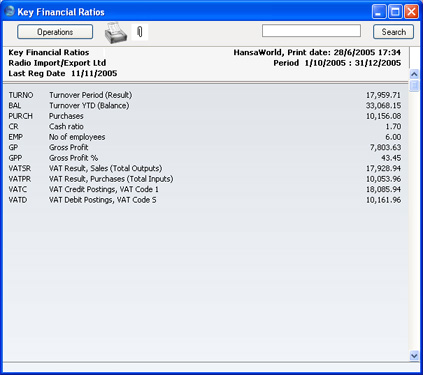
As the calculation uses FirstOffice's internal values, balances on e.g. sales Accounts will be shown as negatives, since they normally are in credit. You can solve this simply by reversing the sign for all such calculations: an example of this is in Key Ratio No. 1 in the illustration. The examples also show how to group different Accounts.
The value of a well-structured Chart of Accounts can easily be seen here. If all income related Accounts are found in a consecutive series, summing them all up becomes simple.
Key Financial Ratios - Printing the Key Financial Ratios report
Open the 'Reports' list window and double-click 'Key Financial Ratios'. The 'Specify Key Ratios' window is opened.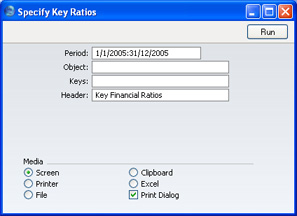
- Period
- Paste Special
Reporting Periods setting, System module
- Enter the report period, in the format "01-02-05:28-02-05". If you are using four-digit years as in the illustration, the leading digits will be inserted automatically. If your report period is a single day, just enter the date once and this will be converted to a period format automatically. The first row of the Reporting Periods setting is the default value.
- Object
- Paste Special
Object register, Nominal Ledger/System module
- Enter the Object (if any) for which you want to calculate Key Ratios.
- Keys
- If you do not want to show all Key Ratios in the report, specify here which ones are to be included. If you specify more than one, separate them using commas (e.g. "TURNO,CR,EMP").
- Header
- Specify a title for the report here.
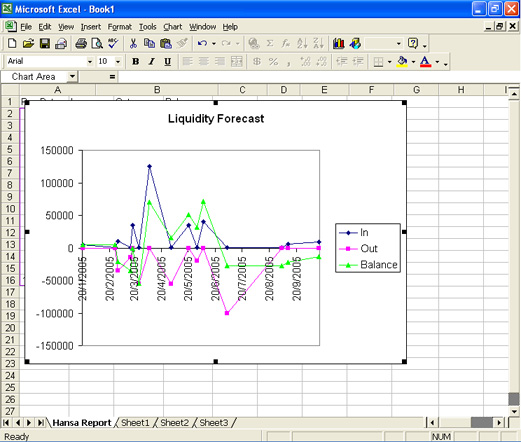
Liquidity Forecast
This report presents a forecast of all actual and future payments to and from the firm during a specified period. The forecast is based on the Due Dates of Purchase and Sales Invoices.When printed to screen, this report has FirstOffice's Drill-down feature. Click on any Transaction Number in the report to open the Transaction. Invoices will be shown in the 'Invoice: Inspect' window, Purchase Invoices in the 'Purchase Invoice: Inspect' window.
Double-clicking 'Liquidity Forecast' in the 'Reports' list opens the following window:
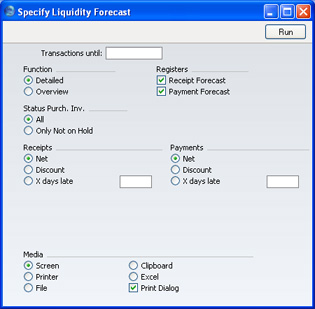
- Transactions Until
- Paste Special
Choose date
- A date entered here instructs FirstOffice to end the report at a particular date. The date can be any date, before or after the current date. The start date of the report will be taken from the first period in the Reporting Periods setting.
- Function
- Choose between the Detailed option, showing each Transaction, and the Overview, showing a single line summary for each day.
- Registers
- By default, the report contains Debtors' and Creditors' forecasts. You can exclude either of these sections from the report by clicking in these boxes.
- Status Purch. Inv.
- You can choose to exclude those Purchase Invoices for which payment has been prevented (those whose Hold check box has been switched on).
- Receipts, Payments
- Select an alternative for the payment pattern to be used in calculating the Receipt and Payment schedule.
- Net
- This option assumes that payment will be received or issued on the Due Date.
- Discount
- This option assumes that invoices with a cash discount term will be paid by the Discount Date in order to qualify for the cash discount.
- X days late
- This option allows you to assume that all Invoices will be paid on average a specified number of days late.
- Net
Nominal Ledger
The Nominal Ledger report is a list of the Transaction rows entered during the report period (i.e. it is a list of the amounts posted to each Account in that period).When printed to screen, the Nominal Ledger report has FirstOffice's Drill-down feature. Click on any Transaction Number to open an individual Transaction record.
Double-clicking 'Nominal Ledger' in the 'Reports' list opens the following window:
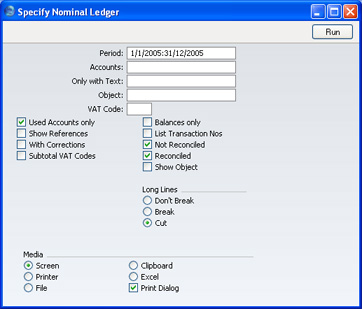
- Period
- Paste Special
Reporting Periods setting, System module
- Specify a report period, in the format "01-02-05:28-02-05". If you are using four-digit years as in the illustration, the leading digits will be inserted automatically. If your report period is a single day, just enter the date once and this will be converted to a period format automatically. The first row of the Reporting Periods setting is the default value.
- Accounts
- Paste Special
Account register, Nominal Ledger/System module
- Range Reporting Alpha
- Limit the report to a single or range of Accounts.
- Limit the report to a single or range of Accounts.
- Only with Text
- Enter a search string in this field to list Transaction rows with certain Descriptions. Thus, assuming that you have used the default entries in the Description field of each Transaction row, you can enter an Account Name here to report on all postings to that Account. Note that you do not have to enter the complete text string: "Sales" finds "Sales Type 1", "Sales Type 2", etc.
- Object
- Paste Special
Object register, Nominal Ledger
- Enter an Object Code in this field if you want the report to list Transaction rows with a certain Object. If the field is empty, all Transaction rows, with and without Objects, are included. If you enter a number of Objects separated by commas, only those Transaction rows featuring all the Objects listed will be shown.
- VAT Code
- Paste Special
VAT Codes setting, Nominal Ledger
- Enter a VAT Code here to list Transaction rows with a particular VAT Code.
- Used Accounts only
- Check this box to exclude Accounts that were not used during the report period. Accounts not used but with a balance brought forward will be shown.
- Show References
- By default, the report shows the Text of each Transaction. Use this option if you would like the Reference and the Text to be shown.
- With Corrections
- Check this box if you want all corrections in the Transactions to be shown.
- Subtotal VAT Codes
- Check this box if you want the total debit and credit amounts for each VAT Code to be shown at the bottom of the report.
- Balances only
- Use this option if you only need to show a balance for each Account, instead of having every Transaction row listed.
- List Transaction Nos
- With this box checked, the Transaction Numbers of all Transactions that fall within the reporting period, together with debit and credit totals, will be listed at the bottom of the report.
- Not Reconciled
- Check this box to include in the report Transaction rows that have not been reconciled using the A/C Reconciliation setting.
- Reconciled
- Check this box to include in the report Transaction rows that have been reconciled using the A/C Reconciliation setting.
- Show Object
- Check this box to print the Objects used in each Transaction row.
- Long Lines
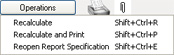
- Three options are available for dealing with long descriptions when printing on paper. The Don't Break option is always used when printing to screen. If you preview the report to screen, choose 'Recalculate and Print' from the Operations menu to invoke the Long Lines option (i.e. do not click the Printer icon).
- If you use a landscape Page Setup and/or reduce the page magnification, the space available for long descriptions (i.e. the width of the description column) is increased.
- Don't Break
- The full length of the description is printed on one line. If it interferes with figures in the next column, these are moved to the next line.
- Break
- The full length of the description is printed, spread over several lines if necessary.
- Cut
- The final characters of the description are not printed, so that it fits onto one line in the allocated column.
- If you use a landscape Page Setup and/or reduce the page magnification, the space available for long descriptions (i.e. the width of the description column) is increased.
N/L Transfer, Subsystems
The integration between FirstOffice's different modules means that Nominal Ledger Transactions can be generated automatically from other ledgers and modules ('Sub Systems'). For example, approving an Invoice in the Sales Ledger can cause the automatic generation of a Nominal Ledger Transaction debiting a Debtor Account and crediting a Sales Account and, if appropriate, a VAT Account. This feature is controlled using the Sub Systems setting.If you are not using this feature, you can use this report, which lists transactions in the selected register or Sub System (e.g. Invoices entered in the Sales Ledger), as a basis for entering equivalent Nominal Ledger Transactions manually. Alternatively you can create the Transactions in batches using the 'Create NL Transactions' Maintenance function in the System module: this report will list the Transactions that will be created by that function.
The report shows all transactions of the specified type in the specified period, irrespective of whether equivalent Nominal Ledger Transactions have already been created. Only approved transactions are shown.
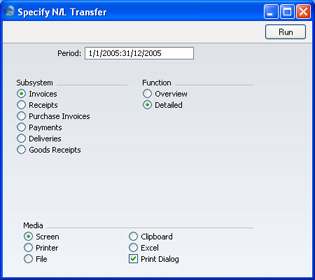
- Period
- Paste Special
Reporting Periods setting, System module
- Enter the start and end date of the report period, separated by a colon (:).
- Subsystem
- Select one subsystem for the report.
- Function
- Use these options to control the level of detail shown in the report.
- Overview
- This option will produce a list with a single row for each transaction (Invoice, Payment etc.) including a total amount for each. At the end, a list of the Account/Object combinations used by the transactions listed above is printed, showing for each the total amounts debited and credited. This allows the summarising of the listed transactions listed into a single Nominal Ledger Transaction.
- Detailed
- This option shows the Account/Object combinations used by each transaction, allowing a separate Nominal Ledger Transaction to be entered for each Sub System transaction. As with the Overview option, a summary of the movements in each Account/Object combination is shown at the end of the report.
- Overview
Profit & Loss
The Profit & Loss report shows the sales turnover achieved by your company in the specified period. It also shows the total cost of sales and thus the gross profit, and the total overheads and thus the net profit of your business.When printed to screen, the Profit & Loss report has FirstOffice's Drill-down feature. Click on the Account Number of any Account in the report to open the Nominal Ledger report for the same Account and period. When in the Nominal Ledger report, you can click on any Transaction Number to open an individual Transaction record.
Profit & Loss - Definition
The content of the Profit & Loss report is defined in the same way as the Balance Sheet. Please refer to the Balance Sheet page for full details.Profit & Loss - Printing a Profit & Loss report
Open the 'Reports' list window and double-click 'Profit & Loss'. The 'Specify Profit & Loss Report' window is opened.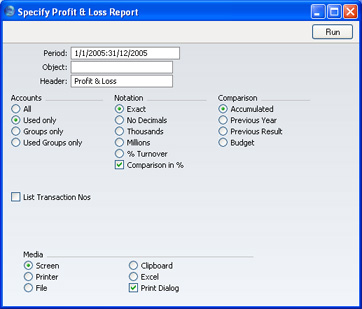
- Period
- Paste Special
Reporting Periods setting, System module
- The report period. Enter first and last date. The first period in the Reporting Periods setting is the default.
- Object
- Paste Special
Object register, Nominal Ledger/System module
- Enter an Object Code to reduce the scope of the report. If you leave this field empty, the Account balances in the report will be calculated from all Transaction rows, with and without Objects. If you enter a number of Objects separated by commas, only those Transaction rows featuring all the Objects listed will be included in the calculations.
- Header
- Enter your own title for the report.
- Accounts
- Select how you want the Accounts printed in the report.
- All
- This option will show all Accounts that have been included in the Profit & Loss report definitions.
- Used only
- This option will only show Accounts that have been used. This includes Accounts that have balances brought forward from a previous period but that have not been used in the report period.
- Groups only
- This option does not show balances for individual Accounts. Instead, it simply shows an overall balance for each row as entered in the Profit & Loss report definitions.
- Used Groups only
- This option only shows balances for rows as entered in the Profit & Loss report definitions that have been used.
- All
- Notation
- There are six options to control the presentation of amounts in the report.
- Exact
- Shows the balances as stored in the Transactions.
- No Decimals
- Rounds the balances up or down to the nearest whole number.
- Thousands, Millions
- Divide the balances by 1,000 or 1,000,000.
- % Turnover
- Shows each account balance as a percentage of overall turnover. This option requires you to have defined 'turnover' as a Key Ratio using the code "TURNO". Please refer to the Key Financial Ratios report page for details about how to do this.
- Comparison in %
- Only valid if Budget is chosen as the Comparison option.
- Exact
- Comparison
- Select one option for the comparison column in the report.
- Accumulated
- This option compares the report period with the Year To Date.
- Previous Year
- This compares the report period with the same period last year.
- Previous Result
- This compares the report period with the previous financial year.
- Budget
- This option compares the report period with the Budget figures for the same period. Note that for each Budget record there must be at least one entry in the grid area of the screen complete with date before they will be included in the report.
- Comparison in %
- This option, in the Notation area causes the comparison values to be expressed as percentages.
- Accumulated
- List Transaction Nos
- With this box checked, the Transaction Numbers of all Transactions that fall within the reporting period, together with debit and credit totals, will be listed at the bottom of the report.
Transaction Journal
The Transaction Journal (also called Daily Transaction Ledger) is a summary of all entries made in the ledger. Its definition cannot be changed.Reporting in FirstOffice is non-destructive. That means you can make and print a report as many times as you wish. Some accounting programs are designed in such a way as to allow journal printing only directly in connection with the data entry. FirstOffice does not have this limitation.
Open the 'Reports' list window and double-click 'Transaction Journal'. The 'Specify Transaction Journal' window is opened.
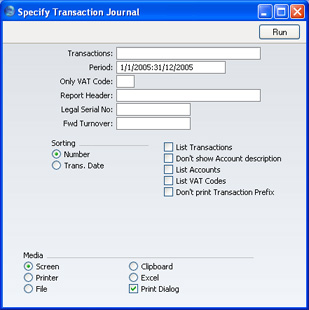
- Transactions
- Range Reporting
Numeric
- If you only want to print a certain range of Transactions, e.g. those entered today, you can select this range using the Transactions field. Enter the first and the last Transaction Number, separated by a colon (:). If you leave the field blank, all records in the Transaction register from the selected period will be printed.
- The Transaction Number must include the prefix as shown in the 'Transactions: Browse' window. To print a Transaction that was entered directly to the Nominal Ledger, enter, for example, "2005.3" or, for a range, "2005.3:2005.10". To print a Transaction that was created from a Sub System, enter, for example, "S/INV.050003" or "S/INV.050003:S/INV.050010" for a range.
- The Transaction Number must include the prefix as shown in the 'Transactions: Browse' window. To print a Transaction that was entered directly to the Nominal Ledger, enter, for example, "2005.3" or, for a range, "2005.3:2005.10". To print a Transaction that was created from a Sub System, enter, for example, "S/INV.050003" or "S/INV.050003:S/INV.050010" for a range.
- Period
- Paste Special
Reporting Periods setting, System module
- Enter the period to be covered by the report.
- Only VAT Code
- Paste Special
VAT Codes setting, Nominal Ledger
- You may limit the report to Transactions that include postings with a particular VAT Code.
- Report Header
- Specify the report title here. If none is specified, 'Transaction Journal' is used.
- Legal Serial No.
- In some countries it is mandatory for all Transactions to follow a single number series, irrespective of their nature. If that is the case, enter the first number in the series here and check the Don't Print Transaction Prefix box below. Each Transaction will be given a number in the specified series, in place of the usual Transaction Number.
- Fwd Turnover
- If you enter an amount in this field, this amount will be added to the total turnover at the bottom of the report.
- Sorting
- The report can be sorted by Transaction Number or Transaction Date.
- List Transactions
- With this box checked, each Transaction used by the report, together with debit and credit totals, will be listed at the bottom of the report. If the scope of the report has been restricted using any of the fields above, only those Transactions included in the report will be listed.
- Don't show Account description
- Use this option if you don't wish Account Descriptions for each Transaction row to be shown.
- List Accounts
- With this box checked, each Account used by the Transactions in the report, together with debit and credit totals, will be listed at the bottom of the report. If the scope of the report has been restricted using any of the fields above, only those Accounts affected by the Transactions shown will be listed.
- List VAT Codes
- With this box checked, each VAT Code used by the Transactions in the report, together with debit and credit totals, will be listed at the bottom of the report. If the scope of the report has been restricted using any of the fields above, only those VAT Codes affected by the Transactions shown will be listed.
- Don't print Transaction Prefix
- Transaction Numbers are usually shown in the report together with their prefixes as shown in the 'Transactions: Browse' window. Transactions entered directly to the Nominal Ledger, for example, are shown as "2005.3" while those created from a Sub System are shown as, for example, "S/INV.050003". If you do not want these prefixes to be shown in the report (i.e. in the examples, to omit "2005." and "S/INV."), check this box.
- If you check this box and enter a Legal Ser. No. above, each Transaction will be given a number in the sequence beginning with the Legal Ser. No. in place of the usual Transaction Number.
Trial Balance
The Trial Balance is a report showing all individual Account balances. It is mostly used for reconciliation. You cannot alter the definition of the Trial Balance report, but you can determine which Transactions are to be included.When printed to screen, the Trial Balance has FirstOffice's Drill-down feature. Click on the Account Number of any Account in the report to open the Nominal Ledger report for the same Account and period. When in the Nominal Ledger report, you can click on any Transaction Number to open an individual Transaction record.
The totals of the three columns in the report should each be zero, signifying that in your accounts the total debits and the total credits are equal. If this is not the case, there may be an error in one or more of your Transactions that should be corrected immediately.
Open the 'Reports' list window and double-click 'Trial Balance'. The 'Specify Trial Balance' window is opened.
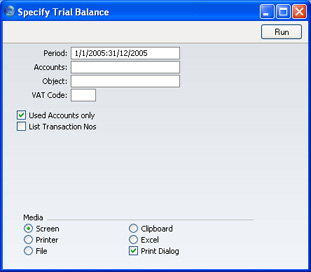
- Period
- Paste Special
Reporting Periods setting, System module
- Enter the period for which you want to produce the Trial Balance. The first period in the Reporting Periods setting is the default value.
- Accounts
- Paste Special
Account register, Nominal Ledger/System module
- Range Reporting Alpha
- Limit the report to a certain Account, or a range of Accounts.
- Limit the report to a certain Account, or a range of Accounts.
- Object
- Paste Special
Object register, Nominal Ledger
- Indicate an Object to limit the scope of the report.
- VAT Code
- Paste Special
VAT Codes setting, Nominal Ledger
- Enter a VAT Code here to restrict the report to Transactions with a certain VAT Code.
- Used Accounts only
- With this box checked, the report will only show Accounts with Transactions registered during the period, and/or with balances brought forward from a previous period.
- List Transaction Nos
- With this box checked, the Transaction Numbers of all Transactions that fall within the reporting period, together with debit and credit totals, will be listed at the bottom of the report. All Transactions will be listed, irrespective of any restrictions in the scope of the report specified in the fields above.
VAT Listing
This report lists the transactions used in calculating the VAT Return (produced using the VAT Report). For each transaction, the total including and excluding VAT, the VAT total and the overall VAT percentage are shown.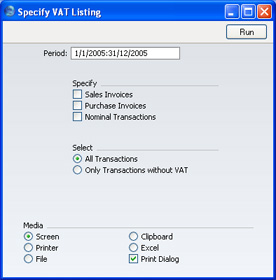
- Period
- Paste Special
Reporting Periods setting, System module
- Enter the period for which you want to print the report in the format 01/02/05:28/02/05. If you are using four-digit years as in the illustration, the leading digits will be inserted automatically. If your report period is a single day, just enter the date once and this will be converted to a period format automatically. The first period in the Reporting Periods setting is the default value and is the period that will be used if you leave the field blank.
- Specify
- You can choose to have Sales Invoices, Purchase Invoices and/or Nominal Ledger Transactions listed in the report. At least one section must be chosen or the report will be blank. For each section, the list of transactions will be followed by a list of VAT Codes used by those transactions, together with totals.
- Select
- The report can show all Transactions or just those without VAT.
VAT Report
Whenever a VAT Return is due you have to print a VAT Report. The report is used both as a transaction document for the ledger and as the basis for payment.The report summarises the Input and Output VAT Accounts for the specified period, and also shows the total Inputs (purchases) and Outputs (sales). A positive total indicates that you are liable for VAT, a negative one signifies that you are owed money by the VAT authority.
Once a VAT Return has been printed for a given period, it is recommended that you enter a Transaction in the Transaction register transferring the VAT amount payable/receivable into the VAT Payments Account (835 in the Chart of Accounts supplied with FirstOffice). This Transaction would debit the VAT Outputs Payable Account (830) and credit the VAT Inputs Receivable Account (831), with a balancing posting to the VAT Payments Account. This Transaction must be entered within the period it concerns, preferably as the last Transaction of the period. The amount payable/receivable can then be transferred to your bank account with a further Transaction when payment is made/received.
VAT Report - Setting up the VAT Report
You can define the VAT Report to determine which Accounts should be included.To change the report definition of the VAT Report, first select 'Settings' from the File menu and double-click 'Report Settings' in the subsequent list. Then highlight 'VAT Report' in the list on the left-hand side of the 'Report Settings' window and click the [Definition] button. The 'Definition of VAT Report: Browse' window is opened.
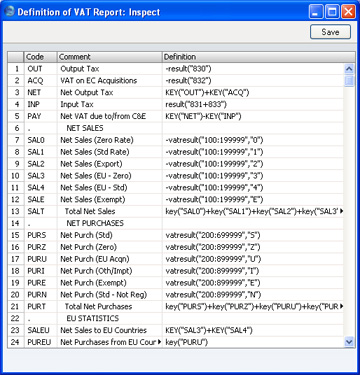
Each row in the definitions list represents a line on the VAT Report. Rows can be added, inserted or deleted as necessary. To insert a row, highlight the row above which the new one is to be inserted (by clicking the row number) and press the Return key. To delete a row, highlight it and press the Backspace key.
The right-hand field of each row contains a formula by which the figure to be shown is calculated. This formula uses the same definition language as the Key Financial Ratios definition. Please refer to the page covering that report for a full description of the commands available.
If you are an existing user of FirstOffice or Office/2 updating to version 4.1 or later, note that the syntax used in the formulae changed in this version. All parameters should now be enclosed in quotation marks. The order of parameters for the VATRESULT, VATBALANCE, VATCREDRESULT and VATDEBRESULT commands has been transposed.
- Row
- Each line of the report is defined on its own numbered row.
- Code
- A code identifying a row that may be used in the definitions of other rows.
- Comment
- A descriptive text that identifies the line in the finished report.
- Definition
- The definition of the row in the report, i.e. which Accounts should be used in calculating the figure to be shown, and the formula of that calculation.
VAT Report - Printing the VAT Report
Open the 'Reports' list window and double-click 'VAT Report'. The 'Specify VAT Report' window is opened.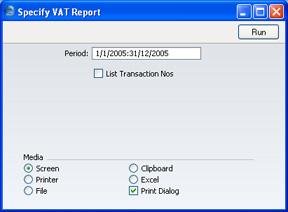
- Period
- Paste Special
Reporting Periods setting, System module
- Enter the period for which you want to print the report in the format 01/02/05:28/02/05. If you are using four-digit years as in the illustration, the leading digits will be inserted automatically. If your report period is a single day, just enter the date once and this will be converted to a period format automatically. The first period in the Reporting Periods setting is the default value.
- List Transactions
- With this box checked, the Transaction Numbers of all Transactions that fall within the reporting period, together with debit and credit totals, will be listed at the bottom of the report.