Introduction to Settings in the Nominal Ledger
The Nominal Ledger module has the following settings:
Account Reconciliation
You will most commonly use this setting to perform bank reconciliations, checking bank statements against the bank account Transactions recorded in FirstOffice. To carry out this task, follow these steps:- Double-click 'A/C Reconciliation' in the 'Settings' list in the Nominal Ledger. The 'A/C Reconciliation' window is opened.
- Enter a Period, using 'Paste Special' if necessary to access a list of reporting periods. The Period should be large enough to cover all likely Transactions against the Bank Account.
- Enter the Account Number representing your bank account.
- Click the Unreconciled check box. All unreconciled Transactions for the specified Account will be listed. The figure in the Recon. Bal field shows the balance previously reconciled and should equal the opening balance on the bank statement.
If the number of unreconciled Transactions is greater than 300, FirstOffice will check the Overflow box at the bottom of the window. If this happens, enter a shorter Period to reduce the number of Transactions in the list.
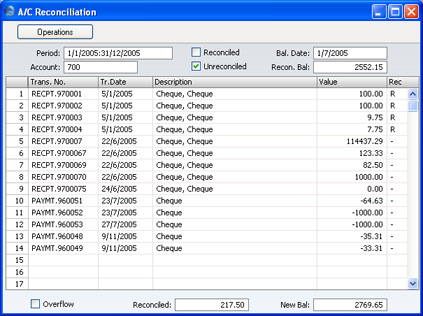
- Compare the list of Transactions with the bank statement. Where a transaction is correctly shown on the statement, enter an "R" to the Rec field. The Transaction value will be added to the Reconciled total, which shows the total reconciled in this session, and to the New Bal figure, which represents the closing balance for the account.
- If a Transaction appears in the bank statement but not in the list of unreconciled Transactions, you should add it to the Transaction register. Examples of such Transactions might be payments into or out of your account by standing order, or bank charges.
You can do this without closing the window. Bring the Master Control panel to the front by clicking or by using the File menu. Click [Transactions] in the Master Control panel and enter the Transaction following the usual procedure described here. When you have saved it, return to the 'A/C Reconciliation' window and select 'Update' from the Operations menu. The new Transaction will be added to the list of unreconciled Transactions.
- If the value of a Transaction shown in the list differs from that shown in the bank statement, you should enter a correcting Transaction to the Transaction register. Please refer to the Correcting Transactions page for full details. When you have done this, return to the 'A/C Reconciliation' window, select 'Update' from the Operations menu and mark both the original Transaction and the correction as reconciled.
- Once you have checked all the Transactions on the bank statement, its closing balance should be the same as the figure in the New Bal field.
Note that nothing has been saved yet and clicking [Save] now would have the effect of losing the reconciliation information entered in this session. To save this information, select 'Commit' from the Operations menu before closing the 'A/C Reconciliation' window by clicking [Save].
! | Closing the 'A/C Reconciliation' window without having selected 'Commit' will lose all changes made. |
In order to ease the task of bank reconciliation, it is recommended that, in the Purchase Ledger, you enter separate Payment records to represent each cheque issued and, in the Sales Ledger, you enter a single Receipt record recording every cheque paid into the bank on a particular paying-in slip. This will ensure that single Transactions will match single lines on the bank statement.
Autotransactions
Autotransactions are templates for accounting, which you can use to simplify the entering of Nominal, Sales and Purchase Ledger Transactions.When a certain type of Transaction occurs repeatedly, you can create a template in which you put all the recurring data once and for all, e.g. a certain combination of Account numbers. Next time you wish to enter this type of Transaction, you can select the automatic function instead. This will create a ready-made Transaction, except for the data that is unique for this particular entry. Examples might include overhead allocations and recurring journals. Autotransactions can thus save labour and ensure that the correct Accounts are used every time.
Autotransactions - Creating a new Autotransaction
Double-click 'Autotransactions' in the 'Settings' list in the Nominal Ledger. A list of existing Autotransactions appears. Click [New] in the Button Bar to enter a new record. When the Autotransaction has been entered, save it using the [Save] button and close the window by clicking the close box. Then, close the browse window using the close box again.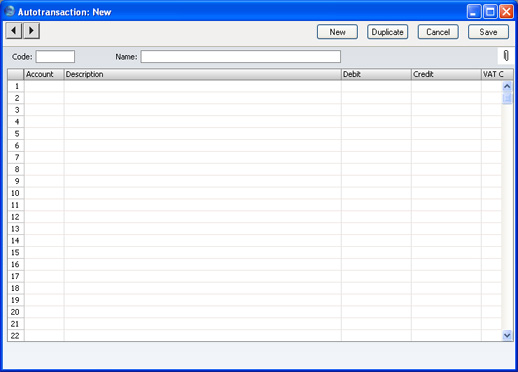
Autotransactions - Example
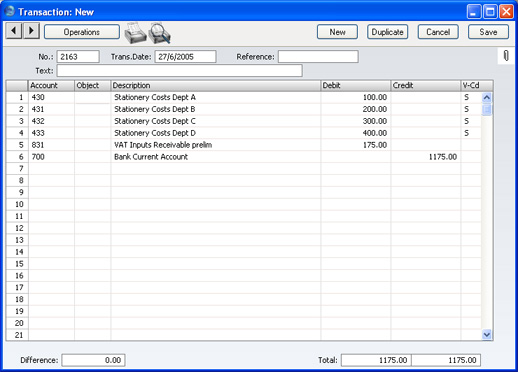
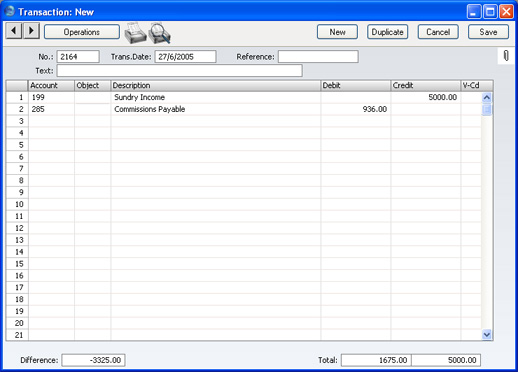
The following example shows a template that distributes an amount across four Accounts on a percentage basis after you have entered that amount in a Transaction. You might use such a templete to allocate shares of overhead costs to Accounts representing four departments.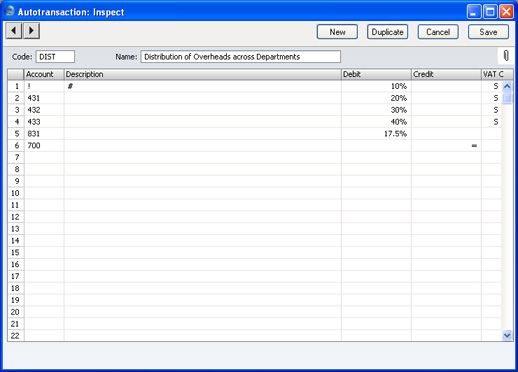
The second line of the Autotransaction will again refer to the original figure and calculate a percentage from it, on the same side (debit or credit) as the original, using a new line in the Transaction. This figure will be posted to Account 431. The third and fourth lines of the Autotransaction will have a similar effect, creating new lines in the Transaction with different percentages of the original figure, posting to Accounts 432 and 433 respectively.
The fifth line calculates VAT from the original figure at the standard rate of 17.5% and places it in a new row in the Transaction, posting to the VAT Inputs Receivable Account on the same side (debit or credit) as the original figure.
The final line of the Autotransaction contains an Account number and an equal sign (=) in the Credit field. This signifies that the sum of the previous lines of the Transaction is to be posted to that Account. The posting will be on the opposite side (debit or credit) to the original figure, since the equal sign is in the Credit field.
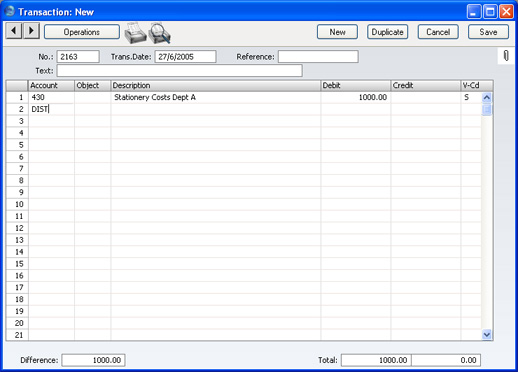
When you enter a Transaction, begin by entering the Account code for the relevant expense category, and the amount excluding VAT. On the second row, enter the code of the Autotransaction in the Account field.
It may be that you will enter many overhead costs in the Purchase Ledger from the Suppliers' Purchase Invoices. You can enter Autotransaction Codes to the Account field of a Purchase Invoice row in the same way as illustrated above for Transactions, so in our example Purchase Invoices can also be distributed across departments. However, the Autotransaction that you use in this situation should be single-sided: it should not have the final balancing line posting to the Bank Account. When you post the Purchase Invoice to the Nominal Ledger, a balancing posting to a Creditor Account will be made automatically as normal. Payment will reach the Bank Account when the Purchase Invoice is paid. In addition, any Autotransaction used in the Purchase Ledger will not need to calculate VAT because that will be handled by the VAT Code.
You can also enter single-sided Autotransactions in the Account field in a Sales Invoice row.
Autotransactions - Creating a new Autotransaction from an existing one
- Double-click 'Autotransactions' in the 'Settings' list.
The 'Autotransactions: Browse' window opens, listing existing records.
- Click the Autotransaction you want to copy, and click [Duplicate] in the Button Bar. Alternatively, double-click the existing Autotransaction and, when it opens, click [Duplicate]. A copy of the selected Autotransaction is shown in the window. The title bar reads "Autotransactions: New", indicating that a new record has been created but not yet saved.
- Edit the Autotransaction in the usual way, and enter the missing information. The new Autotransaction must be given a new, unique Code.
- Save the record using the [Save] button or click [Cancel] to discard the record. Close the window by clicking the close box.
Autotransactions - Changing an Autotransaction
- Double-click 'Autotransactions' in the 'Settings' list.
The 'Autotransactions: Browse' window opens, containing a list of the Autotransactions you have defined.
- Find the Autotransaction you need to change. If necessary, click in the Search field in the top right-hand corner of the window, enter the Code of the Autotransaction you want to find and press Return.
- Double-click the row or press the Enter key.
The Autotransaction is opened in a window with the title 'Autotransactions: Inspect'.
- Edit the Autotransaction in the usual way, and enter the missing information.
- Confirm by clicking the [Save] button or discard the changes using the [Cancel] button. Close the window by clicking the close box.
Autotransactions - Deleting an Autotransaction
- Double-click 'Autotransactions' in the 'Settings' list.
The 'Autotransactions: Browse' window opens.
- Find the Autotransaction you are interested in, using the Search field in the top right-hand corner of the window if necessary.
- Double-click the row or press the Enter key. The Autotransaction is opened in a window with the title 'Autotransactions: Inspect'.
- Select 'Delete' from the Records menu. The Autotransaction is permanently deleted. The previous Autotransaction in the list is shown.
- Click the close box.
! | You cannot undo the deletion of an Autotransaction. |
Budget Keys
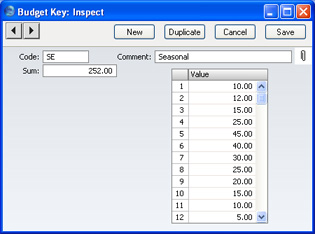
Budget Keys are one of the tools available in FirstOffice to help you calculate budgets. Budget Keys allow you to apply a formula to a yearly budget total in order to divide it into monthly figures.For example, suppose that for a particular Account each month of the year is budgeted to have the same balance, except June, July and August, which are to have balances half the size of the other months. Enter a Budget Key value of 1 for each of the three summer months, and 2 for the other months. The sum will be 21, which then corresponds to the annual balance.
When the sum of the Budget Keys is 100, each month will have a certain percentage of the annual figure. You can use percentage values as Budget Keys, but you don't have to. And remember that in case you start entering percentage values that add up to 100, changing a value will also change the sum away from 100.
You should define your Budget Key records to co-ordinate with your budgeting methods. For example, if you start with an annual budget figure and break it down into quarterly totals, your Budget Keys should feature four lines, one for each quarter. If you work to monthly totals, each Budget Key should have twelve lines, and so on.
Please refer to the description of the Budget register to see how you can use Budget Keys to help calculate Budgets.
To enter Budget Keys, double-click 'Budget Keys' in the 'Settings' list. Then, open the 'Budget Key: New' window by clicking the [New] button. When the Budget Key record has been entered, save it using the [Save] button and close the window by clicking the close box. Then, close the browse window using the close box again.
- Code
- This is a code that identifies the Budget Key, when used for budgeting. You can only use numbers and uppercase letters.
- Name
- Give the key a descriptive name, e.g. "SALES." The name is shown in the "Budget Keys: Browse" window. Ideally, the Name should include a reminder of the number of periods (i.e. the number of rows used in the grid, usually 12 for monthly periods or four for quarterly periods) because Budget records should have the same number of periods as the Budget Keys they use.
- Sum
- FirstOffice will fill in this field automatically with the sum of the monthly or quarterly key values.
- Value
- Enter the monthly or quarterly key values.
Calculation Formulae
You can use this setting to define formulae that you can then use in Autotransactions.Calculation Formulae - Entering a Calculation Formula
Double-click 'Calculation Formulae' in the 'Settings' list. A list of existing Calculation Formulae appears. Click [New] in the Button Bar to enter a new record, or [Duplicate] to create a new record that is based on an existing one. When you have entered the Formula, save it using the [Save] button and close the window by clicking the close box. Then, close the browse window using the close box again.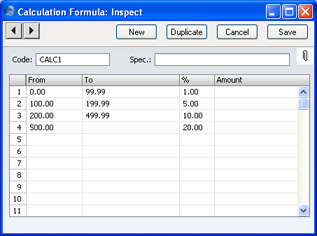
- Enter a unique Code by which the Formula can be identified. This can consist of up to 12 alphanumeric characters. Do not use a code that could be mistaken for a formula (e.g. do not use a code of a number followed by a % sign such as "10%" or "+10%").
- Assign a descriptive name to the Formula, to be shown in the 'Calculation Formulae: Browse' window.
- Use the grid area to draw up the Formula. This can use any combination of percentages (entered in the % column) and fixed values (entered in the Amount column).
The example in the illustration above takes an amount and calculates from it a figure based on a graduated percentage scale, in a similar manner to income tax calculations. It functions by adding the following figures together:
- 1% of the first 99.99 of any amount
- 5% of the next 99.99
- 10% of the next 299.99
- 20% of any remaining amount.
- 5% of the next 99.99
- 1% of the first 99.99 of any amount
Calculation Formulae - Using a Calculation Formula in an Autotransaction
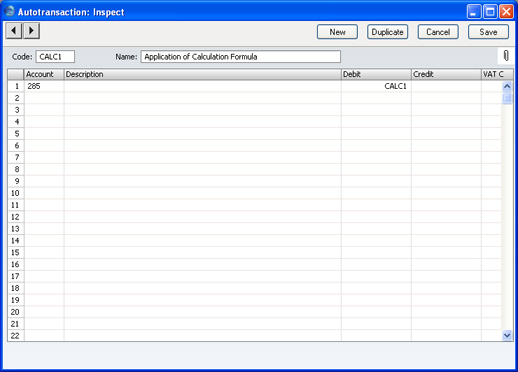
You should attach a Calculation Formula to the Debit or Credit fields of an Autotransaction as follows. If you attach it to the Debit field of the Autotransaction, the Formula will be applied to the value entered in the previous row of the Transaction and the result placed in the Debit field of the Transaction. If you enter the Formula in the Credit field of the Autotransaction, the result will be placed in the Credit field of the Transaction.In the illustration below, the code of the example Formula shown above has been entered to the Debit field of an Autotransaction:
Calculation Formulae - Calculation Formulae in use
When you enter a Transaction, begin by entering the Account code for the relevant expense category, and the amount. On the second row, enter the code of the Autotransaction in the Account field.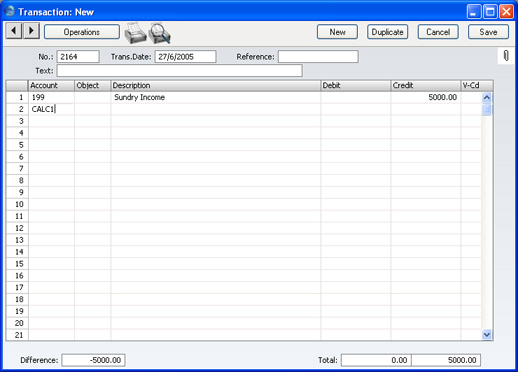
Control Accounts
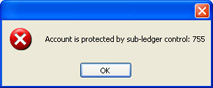
Use this setting to specify the Accounts that are to be part of the sub-ledger Control Accounts feature. You can activate this feature in the Sales and Purchase Ledgers using the Sub-ledger Checking check boxes on the 'Debtors' or 'Creditors' cards of the Account Usage S/L and Account Usage P/L settings respectively.The feature prevents you from posting to the specified Control Accounts manually from the Transaction register in the Nominal Ledger. Instead, you will only be able to post to these Accounts (such as, on the Sales Ledger side, Debtor Accounts) from the sub-ledger (i.e. from Invoices or Receipts in the Sales Ledger). If you try to post to a controlled Account directly from the Nominal Ledger (using the Transaction register) you will be given an alert message.
You can use this feature, for example, to ensure that Receipts are received in the Sales Ledger rather than by journal in the Nominal Ledger. Using the Nominal Ledger for this purpose is incorrect because the Receipt cannot be allocated against the appropriate Invoices. The feature also removes the risk of posting accidentally to your Debtor Account in Nominal Ledger Transactions.
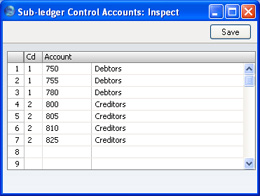
You must list every Account that you want to be part of the sub-ledger control feature (i.e. the Accounts which are not to be used in the Transaction register) in this setting, including the Debtor and Creditor Control Accounts that you have specified on the 'Debtors' or 'Creditors' cards of the Account Usage S/L and P/L settings respectively. To do this, double-click 'Control Accounts' in the 'Settings' list. The 'Sub-ledger Control Accounts: Inspect' window is shown.
For each row, use the Code field to enter an Account Category. Two Account Categories are valid: 1 for accounts receivable (debtors), and 2 for accounts payable (creditors). In the Account field, enter the Account Number of the Control Account that you do not want to be used in the Nominal Ledger. Use 'Paste Special' if necessary. The text in the Type field is entered by the program, depending on the Account Category chosen.
If you try to enter or change a Transaction posting to a protected Account, you will be given the following message:
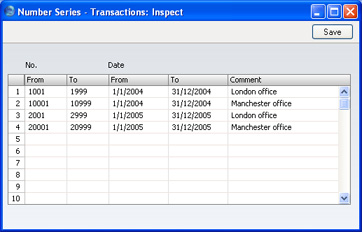
Number Series - Transactions
Each record in the Transaction register has its own unique identifying number, based on a sequential series. When you enter a new Transaction, the next number in the series will be used. If required, you can have a number of such sequences running concurrently, perhaps representing different years or different departments.Use this setting to define these sequences, or Number Series. The different series should not overlap. If you do not define any Number Series, Transaction Numbers will start at 1 and continue consecutively.
When you enter a Transaction, the next number in the first Number Series entered to this setting will be used as a default; change to the next number in any other Number Series using 'Paste Special'.
On double-clicking 'Number Series - Transactions' in the 'Settings' list, the following window appears:
Presentation of Balances
Internally, FirstOffice interprets a Credit entry as a value that is subtracted from an account balance, while a Debit entry is added. Assets and costs are therefore stored as positive values, while liabilities, equity and incomes are negative.These internal calculation and storage methods are often impractical when it comes to displaying balances in reports on the screen or on paper. Therefore, FirstOffice has a default setting for displaying balances, whereby some values are inverted, e.g. incomes, liabilities and equity are shown as positive values in reports. There are, however, many different accounting conventions in this world, and you are therefore given the option to change the default settings. You may have your own standard, or you may wish to exchange data with other accounting systems using conventions other than FirstOffice's default method.
It is not unusual for the board, the bank, auditors, and tax authorities to request different presentations of the company's figures. With FirstOffice's flexible method for presentation, you can solve this easily by changing the settings of Presentation of Balances. This can be done any time, e.g. between printing two reports of the same kind.
Open the 'Presentation of Balances' window by double-clicking 'Presentation of Balances' in the 'Settings' list.
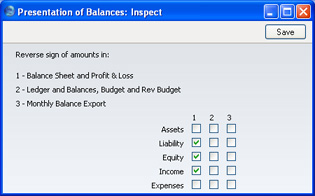
A checked box indicates that the field will be presented with the sign opposite to the internal representation. An empty box means that FirstOffice's internal sign will be used. Internally, FirstOffice regards all debits as positive numbers, and all credits as negative numbers.
The default setting is that values for Assets, Liabilities and Equity follow the internal values, while Revenues and Costs are presented with the opposite sign.
Check the boxes in the window to select your settings.
Confirm your changes by clicking [Save] or revert to the previously saved setting by clicking [Cancel].
Report Settings
The appearance and format of some Nominal Ledger reports can be changed to suit your specific requirements. This is known as changing the report's definition. The reports for which this facility is available are the Balance Sheet, Key Financial Ratios, Profit & Loss Report and VAT Report.To change a report definition, first select 'Settings' from the File menu and double-click 'Report Settings' in the subsequent list. Then, highlight a report name in the list on the left-hand side of the 'Report Settings' window and click the [Definition] button. The subsequent definitions windows are described on the pages describing the Balance Sheet, Key Financial Ratios, Profit & Loss Report and VAT Report.
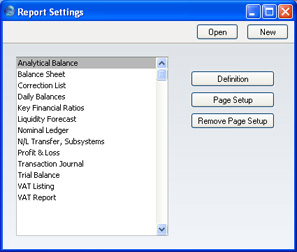
When you have finished working with the 'Report Settings' window, close it by clicking the close box.
- Page Setup, Remove Page Setup
- The [Page Setup] button allows you to set the page size, number of copies and other printer options for the highlighted report. These settings will be used whenever the report is printed. Windows users can also use this function to choose the printer on which the report is to be printed. Click the [Remove Page Setup] button to revert to standard.
Sub Systems
The integration between FirstOffice's different modules means that Nominal Ledger Transactions can be generated automatically from other ledgers and modules ('Sub Systems'). For example, approving an Invoice in the Sales Ledger can cause the automatic generation of a Nominal Ledger Transaction debiting a Debtor Account and crediting a Sales Account and, if appropriate, a VAT Account.This setting controls when such automatic generation of Transactions is to be activated, and from which sub systems. Double-click 'Sub Systems' in the 'Settings' list to open the following window:
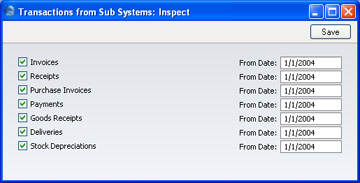
This function is particularly useful at the transfer to FirstOffice from another accounting system, when it is necessary to enter opening balances to FirstOffice. If an overall opening balance has been entered to the Debtor Account for example, any Invoices transferred from the old system and entered as Sales Ledger opening balances should not generate Transactions posting to that Account as well.
It is therefore recommended that the check boxes be switched on according to your requirements, and for each a date entered which is later than the Transaction Date used for all your opening balance transactions. This will ensure that these will not be posted to the Nominal Ledger, and that there is no danger of forgetting to switch the check boxes on when new transactions are entered.
Transaction Settings
This setting contains some miscellaneous options controlling the behaviour of various aspects of the Transaction screen.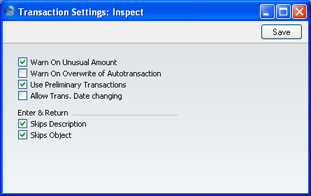
- Warn on Unusual Amount
- When you define Accounts using the Account register in the System module, you should specify whether each Account will normally be used on the credit side of a transaction, the debit side or both. In the case of Accounts that are normally used on one side only (for example, debit), a warning can be made to appear if you try, in the example, to credit the Account when entering a Transaction. The warning will not prevent the posting from taking place. If you would like this warning to appear, switch this option on.
- Warn on Overwrite of Autotransaction
- Check this box if you want FirstOffice to issue a warning if you try to alter anything, for example an Account number, when you use an Autotransaction.
- Use Preliminary Transactions
- This option allows Nominal Ledger Transactions to remain fully editable even after they have been saved. If you are using this feature, you can restrict its scope using the No Preliminary Transactions field in the Locking setting in the System module. If you enter a date in this field, only Transactions whose Transaction Date is later than this date will be modifiable (i.e. they will be 'Preliminary' Transactions); Transactions whose Transaction Date is on or before that date will not be modifiable (i.e. they will be of 'actual' status).
- When you print reports for a month that is not locked, the report heading will state that the report contains Preliminary Transactions.
- You must lock months chronologically. You cannot close transactions for June while May is still open. (When a month is locked for Preliminary Transactions it is, however, still open for normal Transaction entry.)
- When you print reports for a month that is not locked, the report heading will state that the report contains Preliminary Transactions.
- Allow Trans. Date changing
- Invoices and Receipts contain separate fields for registration date and transaction date. In some countries, these dates can be different, while in other countries they have to be the same. For example, in an Invoice, in some countries, the Invoice Date can be different to the Transaction Date. This can mean there will be a difference between your Sales and Nominal Ledgers, visible when comparing the Aged Debtor report with the Debtor Account. Use this option if you would like to allow different registration and transaction dates.
- Enter and Return
- When pressing the Return or Enter key, you can determine whether the cursor is to skip over the Object and Description fields in each row of the Transaction screen using these check boxes. If so, you can still move the cursor into those fields using the mouse or the Tab key if necessary.
VAT Codes
In order to comply with VAT regulations it is necessary to differentiate between domestic, EU and external trade. To solve this, FirstOffice makes use of VAT Codes, whereby any number of VAT Codes with different accounting specifications can be defined.
VAT Codes can be assigned to Customers, Suppliers and also to individual Sales and Purchase Accounts. The VAT Codes help FirstOffice to use the correct VAT percentage, to control the Nominal Ledger accounting and to provide VAT statistics. The standard VAT Codes used in the UK are supplied with the program.
To edit the VAT Codes, double-click 'VAT Codes' in the 'Settings' list. The following window appears:
To edit a VAT Code, simply click in the field to be changed and overtype the existing entry. To add a new VAT Code record, scroll down to the first blank line. The information required for each VAT Code record is as follows: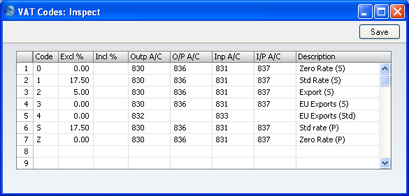
- Code
- Each VAT Code record should be identified by a unique Code.
- Excl %
- Specify the percentage to be applied to a figure that excludes VAT in order to calculate the VAT amount.
- You must specify an Input or Output Account if the percentage is zero, as shown in the illustration above.
- You must specify an Input or Output Account if the percentage is zero, as shown in the illustration above.
- Incl %
- Specify the percentage to be applied to a figure that includes VAT in order to calculate the VAT amount.
- Outp A/C
- Paste Special
Account register, Nominal Ledger/System module
- Specify here the VAT Outputs Account to be credited whenever this VAT Code is used in a sales transaction.
- In any Nominal Ledger Transaction resulting from Purchase Invoices from the EU Zone, VAT is debited to the Input Account of the selected VAT Code and credited to the Output Account. Therefore, it is recommended that you use a dedicated VAT Code for VAT on EU Acquisitions, with an Output Account that is not used in any other VAT Code.
- In any Nominal Ledger Transaction resulting from Purchase Invoices from the EU Zone, VAT is debited to the Input Account of the selected VAT Code and credited to the Output Account. Therefore, it is recommended that you use a dedicated VAT Code for VAT on EU Acquisitions, with an Output Account that is not used in any other VAT Code.
- O/P A/C
- Paste Special
Account register, Nominal Ledger/System module
- This field is only used if you are using the Post Receipt VAT and/or Post Prepayment VAT options on the 'Debtors' card of the Account Usage S/L setting. Users of the Cash VAT scheme in the UK will need to use both options, users resident in the Baltic States may only need to use the Post Prepayment VAT option, and users in Poland may only need to use the Post Receipt VAT option.
- If you are using the Post Receipt VAT option, your output VAT liability is calculated from your Receipts, not from your Invoices. In this case, the Outp A/C will be treated as a preliminary VAT Output Account, to be credited whenever an Invoice is approved. When the Invoice is paid, the Transaction from the Receipt will include an extra VAT element, in which the VAT is moved from the Outp A/C to the O/P A/C. This therefore becomes the final VAT Output Account. The Post Receipt VAT option also posts VAT from On Account VAT Receipts (Receipts with no Invoice Number or Prepayment Number).
- If you are using the Post Prepayment VAT option, VAT will also be posted from Prepayment Receipts (Receipts with no Invoice Number but with a Prepayment Number). VAT will be credited to the O/P A/C and debited to the Prepayment VAT Account specified in the Account Usage S/L setting.
- In all cases, if a particular VAT Code does not have an O/P Account, the VAT (C/A) Account from the 'Debtors' card of the Account Usage S/L setting will be used instead.
- If you are using this feature, don't forget to alter the definition of the VAT Report so that it uses this Account and not the Outp Account.
- If you are using the Post Receipt VAT option, your output VAT liability is calculated from your Receipts, not from your Invoices. In this case, the Outp A/C will be treated as a preliminary VAT Output Account, to be credited whenever an Invoice is approved. When the Invoice is paid, the Transaction from the Receipt will include an extra VAT element, in which the VAT is moved from the Outp A/C to the O/P A/C. This therefore becomes the final VAT Output Account. The Post Receipt VAT option also posts VAT from On Account VAT Receipts (Receipts with no Invoice Number or Prepayment Number).
- Inp A/C
- Paste Special
Account register, Nominal Ledger/System module
- Specify here the VAT Inputs Account to be debited whenever this VAT Code is used in a purchase transaction.
- I/P A/C
- Paste Special
Account register, Nominal Ledger/System module
- This field is only used if you are using the Post Payment VAT and/or Post Prepayment VAT options on the 'Creditors' card of the Account Usage P/L setting. This will be the case for users in Latvia and for users of the Cash VAT scheme in the UK. Users in Poland may only need to use the Post Payment VAT option.
- If you are using the Post Payment VAT option, the value of the input VAT that you can reclaim is calculated from your Payments, not from your Purchase Invoices. In this case, the Inp A/C will be treated as a preliminary VAT Input Account, to be debited whenever a Purchase Invoice is approved. When the Purchase Invoice is paid, the Transaction from the Payment will include an extra VAT element, in which the VAT is moved from the Inp A/C to the I/P A/C. This therefore becomes the final VAT Input Account.
- If you are using the Post Prepayment VAT option, VAT will also be posted from Prepayment Payments (Payments with no Invoice Number but with a Prepayment Number). VAT will be debited to the I/P A/C and debited to the On Account VAT Account specified in the Account Usage P/L setting.
- In all cases, if a particular VAT Code does not have an I/P Account, the Prepayment VAT Account from the 'VAT' card of the Account Usage P/L setting will be used instead.
- If you are using this feature, don't forget to alter the definition of the VAT Report so that it uses this Account and not the Inp Account.
- If you are using the Post Payment VAT option, the value of the input VAT that you can reclaim is calculated from your Payments, not from your Purchase Invoices. In this case, the Inp A/C will be treated as a preliminary VAT Input Account, to be debited whenever a Purchase Invoice is approved. When the Purchase Invoice is paid, the Transaction from the Payment will include an extra VAT element, in which the VAT is moved from the Inp A/C to the I/P A/C. This therefore becomes the final VAT Input Account.
- Description
- The description entered here will appear in the 'Paste Special' list, so should be detailed enough to ensure the correct VAT Code is always chosen.
- Code