Introduction to the Payment Register
Use this register to issue Payments to creditors. Keeping the Purchase Invoice and Payment registers up to date will allow you to operate an efficient system for paying your Suppliers and will help you to predict your cash flow accurately.Entering a Payment
In the Purchase Ledger module, click the [Payments] button in the Master Control panel. The 'Payments: Browse' window is opened, showing Payments already entered.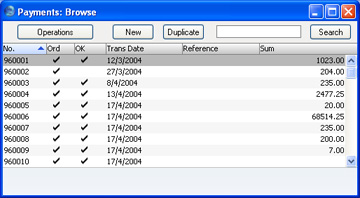
To enter a new Payment, click [New] in the Button Bar or use the Ctrl-N (Windows and Linux) or ⌘-N (Macintosh) keyboard shortcut. Alternatively, highlight a Payment similar to the one you want to enter and click [Duplicate] on the Button Bar.
The 'Payment: New' window is opened, empty if you clicked [New] or containing a duplicate of the highlighted Payment.
The principle for entering a Payment is that you know the following:
- How much has actually been withdrawn; and
- any extra fees charged by the bank.
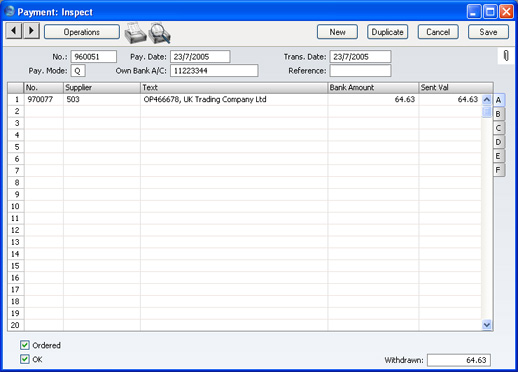
- No.
- Paste Special
Select from another Number Series
- The serial number of the Payment: FirstOffice will enter the next unused number from the number sequence specified in the Number Series Defaults setting or from the first record in the Number Series - Payments setting. You may change this number, but not to one that has already been used.
- Pay. Date
- Paste Special
Choose date
- The date when you want the Payment to be executed.
- Once you have Ordered a Payment, you can still change the Payment Date. After approval, however, no further changes are possible.
- Once you have Ordered a Payment, you can still change the Payment Date. After approval, however, no further changes are possible.
- Trans. Date
- The date of the Nominal Ledger Transaction resulting from this Payment. This date is always the same as the Payment Date and cannot be changed independently.
- Pay. Mode
- Paste Special
Payment Modes setting, Sales/Purchase Ledger
- The Payment Mode is the method of payment (e.g. cheque, credit card or cash). It determines the Nominal Ledger Account that will be credited by the Payment.
- On a single Payment record it is possible to enter payments to different Suppliers against different Invoices. It is also possible to enter payments across Payment Modes: specifying a Payment Mode for any of the individual payments in the grid will override that entered here.
- On a single Payment record it is possible to enter payments to different Suppliers against different Invoices. It is also possible to enter payments across Payment Modes: specifying a Payment Mode for any of the individual payments in the grid will override that entered here.
- Own Bank A/C
- The number for the bank account you want to use for the Payment. This information will be brought in from the Payment Mode record.
- Reference
- You can use this field if you need to identify the Payment by any means other than the Payment Number (e.g. a bank reference in the case of credit transfers or BACS payments).
- The Reference is shown in the 'Payments: Browse' window, allowing you to search for a Payment with a particular Reference. This Reference will be copied to the Reference field of any Nominal Ledger Transaction generated from this Payment.
If you need FirstOffice to print a remittance advice and/or a cheque, separate such forms will be printed for each Supplier included in the Payment record.
Each record in the Payment register results in one Nominal Ledger Transaction, with bank or other institution as credit Account (taken from the Payment Mode).
You can also bring Purchase Invoices into a Payment by opening the 'Purchase Invoices: Browse' window, selecting a range of Invoices by clicking while holding down the Shift key, and then dragging them to the Invoice No field in the first empty Payment row. You can also copy a list of Invoice Numbers from a spreadsheet or word processor and paste them in the Invoice No field in the first empty row.
Flip A
- No.
- Paste Special
Open, approved Purchase Invoices, Purchase Invoice register
- The number of the Purchase Invoice being paid. When you enter an Invoice Number, if the Invoice qualifies for an early settlement discount, a discount row will be inserted automatically, together with a suggested discount amount. This is calculated using the formula specified for the appropriate Payment Terms record.
- Note that when you use 'Paste Special', only unpaid Purchase Invoices will appear in the selection list. However, Purchase Invoices against which an unapproved Payment has been entered are treated as unpaid (unless the Payment's Ordered box is checked) and thus will be listed. Sorting the 'Paste Special' selection by Supplier will allow you to find the Invoice that is being paid quickly and easily.
- If the Payment is a Prepayment or On Account Payment to a Supplier with whom you have an account (marked using the On Account box on the 'Company' card of the Customer record for the Supplier) for which an Invoice has not yet been received, leave this field blank and enter a Prepayment Number field on flip D instead. This is fully described on the On Account Payments and Prepayments page.
- Note that when you use 'Paste Special', only unpaid Purchase Invoices will appear in the selection list. However, Purchase Invoices against which an unapproved Payment has been entered are treated as unpaid (unless the Payment's Ordered box is checked) and thus will be listed. Sorting the 'Paste Special' selection by Supplier will allow you to find the Invoice that is being paid quickly and easily.
- Supplier
- Paste Special
Suppliers in Customer register
- Default taken from Purchase Invoice
- Entered by FirstOffice when you enter an Invoice Number.
- Entered by FirstOffice when you enter an Invoice Number.
- Text
- The Supplier's Name is entered by FirstOffice, from the Customer register. You may change this if you wish. It will appear in the Text field of the Nominal Ledger Transaction.
- Bank Amount
- Default taken from
Sent Value
- The amount paid out of your bank account. Usually, this will be the same as the Sent Value (below): do not use this field to subtract bank fees from the amount paid: the Bank Fee field on flip F is provided for this purpose.
- Sent Val
- Default taken from
Outstanding amount on Invoice
- The amount paid against the Purchase Invoice. You can change the default figure in the event of partial payments or overpayments.
- Open Inv. Value
- The outstanding amount of the Invoice being paid. This field cannot be changed.
- PInv Val
- The amount being paid against the Purchase Invoice.
- Bank Reference
- This field is used in Estonia. Please refer to your local FirstOffice representative for details.
- To Bank A/C
- The number of the Supplier's bank account receiving the Payment is brought in from the 'Identifiers' card of the Purchase Invoice or from the 'Company' card of the Customer record for the Supplier.
- P. Mode
- Paste Special
Payment Modes setting, Sales/Purchase Ledger
- Enter a Payment Mode, if different from the Payment Mode entered in the header. This allows different payments on the same Payment to be credited to different Bank Accounts.
- Cheque No.
- Record the number of the cheque used for the Payment here.
- If you print a cheque using the Payment Forms document, the cheque number will be recorded here automatically.
- If you print a cheque using the Payment Forms document, the cheque number will be recorded here automatically.
- Prepay. No
- If the payment is a Prepayment (i.e. one where it is not possible to specify an Invoice Number on flip A), you should enter a Prepayment Number here. This can be a number of your own generation or, preferably, a reference given to the prepayment by the Supplier.
- When you receive an Invoice to be set against the Prepayment, you can connect the two using the 'Connect to Prepayment' function on the Operations menu of the Purchase Invoice screen. This is fully described on the On Account Payments and Prepayments page. If a deposit or prepayment exists without a Prepayment Number, it will not be made available to that function and connecting it to an Invoice will be more difficult. Prepayments that do not have a Prepayment Number will not be shown in the Prepayment History report.
- VAT Val, V-Cd
- These fields are provided to satisfy a requirement of users in Latvia, where it can be necessary to post VAT on Payment. This is also the case for users of the Cash VAT scheme in the UK and for some users in Poland. If you are using the Post Payment VAT option in the Account Usage P/L setting, the VAT Code and VAT Amount will be brought in to these fields automatically when you enter a Purchase Invoice Number on flip A (the VAT Code comes from the first row of the Invoice). When you approve and save the Payment, the VAT amount will be moved from the temporary VAT Input Account to the final one (the I/P Account), as specified in the VAT Codes setting in the Nominal Ledger.
- The Post Payment VAT option also adds a VAT element to On Account Payments. Once again, the I/P Account for the VAT Code is debited and the Input Account for the VAT Code is credited with the VAT amount.
- Take care with these fields when entering On Account Payments. As On Account Payments do not have an Invoice Number or a Prepayment Number, you must enter a VAT Code manually if you are using the Cash VAT scheme (i.e. if you are using the Post Payment VAT option). The VAT Value will then be calculated from the Sent Value. The Nominal Ledger Transaction resulting from the Receipt will not have a VAT element if the VAT Code or VAT Value is blank.
- If you would like VAT to be posted from Prepayments, you should check the Post Prepayment VAT box on the 'Creditors' card of the Account Usage P/L setting. When you enter a Prepayment Number (on flip D), the Domestic VAT Code from the Supplier or from the 'VAT' card of the Account Usage P/L setting will be placed here as a default when you enter the Prepayment Number. The VAT Value will then be calculated from the Sent Value. The VAT Value will be credited to the On Account VAT Account and debited to the I/P Account for the VAT Code.
- In all cases, if a particular VAT Code does not have an I/P Account, the Prepayment VAT Account from the 'Creditors' card of the Account Usage P/L setting will be used instead.
- The Post Payment VAT option also adds a VAT element to On Account Payments. Once again, the I/P Account for the VAT Code is debited and the Input Account for the VAT Code is credited with the VAT amount.
- Bank Fee
- Enter any fee charged by the bank for this payment. Bank fees will be debited to the Bank Fee Account specified on the 'Exchange Rate' card of the Account Usage P/L setting. The Sent Value plus the Bank Fee will be credited to the Bank Account specified in the Payment Mode.
- Note that this field allows you to specify a Bank Fee for each row (or for a single particular row) on the Payment, remembering that each row can have a different Payment Mode and therefore a different credit (Bank) account. If you want to record a single Bank Fee for the entire Payment, use the 'New Fee' function on the Operations menu.
- Ordered
- The Ordered and OK check boxes are provided to allow for the delay between the issuing of a Payment and the clearing of the funds from your company's bank account. Checking the Ordered box indicates that you have issued a Payment, while checking the OK box indicates that the funds have been cleared. You must therefore check the Ordered box before the OK box.
- When you save a Payment with its Ordered box checked, the Invoice being paid is no longer treated as open, even if the OK box is not checked.
- If, once a Payment has been issued, it transpires that the funds are not cleared from your company's bank account (perhaps because the cheque bounced or was lost), highlight each row in the Payment in turn by clicking the row number. Then, press the Backspace key. A red line will be drawn through the row, re-opening the Purchase Invoice.
- When you save a Payment with its Ordered box checked, the Invoice being paid is no longer treated as open, even if the OK box is not checked.
- OK
- Approve a Payment by clicking this check box. On clicking [Save] to save the Payment, if so determined in the Sub Systems setting in the Nominal Ledger, a Transaction will be generated crediting the Bank Account specified for the Payment Mode and debiting the Creditor Control Account of the Invoice being paid.
- You can use Access Groups to control who can approve Payments. To do this, deny access to the 'OKing Payments' Action.
- References in these web pages to approved Payments are to Payments whose OK check box has been switched on.
- You can use Access Groups to control who can approve Payments. To do this, deny access to the 'OKing Payments' Action.
- Withdrawn
- The sum of the Bank Amounts: the total for this Payment.
Entering a Payment - Example
We shall now show how to enter a Payment with the help of a few examples.Open the Payment register using the button in the Master Control panel. When the 'Payments: Browse' window appears, click the [New] button. The 'Payments: New' window is shown with a Payment Number already entered. Press Enter to move the insertion point to the Payment Date field. Enter the date when you want the Payment to go out.
The next field is Payment Mode. You can choose between the various modes you have entered in Settings. FirstOffice will automatically enter the details such as the Bank account number.
Press Return again to move the insertion point to the Number field, the top left-hand field in the Payment rows grid. For each line, enter the Purchase Invoice Number from your Purchase Ledger. Ctrl-Enter (Windows and Linux) or ⌘-Enter (Macintosh) will activate the 'Paste Special' function, showing all open (unpaid) Supplier invoices.
Select a Purchase Invoice by double-clicking. Press Return to bring in information such as the Supplier Number and Name. Enter the amount you want to pay. Check the Ordered box to order a payment. When this is done you can print a Remittance Advice by using the 'Print Forms' function on the Operations menu or by clicking the Printer icon. This can also serve as your documentation for the person writing the cheques. If necessary, you can design the Remittance Advice form to incorporate a cheque.
Reconciling and Approving Payments
When paying Purchase Invoices by cheque, there will be a delay between the ordering of the Payment and the clearing of the funds from your company's bank account.In such a situation, when you issue the cheque, enter the Payment in the usual way and check the Ordered box but not the OK box. Then click [Save]. This will ensure the Purchase Invoice(s) being paid will no longer be treated as open (due). You can order several Payments at once by highlighting them in a browse window and selecting 'Order' from the Operations menu.
When you receive a statement from the bank, you can reconcile it with the ordered Payments. You should approve Payments that agree with your bank statement by clicking the OK check box and saving. If so defined in the Sub Systems setting in the Nominal Ledger, Nominal Ledger Transactions will be generated, debiting the Creditor Control Account of the Invoice(s) being paid and crediting the Bank Account specified in the Payment Mode. You can approve several Payments at once by highlighting them in the 'Payments: Browse' window and selecting 'OK' from the Operations menu.
! | After approving a Payment, it cannot be altered. |
If an Ordered Payment is not included on the statement (perhaps because the cheque bounced or was lost), highlight each row in the Payment in turn by clicking the row number. Then, press the Backspace key. A red line will be drawn through the row, re-opening the Purchase Invoice. When you approve the Payment, rows with red lines will not be included in the resulting Nominal Ledger Transaction.
Printing Payment Forms and Cheques
It is often necessary to print certain documents associated with the Payment. These may be remittance advices, cheques or documents used to gain internal authorisation for the Payment.If you want to print a remittance advice and a cheque together, you can do so, providing some set-up work has been carried out in advance. Follow this procedure:
- Using the Form register in the System module, design the remittance advice and the cheque and name them "REM_ADVICE" and "CHEQUE". Use the 'Properties' function on the Operations menu to assign a Document Type of "Payment" (in the former case) and "Payment Cheques". A sample "REM_ADVICE" is supplied with FirstOffice: this can be modified to suit your requirements. Full instructions for using the Form register can be found here.
- Select the Purchase Ledger using the [Select Module] button in the Master Control panel or the Ctrl-0 (Windows and Linux) or ⌘-0 (Macintosh) keyboard shortcut.
- Click [Documents] in the Master Control panel. The 'Documents' list window is opened showing a list of available documents. Highlight 'Payment Forms'.
- Select 'Define Document' from the Operations menu.
- Use the Sequence column in the subsequent window to determine the order in which the Forms will be printed. If, for example, you need a remittance advice to be printed first, on the first line enter "1" as the Sequence Number and "REM_ADVICE" as the Form (you can use 'Paste Special' from the Form field to ensure the spelling is correct). On the second line, enter "2" as the Sequence Number and "CHEQUE" as the Form. You can, of course, specify on a third line that an internal authorisation document is also to be printed.
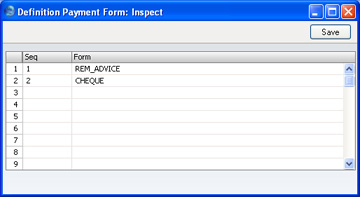
- Click [Save] to save the Payment Form definition. From now on, whenever the Payment Form is printed, the remittance advice and the cheque will be printed.
You can print the Payment Form using one of three methods:
- When viewing an individual Payment record, by selecting 'Print Form' from the Operations menu.
- When viewing an individual Payment record, by clicking the Printer icon. If you want to print to screen, click the Preview icon.
- By selecting 'Documents' from the File menu or by clicking the [Documents] button in the Master Control panel and selecting 'Payment Forms' in the subsequent list.
If you are not using the No Test Printout option in the Configuration setting in the System module, an unordered Payment will be printed with the phrase "Test Printout" diagonally across the page as a watermark.
Operations Menu

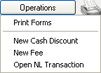
Operations Menu - Order
This command is available on the Operations menu only from the 'Payments: Browse' window. It allows you to order a Payment and is therefore the equivalent of checking the Ordered box in a Payment record. You can also select several Payments in the 'Payments: Browse' window (hold down the Shift key to select a range of Payments in the list) and order them all at once.Operations Menu - OK
This command is available on the Operations menu only from the 'Payments: Browse' window. It allows you to approve a Payment and is therefore the equivalent of checking the OK box in a Payment record. You can also select several Payments (hold down the Shift key to select a range of Payments in the list) and approve them all at once. Remember that, if so defined in the Sub Systems setting in the Nominal Ledger, this action causes Transactions to be created for each Payment in the selection and that therefore once it has been carried out you will no longer be able to modify those Payments.You can use Access Groups to control who can approve Payments. To do this, deny access to the 'OKing Payments' Action.
Operations Menu - Print Forms
Use this function to print any documents associated with the Payment, such as remittance advices, cheques or documents used to gain internal authorisation for the Payment. Please refer to the Printing Payment Forms and Cheques page for full details of this function.You can print unordered Payments any number of times, but once Ordered or approved they can only be printed once. This prevents the accidental issuing of duplicate cheques, should cheques be incorporated into your payment forms.
Operations Menu - New Cash Discount
In normal circumstances, when you pay a Purchase Invoice, a settlement discount will be calculated automatically when you enter the Payment. This discount depends on the Payment Terms of the Invoice and the Payment Date. The 'New Cash Discount' function is provided for more individual circumstances.If you have a Purchase Invoice for which you want to deduct a cash discount, start by entering the Purchase Invoice number in the left-hand column. Change the Sent Value to the amount less discount. Press Tab or Return (but make sure the cursor is in the same row) and then select 'New Cash Discount' from the Operations menu. A new row will be created, containing the phrase "Cash Disc" and the deducted amount, calculated by FirstOffice. You can change this figure as appropriate. When the Nominal Ledger Transaction is created, the Cash Discount Account specified on the 'Creditors' card of the Account Usage P/L setting will be credited.
Operations Menu - New Fee
You should use this function when you need to pay a single bank charge for the whole Payment. If you need to pay separate bank charges for each Payment row, use the Bank Fee field on flip F.Start by entering the Purchase Invoice number in the left-hand column. Then select 'New Fee' from the Operations menu. A new row will be created, containing the phrase "Fee". Enter the Bank Fee in the right-hand Amount field. When the Nominal Ledger Transaction is created, the Bank Fee Account specified on the 'Exchange Rate' card of the Account Usage P/L setting will be debited. The Sent Value plus the Bank Fee will be credited to the Bank Account from the Payment Mode, while the Sent Value will be debited to the Creditor Account.
Operations Menu - Open NL Transaction
When you approve and save a Payment, if so defined in the Sub Systems setting in the Nominal Ledger, a Nominal Ledger Transaction will be created. This function allows you to view that Transaction.On selecting the function, the Transaction will be opened in a new window.
On Account Payments and Prepayments
You can use On Account Payments and Prepayments when you issue payments to Suppliers without reference to specific Invoices (usually before you have received the Invoices). You can enter these payments to the Payment register without specifying a Purchase Invoice Number on flip A. In the case of a Prepayment, specify a Prepayment Number on flip D instead. In the case of an On Account Payment, leave both the Invoice Number and the Prepayment Number blank. Please click for full details of Prepayments and On Account Payments.On Account Payments and Prepayments - Prepayments
You will usually use a Prepayment Payment when you have paid a deposit to a Supplier against a Purchase Order, before you have received an Invoice for that deposit.In the Customer records for every Supplier to whom you are likely to pay deposits, switch on the On Account check box on the 'Company' card. Then specify the separate control or suspense Account number on the 'Exchange Rate' card of the Account Usage P/L setting, using the On Account A/C field.
When you issue a Prepayment to a Supplier, you should record it in the Payment register. Leave the Purchase Invoice Number blank, and instead, specify a Prepayment Number on flip D. This can be a number of your own generation or, preferably, the number allocated to the pre-payment by the Supplier.
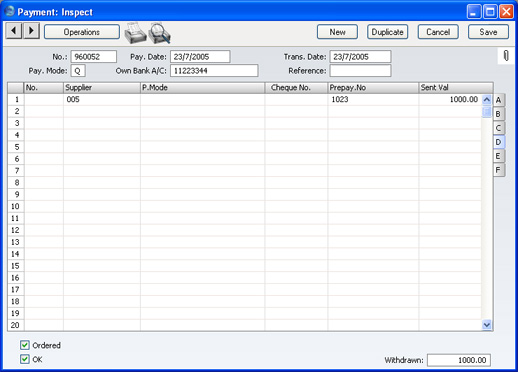
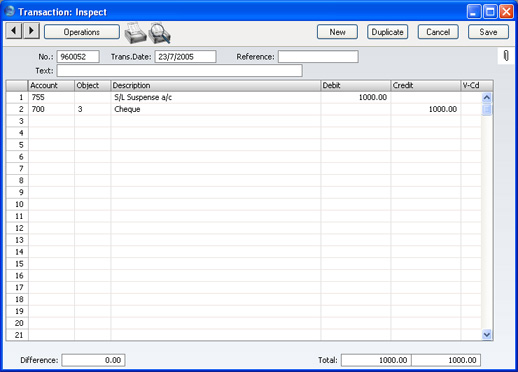
Enter the Invoice to the Purchase Invoice register in the usual way. When you enter the Supplier Number, you will be warned that an open Prepayment (i.e. one that has not yet been allocated to an Invoice) exists in the Supplier's name. This will remind you to allocate the Prepayment to the Purchase Invoice. Complete the grid area in the usual way.
When you are certain that the Purchase Invoice is complete, select 'Connect to Prepayment' from the Operations menu. A new row is inserted as the first row of the grid area, containing a reference to the Prepayment. Enter the Prepayment Number of the Payment row representing the Prepayment, using 'Paste Special' if necessary to bring up a list of open (unallocated) Prepayments. This list shows open Payment rows with a Prepayment Number and without an Invoice Number. Payment rows that do not have a Prepayment Number or an Invoice Number will not be in this list: please refer to the On Account Payments page for details of allocating these to Purchase Invoices.
Select a Prepayment from the list by double-clicking. The Prepayment Number will be shown in the special Prepayment row. An amount will also be shown. This will be the whole open value of the Prepayment, or the Invoice TOTAL (from the Purchase Invoice header) whichever is the lower. This figure will be debited to the Creditor Account when you approve and save the Purchase Invoice, so the Invoice will be treated as paid to that extent.
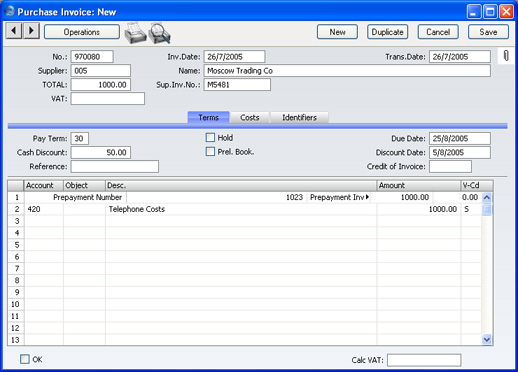
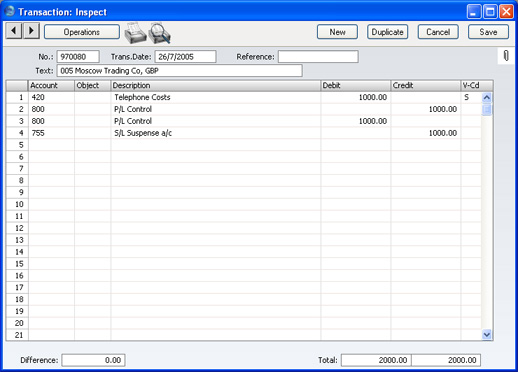
- if the Purchase Invoice value is the same as the whole open value of the Prepayment, the Purchase Invoice is treated as paid and will not appear in the Open Supplier Customer Statement. The Prepayment is fully used up by the Purchase Invoice, so it is no longer regarded as open;
- if the Purchase Invoice value is less than the whole open value of the Prepayment, the Purchase Invoice is treated as paid and will not appear in any reports showing Open Purchase Invoices. The Prepayment is not fully used up by the Purchase Invoice, so the remaining outstanding amount is still regarded as open; or
- if the Purchase Invoice value is more than the whole open value of the Prepayment, the Purchase Invoice is treated as part-paid. The Prepayment is fully used up by the Purchase Invoice, so it is no longer regarded as open.
If you select 'Connect to Prepayment' before the Purchase Invoice is complete (it may be that a late change is required) you can either change the amount shown in the special Prepayment row or you can delete the special Prepayment row and use 'Connect to Prepayment' once again. If you choose the former option, you will be prevented from entering an amount that is greater than the open value of the Prepayment, or greater than the Purchase Invoice total.
! | Ensure the TOTAL of the Purchase Invoice is correct before using 'Connect to Prepayment'. |
If you have used 'Connect to Prepayment' and you are unable to save the Invoice, the probable reason is that the date of the Prepayment is later than that of the Invoice. The date of the Prepayment must be the same as or earlier than that of the Invoice.
On Account Payments and Prepayments - On Account Payments
An On Account Payment is one with no Purchase Invoice Number and with no Prepayment Number. It is possible to connect an On Account Payment to a subsequent Purchase Invoice, but you cannot use the 'Connect to Prepayment' function. Instead, you should first enter and approve the Purchase Invoice without reference to the On Account Payment. You must then register that it has been paid by the On Account Payment. You can do this in a Payment record as a two-step process: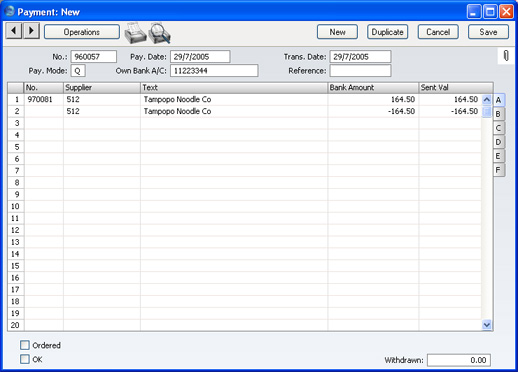
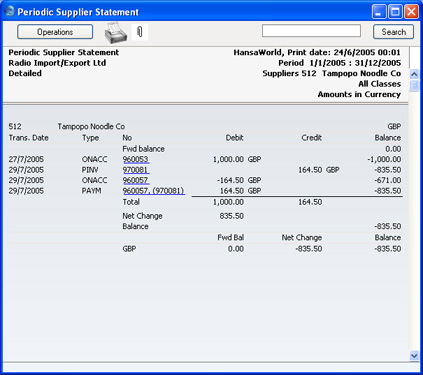
Correcting Mistakes in Payments
Even with the tightest quality control, it is probable that the occasional mistake will be made when entering Payments. Once you have approved a Payment, you cannot change it, but you can correct mistakes easily using the following procedure. It is important that you follow this procedure, to ensure the Supplier's history remains correct.- In the 'Payments: Browse' window, highlight the Payment containing the error.
- Click [Duplicate]. A new Payment record is created, an exact copy of the Payment with the error.
- Insert a minus sign in front of the Sent Value, ensuring the Sent Value figure itself remains unchanged.
- Click the OK check box and save the Payment.
- Enter a new, correct, Payment.