Introduction to the Purchase Invoice Register
The Purchase Invoice register is a record of your company's purchases. Each time you make a purchase, you will receive a Purchase Invoice from the Supplier, which you should enter to the Purchase Invoice register. You will therefore use this register for a number of tasks:- The Purchase Invoice is a record of the payment demanded from your company by the Supplier;
- Unpaid Purchase Invoices in the register provide the basis for your creditor management reports; and
- Each Purchase Invoice can cause a Nominal Ledger Transaction to be created, thus generating the overall purchase and creditor figures in your monthly and yearly management reports. This creation process is automatic, requiring no intervention or work from you.
- Standard Purchase Invoices are received where the goods have been delivered or work carried out before payment has been issued. Payments against such Purchase Invoices should be recorded in the Payment register.
- The Cash Note represents the issuing of a payment at the same time as the work is carried out. When a Cash Note is entered to the Purchase Invoice register, FirstOffice will treat it as having being paid, so there is no need to enter a separate payment record in the Payment register. FirstOffice can also look after the Nominal Ledger implications for you (crediting the Cash Account rather than the Creditor Account).
- A Deposit is the issuing of money before an Invoice has been received. These should be recorded in the Payment register as a Prepayment Payment. These can be allocated to the Invoice when it is received at a later date. Alternatively, they can be entered as Cash Notes in as described in point (2) above.
- Credit Notes are used to correct mistakes in Purchase Invoices, or to cancel Invoices that have been raised in error. They are, in effect, negative Invoices that reduce your overall purchase and creditor figures. Again, FirstOffice can look after these Nominal Ledger implications automatically.
Before you start entering Purchase Invoices, you must ensure you have defined the current financial (accounting) year, using the Fiscal Years setting in the System module. You should also have defined a journal number series for Purchase Invoices using the Number Series - Purchase Invoices setting. Other settings can be adjusted as you go along.
To open the Purchase Invoice register, first ensure you are in the Purchase Ledger module, then click the [Purchase Invoices] button in the Master Control panel. The 'Purchase Invoices: Browse' window is opened, showing Purchase Invoices that have already been entered.
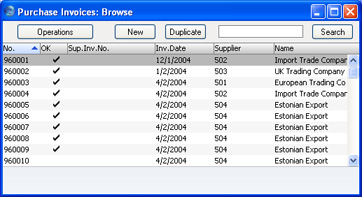
As in all browse windows you can change the sort order by clicking on the column headings. To reverse any sort, simply click once again on the column heading. You can also scroll the list with the scroll bars. Finally, you can search for a record by entering a keyword in the field in the top right-hand corner. FirstOffice will search for the first record matching the keyword in the same column as the selected sorting order.
Entering a Purchase Invoice
To enter a new Purchase Invoice, click [New] in the Button Bar or use the Ctrl-N (Windows and Linux) or ⌘-N (Macintosh) keyboard shortcut. Alternatively, highlight a Purchase Invoice similar to the one you want to enter and click [Duplicate] on the Button Bar.The 'Purchase Invoice: New' window is opened, empty if you clicked [New] or containing a duplicate of the highlighted Purchase Invoice. In the case of the duplicate, the Invoice and Transaction Dates of the new Purchase Invoice will be the same as those in the original Purchase Invoice, and the Supplier Invoice Number will not be copied.
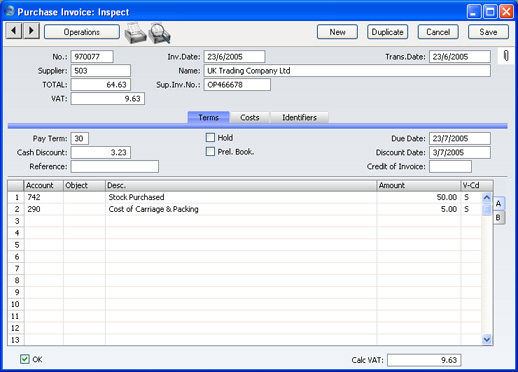

Entering a Purchase Invoice - Header
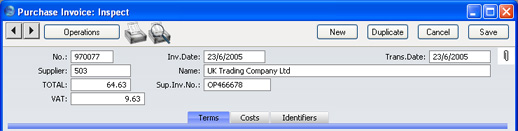
- No.
- Paste Special
Select from another Number Series
- The number of the Invoice in your Purchase Ledger. When you enter a new Purchase Invoice, FirstOffice will enter the next unused number from the number sequence specified in the Number Series Defaults setting or from the first record in the Number Series - Purchase Invoices setting. You may change this number, but not to one that has already been used. If you are working in a multi-user environment, the Invoice Number is assigned when you first save the Invoice.
- Invoice Date
- Paste Special
Choose date
- This date, together with the Payment Terms, will determine when the Invoice will become due for payment. The date of the previous Purchase Invoice entered is used as a default.
- Trans. Date
- Paste Special
Choose date
- The Transaction Date for the Nominal Ledger Transaction. You may thus separate Invoice and Transaction Dates in your ledger. It determines the accounting period for the Invoice.
!
If you enter different Invoice and Transaction Dates, there will be a timing difference between the Purchase and Nominal Ledgers so long as the Invoice remains unpaid. This will be apparent when comparing the Aged Creditors report with the Creditor Control Account.
- Supplier
- Paste Special
Suppliers in Customer register
- Enter the Supplier Number or use the 'Paste Special' function. When you press Return, the Supplier's name, address and other information will be entered into the appropriate fields.
- If there is a Prepayment in the Supplier's name that has not yet been allocated to an Invoice, a warning will appear when you enter the Supplier Number. Prepayments are described here.
- If there is a Prepayment in the Supplier's name that has not yet been allocated to an Invoice, a warning will appear when you enter the Supplier Number. Prepayments are described here.
- Name
- The Supplier's Name is entered after you have entered the Supplier Number.
- TOTAL
- The total amount to pay for this Invoice, including any taxes. Before you can save the Purchase Invoice, this figure must equal one of the following, depending on the Zone of the Invoice:
- Domestic, Inside EU (Post VAT) and Outside EU (Post VAT)
- the sum of the Amounts of the rows plus VAT.
- Inside EU
- the sum of the Amounts of the rows.
- Outside EU
- the sum of the Amounts of the rows. No VAT is calculated in this case.
- The Zone is taken from the Customer record for the Supplier and can be seen on the 'Identifiers' card.
- Domestic, Inside EU (Post VAT) and Outside EU (Post VAT)
- VAT
- Enter the total VAT amount from the Purchase Invoice.
- The purpose of this field is to provide a control figure. When you save the Purchase Invoice, the VAT total from the Invoice rows (shown in the Calc. VAT field in the footer) should be the same as this control figure. You will not be able to save the Purchase Invoice if this is not the case.
- If you are using the Calculate VAT option in the Purchase Invoice Settings setting and the Invoice is from the Domestic, the Inside EU (Post VAT) or the Outside EU (Post VAT) Zones, the VAT amount will be calculated automatically (from the TOTAL figure above) using the percentage entered in the setting. You can change the resulting figure if it does not match that on the Invoice. This feature will be useful in countries with a single standard VAT rate.
- If the Invoice is from the Inside EU or Outside EU Zones, this field is not filled automatically and should be left blank. In the case of the Inside EU Zone, VAT is calculated using the VAT Code of each row and is shown in the Calc VAT field in the footer of the 'Costs' card.
- The purpose of this field is to provide a control figure. When you save the Purchase Invoice, the VAT total from the Invoice rows (shown in the Calc. VAT field in the footer) should be the same as this control figure. You will not be able to save the Purchase Invoice if this is not the case.
- Sup. Inv. No.
- The Supplier's invoice number. For reference; it can be printed on the remittance advice.
Entering a Purchase Invoice - Terms Card

- Pay Term
- Paste Special
Payment Terms setting, Sales/Purchase Ledger
- Default taken from Customer (Purch. Pay Terms)
- Payment Terms entered here will determine the Due Date (below). Payment Terms records entered using the Sales Ledger setting can enable a system of early settlement discounts to be established.
- Payment Terms are also the means by which Cash Notes and Credit Notes are distinguished from ordinary Invoices. Using 'Paste Special', select a Payment Term record of the "Cash" or "Credit Note" type respectively. When the record is then approved and saved, the appropriate Nominal Ledger Transaction will be created. In the case of Cash Notes, this will credit the Cash Account (as specified in the Payment Term record or in the Account Usage P/L setting) rather than the Creditor Account, while in the case of Credit Notes, the Transaction will be a reversal of the original Invoice Transaction.
- Cash Notes are immediately treated as paid and so will not appear in your creditor reports. There is no need to enter a Payment against them. If you need to reverse a Cash Note, use a negative Cash Note, not a Credit Note.
- When you select a Payment Term of the "Credit Note" type, enter the number of the Invoice to be credited in the Credit of Invoice field, using 'Paste Special' if necessary to bring up a list of open (unpaid) Invoices.
- Payment Terms entered here will determine the Due Date (below). Payment Terms records entered using the Sales Ledger setting can enable a system of early settlement discounts to be established.
- Cash Discount
- The amount of the cash discount, if any. The figure will be calculated from the TOTAL using the formula attached to the specified Payment Term record.
- Reference
- Record here any additional code by which the Purchase Invoice can be identified.
- Hold
- Check this box if you wish to prevent this Purchase Invoice from being paid. You can do this after the Invoice has been approved.
- Prel Book.
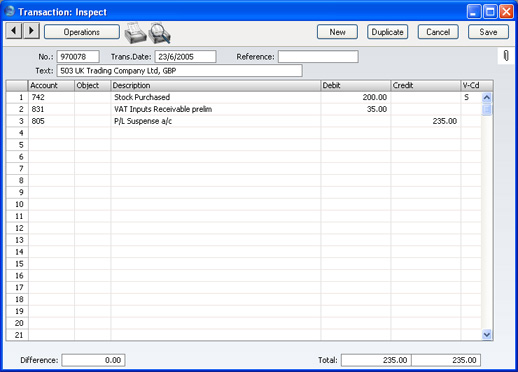
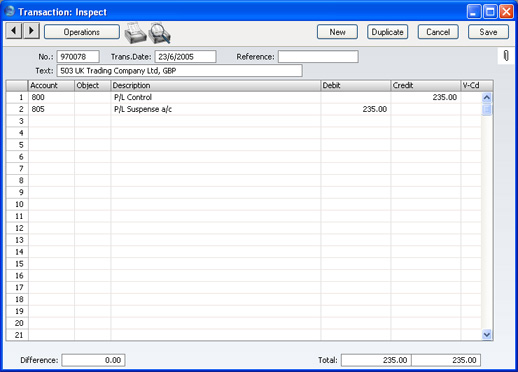
- Used for preliminary (temporary) booking of Purchase Invoices. If you use this option, a Nominal Ledger Transaction will be generated for the preliminary booking when you next save the Invoice. Normal VAT and Cost Account postings take place, but, instead of the usual Creditor Account, a preliminary Account (defined on the 'Creditors' card of the Account Usage P/L setting) is credited. As long as the Purchase Invoice is in the temporary state, you can change the Cost Accounts in any of the Purchase Invoice rows. When you approve the Purchase Invoice, a new Nominal Ledger Transaction will be created, reversing the posting to the preliminary Account and replacing it with a debit to the normal Creditor Account. Any change in the Cost Accounts used will also be reflected in this Transaction.
- This check box is described in more detail on the Preliminary Booking page.
- This check box is described in more detail on the Preliminary Booking page.
- Due Date
- The last day for payment of this invoice, calculated by FirstOffice using the Invoice Date and the Payment Terms. You can change the Due Date, even after the Invoice has been approved. If you receive an extended credit time for this Invoice, it will be re-scheduled in your Purchase Ledger.
- Discount Date
- The date by which you should pay the Invoice if you are to receive a cash discount. This will be calculated using the formula attached to the specified Payment Term record.
- Credit of Invoice
- Paste Special
Unpaid Purchase Invoices
- If you are entering a Purchase Credit Note, (a "debit note"), enter here the number of the Purchase Invoice being credited. The Purchase Invoice being credited cannot itself be a credit note.
- Remember to specify a Payment Term of type "Credit Note" in the Payment Terms field: you must leave the Credit of Invoice field blank when the Payment Term is of any other type.
Entering a Purchase Invoice - Costs Card
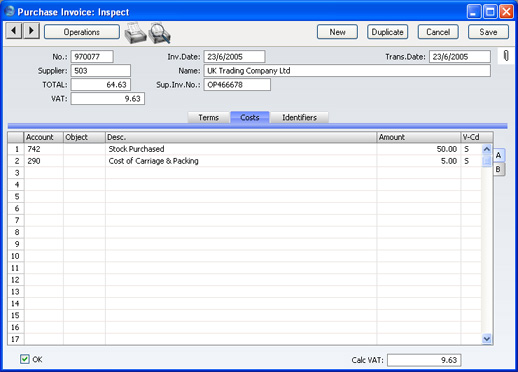
Use the grid on the 'Costs' card to list the items and costs on the Purchase Invoice. This grid is divided into two horizontal flips. When you click on a flip tab (marked A and B), the two or three right-hand columns of the grid are replaced.
- Account
- Paste Special
Account register, Nominal Ledger/System module
- Specify the Cost Account to be debited by the Purchase Invoice. Enter an Account number and press Enter. The Account name will be entered automatically to the Description field.
- If the Customer record for the Supplier has a Cost Account specified on the 'Terms' card, this will be entered as a default.
- You can also enter the Code of an Autotransaction to this field. Autotransactions are used to automate the entry of frequently used Transactions, not only reducing labour but also ensuring the correct Accounts are used every time.
- If the Customer record for the Supplier has a Cost Account specified on the 'Terms' card, this will be entered as a default.
- Object
- Paste Special
Object register, Nominal Ledger
- You can assign up to 20 Objects, separated by commas, to this row. They will be transferred to the Nominal Ledger Transaction generated for this invoice, and can be used for your profit centre reports. You might define separate Objects to represent different departments, cost centres or product types. This provides a flexible method of analysis that can be used in Nominal Ledger reports.
- In the Nominal Ledger Transaction generated from this Purchase Invoice, any Objects specified here will be assigned to the debit posting to the Purchase Account. This assignment will merge these Objects with those of the parent Invoice (shown on the 'Identifiers' card).
- If you don't use Objects, you can use a check box in the Purchase Invoice Settings setting to have the cursor skip over this field when you press Return or Enter.
- In the Nominal Ledger Transaction generated from this Purchase Invoice, any Objects specified here will be assigned to the debit posting to the Purchase Account. This assignment will merge these Objects with those of the parent Invoice (shown on the 'Identifiers' card).
- Description
- Default taken from
Account
- The Account name is entered automatically. You can use a check box in the Purchase Invoice Settings setting to have the cursor skip over this field using a check box when you press Return or Enter. The text can be changed or written over.
- Amount
- The amount to be debited to the Cost Account.
- A convenient way of quickly entering the correct value is to move the cursor into the field and then to press the Enter or Return key. FirstOffice will enter the correct value to balance the Invoice, taking the TOTAL and any previous rows into account.
- A convenient way of quickly entering the correct value is to move the cursor into the field and then to press the Enter or Return key. FirstOffice will enter the correct value to balance the Invoice, taking the TOTAL and any previous rows into account.
- V-Cd
- Paste Special
VAT Codes setting, Nominal Ledger
- The VAT Code entered here refers to a VAT Code record in the VAT Codes setting in the Nominal Ledger. This will determine the rate at which VAT will be charged on this Item and the Input VAT Account to be debited.
- A default is offered, taken from the Purch. VAT Code field in the Customer record for the Supplier, from the Account record or from the 'VAT' card of the Account Usage P/L setting. In the last case, the appropriate VAT Code for the Zone of the Supplier will be used.
If you need to use FirstOffice's Intrastat reporting feature, you should ensure the Item and Quantity fields on flip B of each Purchase Invoice are filled out correctly before approval. The Intrastat P/L document lists the Items that have been purchased from Suppliers in other EU countries. This document takes this information from these fields.
- Item
- Paste Special
Item register
- You may enter the Item number of the purchased Item here.
- Qty
- The quantity purchased can be entered here.

- OK
- When you check this box and save the record by clicking [Save], the Purchase Invoice will be approved and entered into the Purchase Ledger, and a corresponding Transaction will be created in the Nominal Ledger. Because of these consequences, you will no longer be able to make changes to the Purchase Invoice except to the Due Date and Comment fields.
- You can use Access Groups to control who can approve Purchase Invoices and Purchase Credit Notes. To do this, deny access to the 'OKing Purchase Invoices' and 'OKing Purchase Credit Notes' Actions respectively.
- References in these web pages to approved Purchase Invoices are to Purchase Invoices whose OK check box has been switched on.
- You can use Access Groups to control who can approve Purchase Invoices and Purchase Credit Notes. To do this, deny access to the 'OKing Purchase Invoices' and 'OKing Purchase Credit Notes' Actions respectively.
- Calc. VAT
- The VAT sum, calculated from the Purchase Invoice rows. This figure is calculated automatically as you add rows to the Purchase Invoice.
- This figure is rounded up or down according to rounding rules set in the Round Off setting in the System module. In the Nominal Ledger Transaction resulting from this Purchase Invoice, any amounts lost or gained in this rounding process are posted to the Round Off Account specified in the Account Usage S/L setting.
Entering a Purchase Invoice - Identifiers Card
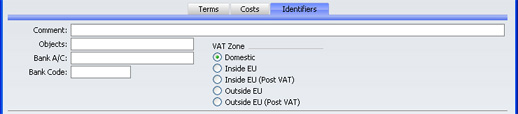
- Comment
- Default taken from
Customer
- Record here any comment about this Purchase Invoice.
- Objects
- Paste Special
Object register, Nominal Ledger
- You can assign up to 20 Objects, separated by commas, to this Purchase Invoice and all transactions generated from it. You might define separate Objects to represent different departments, cost centres or product types. This provides a flexible method of analysis that can be used in Nominal Ledger reports.
- In any Nominal Ledger Transactions generated from this Invoice, any Objects specified here will be assigned to the debit posting to the Purchase Account(s) and, if you are using the Objects on Creditor Account option in the Account Usage P/L setting, to the credit posting to the Creditor Account.
- If you are using the Objects on Creditor Account option, any Objects specified for the Supplier will be copied here as a default.
- In any Nominal Ledger Transactions generated from this Invoice, any Objects specified here will be assigned to the debit posting to the Purchase Account(s) and, if you are using the Objects on Creditor Account option in the Account Usage P/L setting, to the credit posting to the Creditor Account.
- Bank Code
- Paste Special
Banks setting, Purchase Ledger
- The Bank where the Supplier's bank account is held. This is brought in from the Supplier record. It may be used in relation with foreign bank transactions.
- Bank A/C
- The Supplier's bank account number is brought in from the 'Company' card of the Customer record for the Supplier. When a Payment is issued against the Invoice, it will be shown on flip C of the Payment record. If necessary, it can be changed to allow payment to be sent to a different account.
- VAT Zone
- Default taken from
Customer
- This information is taken from the Customer record for the Supplier, and indicates the origin of the Supplier. The selection of a VAT Code for each row depends on the Zone of the Supplier. The Zone cannot be changed for an individual Invoice: any change should be made in the Customer register before entering Invoices.
- VAT is calculated as follows:
- Domestic, Inside EU (Post VAT) and Outside EU (Post VAT)
- VAT is calculated using the VAT Code of each row. In any Nominal Ledger Transaction resulting from the Invoice, VAT is debited to the Input Account from the VAT Code and credited to the Creditor Account.
- Inside EU
- Invoices received from other countries in the EU do not carry VAT. However, depending on the nature of the Invoice, VAT can be payable.
- VAT is calculated using the VAT Code of each row. In any Nominal Ledger Transaction resulting from the Invoice, VAT is debited to the Input Account from the VAT Code and credited to the Output Account from the VAT Code. Therefore, it is recommended that a dedicated VAT Code be used for VAT on EU Acquisitions, with an Output Account that is not used in any other VAT Code.
- It is usually recommended that you leave the VAT field in the header empty when entering Purchase Invoices from inside the EU.
- VAT is calculated using the VAT Code of each row. In any Nominal Ledger Transaction resulting from the Invoice, VAT is debited to the Input Account from the VAT Code and credited to the Output Account from the VAT Code. Therefore, it is recommended that a dedicated VAT Code be used for VAT on EU Acquisitions, with an Output Account that is not used in any other VAT Code.
- Outside EU
- VAT is not calculated. Any Nominal Ledger Transaction resulting from the Invoice will not include a VAT element.
- VAT is calculated as follows:
Entering a Purchase Invoice - Example
We shall now show how to use the various fields on the Invoice screen with the help of a few examples.Open the Purchase Invoice register using the button in the Master Control panel in the Purchase Ledger. When the 'Purchase Invoices: Browse' window appears, click the [New] button. The 'Purchase Invoice: New' window is shown, with internal Invoice Number entered. Enter the Invoice Date as shown on the Invoice and press the Return key twice. The Invoice Date is copied to the Transaction Date field. In almost all cases, these two dates should be the same otherwise your Creditor Account may differ from your Aged Creditor report. The insertion point is now in the Supplier Number field. Press Ctrl-Return (Windows and Linux) or ⌘-Return (Macintosh): this brings up the 'Paste Supplier' window.
Select a Supplier from the list by double-clicking on its name (or by using the cursor keys and pressing Return). Press Return again and Supplier information such as Name and Address is placed in the appropriate fields on the Purchase Invoice screen.
The insertion point should now be in the TOTAL field. Enter the total amount payable (inclusive of tax), and, in the VAT field, the tax amount (this latter is optional). Depending on the setting of the Calculate VAT check box in the Purchase Invoice Settings setting, the tax amount may be calculated automatically. Press Return again to move the insertion point to the Supplier Invoice Number field, and enter the number.
If the Payment Terms include a cash discount, FirstOffice will calculate the amount and display it in the Cash Discount field. The Discount Date field will show the expiry date of the discount.
Continue and enter the accounting information. Move the insertion point to the Account Number field of the first row in the grid area, and enter the Account Number. Use the 'Paste Special' function to get access to the Chart of Accounts, from which the appropriate Account can be chosen: search among the Accounts in the normal way, by Number or by Name. On pressing Return, the insertion point will move to the Description field, or skip to the Amount field, depending on the option you have selected in the Purchase Invoice Settings setting. Ensure the insertion point is in the Amount field and enter the row amount (excluding VAT).
When you have added all the items and have checked the Invoice, approve it by checking the OK box. When you save it, it will be committed to the Purchase Ledger.
Save the Invoice by clicking [Save] or [New]: use the latter option to continue with the next Invoice. The TOTAL must equal one of the following before you can continue, depending on the Zone of the Invoice:
- Domestic, Inside EU (Post VAT) and Outside EU (Post VAT)
- the sum of the Amounts of the rows plus VAT.
- Inside EU
- the sum of the Amounts of the rows.
- Outside EU
- the sum of the Amounts of the rows. No VAT is calculated in this case.
Until you have approved the Invoice by checking the OK box and saving, you can still change it.
Preliminary Booking
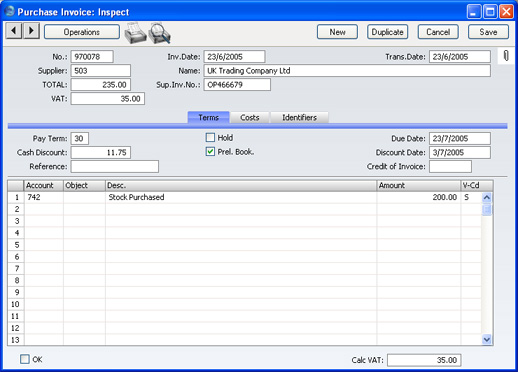
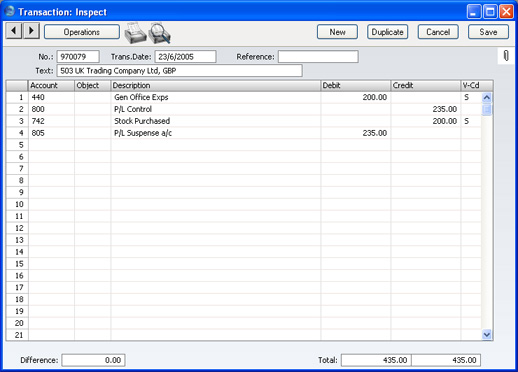
It is possible to make a preliminary booking of a Purchase Invoice upon arrival. In some companies, Purchase Invoices are passed around within the organisation for some time, in order for the expense to be approved and classified properly.When you use this option, you can enter the Invoice to the Purchase Invoice register as soon as you receive it. In the illustration below, a Purchase Invoice has been entered and the Prel. Book box checked.
Inspecting and Approving Purchase Invoices
If you did not approve a Purchase Invoice when you entered it, you must approve it at a later time in order to commit it to the Purchase Ledger, and, if so defined in the Sub Systems setting in the Nominal Ledger, for the Nominal Ledger Transaction to be generated. Approval also causes the Invoice record to be locked, so that it cannot be altered after this point. Payments can only be issued against approved Purchase Invoices.There are two ways to approve an Invoice:
- When viewing a Purchase Invoice, click the OK check box; or
- Highlight one or more Invoices in the 'Purchase Invoices: Browse' window and select 'OK' from the Operations menu.
Nominal Ledger Transactions from Purchase Invoices
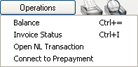
When you approve and save a Purchase Invoice, a Nominal Ledger Transaction will be generated automatically if you have so determined in the Sub Systems setting in the Nominal Ledger. Please click here for full details of this Transaction.Once the Transaction has been generated, you can look at it straight away using the 'Open NL Transaction' function on the Operations menu.
Error Messages
When you approve Purchase Invoices, Nominal Ledger Transactions are automatically generated and put in your Nominal Ledger journal.An error message will appear if an Account or other setting is incorrect. All Account numbers used by the Purchase Invoice, which may have been offered as defaults from the Account Usage P/L setting, the Supplier or the Supplier Category, must exist in the Account register in the System module. The VAT Codes used must be defined, while Number Series for the current period must also exist.
While the Purchase Invoice is still on screen, you can correct the error, by adding the missing Account(s) to the Account register in the System module or by changing the settings accordingly.
The program cannot post transactions to non-existent Accounts, to prevent accounting errors.
Printing Purchase Invoices
You can print a Purchase Invoice, to facilitate approval or authorisation.To print a Purchase Invoice, open it in a record window and click the Printer icon in the Button Bar. You must save the Purchase Invoice if the latest modifications are to be shown in the printed document. If you want to print to screen, click the Preview icon.
Alternatively, to print several Purchase Invoices at once, select 'Documents' from the File menu or click [Documents] in the Master Control panel and double-click 'Purchase Invoices' in the subsequent list.
Crediting Purchase Invoices
If you want to credit a Purchase Invoice that has been sent to you, follow these steps:- Create a new Purchase Invoice record, or duplicate the Purchase Invoice you want to credit. Duplicating will ensure that the correct Purchase Account will be credited.
- Fill in the data in the normal way, but change the Payment Terms to "CN" and enter the number of the credited Invoice in the Credit of Invoice field on the 'Terms' card. Use 'Paste Special' to search for the correct Purchase Invoice Number. The Invoice to be credited must be approved.
Note: this assumes a Payment Term record with a Code of "CN" and of type "Credit Note" has been entered using the Payment Terms setting.
- When you approve and save the Invoice, the Purchase Ledger will be updated, and a new Nominal Ledger Transaction will be generated.
You can use Access Groups to control who can approve Purchase Credit Notes: they need not be the same members of staff as those who can approve Invoices. To do this, deny access to the 'OKing Purchase Credit Notes' Action.
Crediting Purchase Invoices - and Cash Notes
If you need to reverse a Cash Note, you cannot follow the standard crediting procedure described here. A Credit Note will debit the Creditor Account, while reversing a Cash Note should debit the Cash Account. Instead you should enter a new Cash Note (i.e. with a cash Payment Term) with a negative value.Operations Menu
Operations Menu - OK
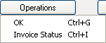
This command is available on the Operations menu only from the 'Purchase Invoices: Browse' window. It allows you to approve a Purchase Invoice and is therefore the equivalent of checking the OK box in a Purchase Invoice record. You can also select several Purchase Invoices (hold down the Shift key to select a range of Purchase Invoices in the list) and approve them all at once. Remember that this action causes Nominal Ledger Transactions to be created for each Purchase Invoice in the selection and that therefore once it has been carried out you will no longer be able to modify those Purchase Invoices.You can use Access Groups to control who can approve Purchase Invoices and Purchase Credit Notes. To do this, deny access to the 'OKing Purchase Invoices' and 'OKing Purchase Credit Notes' Actions respectively.
Operations Menu - Invoice Status
This command creates a quick report, only available through this menu. This report summarises all aspects of the Invoice, including Accounts and payment history.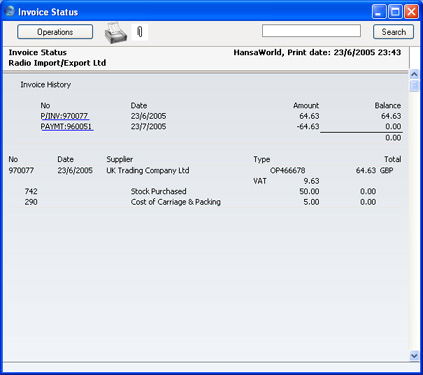
Operations Menu - Balance
Before you can save a Purchase Invoice, the amount in the VAT field in the header must equal that in the Calc VAT field (which contains the VAT sum of the Invoice rows), and the TOTAL field must equal the sum of the Amounts of the Invoice rows plus the VAT. If this is not the case, an error message 'Transaction out of balance' will appear when you try to save. You can then use this function to balance the figures.Before you use the function, you should place the cursor either in the TOTAL field in the header or in the Amount field of one of the Purchase Invoice rows. Selecting the function will cause the field containing the cursor to be adjusted so that the Purchase Invoice balances, allowing it to be saved.
Operations Menu - Open NL Transaction
When you approve and save a Purchase Invoice, if so defined in the Sub Systems setting in the Nominal Ledger, a Nominal Ledger Transaction will be created. This function allows you to view that Transaction.On selecting the function, the Transaction will be opened in a new window.
Note: this function will only open the final Transaction, not any preliminary Transaction that might exist.
Operations Menu - Connect to Prepayment
Please refer to the On Account Payments and Prepayments page for a full description of this function.