Introduction to Settings in the Sales Ledger
The Sales Ledger has the following settings: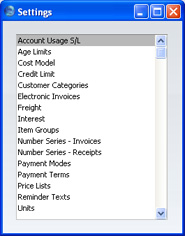
Account Usage S/L
Use the Account Usage S/L setting to specify the default Accounts and VAT Codes for use in your Sales Ledger transactions (i.e. Invoices and Receipts). These defaults will be used in the absence of Accounts or VAT Codes being specified elsewhere (for example, for the Items, Item Groups, Customers or Customer Categories used in the transactions). Please click for complete descriptions of how FirstOffice selects these defaults in Invoices and Receipts.If you have imported the sample Chart of Accounts supplied with FirstOffice, you will find that most of the fields in the Account Usage S/L setting contain suggested values. If you have modified this Chart of Accounts or have used your own, you must ensure that these values are replaced with the correct Accounts.
! | The Account numbers in this setting must also be in the Chart of Accounts. Otherwise, FirstOffice will not verify and accept the transactions controlled by this setting. You must either add the Accounts to the Chart of Accounts (the Account register in the System module), or change the Account numbers in this setting to Accounts that do exist in the Chart of Accounts. |
The Account Usage S/L setting is spread over three cards. To view specific cards, click one of the three named tabs:

Account Usage S/L - Debtors Card
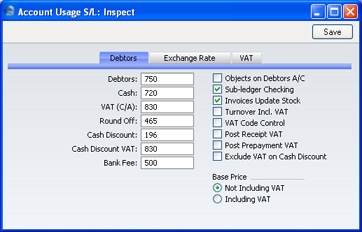
- Debtors
- When you approve an Invoice (i.e. post it to the Nominal Ledger), its value including VAT will be debited to a Debtor Account. When you enter a Receipt, its value will be credited to the same Account. This Account therefore shows how much your company is owed at a particular time.
- Enter here the Account Code of the Account that you wish to be used as your Debtor Account. It will be overridden if a separate such Account has been specified for the Customer Category of the Customer.
- Enter here the Account Code of the Account that you wish to be used as your Debtor Account. It will be overridden if a separate such Account has been specified for the Customer Category of the Customer.
- Cash
- The Account entered here will be debited instead of the Debtor Account whenever you approve a cash sale (Cash Note). Please refer to the description of the Payment Terms setting for details of Cash Notes.
- The Account specified here will be overridden if a separate such Account has been specified for the Payment Term used in the Cash Note.
- The Account specified here will be overridden if a separate such Account has been specified for the Payment Term used in the Cash Note.
- VAT (C/A)
- This Account is used for two purposes.
- First, the Post Receipt VAT and/or Post Prepayment VAT options elsewhere on this card allow you to account for VAT based on Receipts. When you approve a Receipt, VAT will be moved from a temporary VAT Output Account to the final one. Usually, the final Output Account will be the O/P Account specified in the VAT Codes setting. If a particular VAT Code does not have an O/P Account, the VAT amount will be credited to this Account instead.
- Second, this Account is used if you need to reduce VAT when you give a cash (settlement) discount. Please refer to the description of the Cash Discount VAT Account below for details.
- First, the Post Receipt VAT and/or Post Prepayment VAT options elsewhere on this card allow you to account for VAT based on Receipts. When you approve a Receipt, VAT will be moved from a temporary VAT Output Account to the final one. Usually, the final Output Account will be the O/P Account specified in the VAT Codes setting. If a particular VAT Code does not have an O/P Account, the VAT amount will be credited to this Account instead.
- Round Off
- The total and VAT amounts of each Invoice will be rounded up or down according to rounding rules defined in the Round Off setting in the System module. Whenever you approve an Invoice, any amount lost or gained by this rounding process will be posted to the Account specified here.
- This Account can only be defined in the Account Usage S/L setting and is therefore used in Transactions generated from the Purchase Ledger as well.
- This Account can only be defined in the Account Usage S/L setting and is therefore used in Transactions generated from the Purchase Ledger as well.
- Cash Discount
- In the event of an Invoice attracting a settlement discount when it is paid on time, the Account specified here will be debited with the discount amount. You can define settlement discounts using the Payment Terms setting.
- Cash Discount VAT
- If you need to reduce VAT when you give a cash (settlement) discount, specify here the Account that is to be debited with the VAT reduction. The balancing credit will be to the VAT (C/A) Account. For example, you have a Payment Term with a 10% early settlement discount and you enter an Invoice worth 100 + 17.50 VAT. When you enter the Receipt, the settlement discount will be calculated to be 11.75. This figure will be debited to the Cash Discount Account specified above. If you have specified a Cash Discount VAT Account, 1.75 VAT from the cash discount will be debited to this Account and credited to the VAT (C/A) Account. If you do not specify a Cash Discount VAT Account, the final two postings will not be made.
- The use of this Account depends on local VAT legislation.
- The use of this Account depends on local VAT legislation.
- Bank Fee
- Enter here the Account Code of the Account to be credited by any bank charges that you may incur when banking Receipts.
- Objects on Debtors A/C
- When you approve and save Invoices, any Objects specified on the 'Terms' card will be assigned to the credit posting to the Sales Account(s) when a Nominal Ledger Transaction is generated. If you have checked this box, they will be assigned to the debit posting to the Debtor Account as well.
- Sub-ledger Checking
- Check this box if you want to use the sub-ledger checking feature in the Sales Ledger. This will mean that you will only be able to post to specified Accounts (such as Debtor Accounts) from the sub-ledger (i.e. from Invoices or Receipts in the Sales Ledger). If you then try to post to a controlled Account directly from the Nominal Ledger (using the Transaction register) you will get an alert message.
- You can use this feature, for example, to ensure that Receipts are received in the Sales Ledger rather than by journal in the Nominal Ledger. Using the Nominal Ledger for this purpose is incorrect because the Receipt cannot be allocated against the appropriate Invoices. The feature also removes the risk of posting accidentally to your Debtor Account in Nominal Ledger Transactions.
- For this feature to work, you must specify the Accounts which are to be included in the sub-ledger checking function (i.e. the Accounts which are not to be used in the Transaction register). Do this using the Control Accounts setting in the Nominal Ledger.
- Note that this check box is used to control whether sub-ledger checking will take place for specified Sales Ledger Accounts only. There is an option with the same name in the Account Usage P/L setting that performs an equivalent function for Purchase Ledger Accounts.
- You can use this feature, for example, to ensure that Receipts are received in the Sales Ledger rather than by journal in the Nominal Ledger. Using the Nominal Ledger for this purpose is incorrect because the Receipt cannot be allocated against the appropriate Invoices. The feature also removes the risk of posting accidentally to your Debtor Account in Nominal Ledger Transactions.
- Invoices Update Stock
- This option has two effects. First, it indicates how an Invoice is to update stock levels. If you are using this option, FirstOffice will reduce the stock level of each Stocked Item in an Invoice by the appropriate quantity when it is approved. No check of the availability of stock will be made, unless you are using the Do Not Allow Over Delivery option in the Stock Settings setting in the Stock module. The second effect is to include cost accounting postings (for use when maintaining stock values in the Nominal Ledger) in the Nominal Ledger Transaction generated when you approve the Invoice.
- This option is only used when you issue Deliveries directly from an Invoice (i.e. where no Sales Order exists). Otherwise, stock levels are depleted when Deliveries are issued from the Sales Order register.
- You can change the setting in an individual Invoice using the Update Stock check box on the 'Delivery' card.
- Full details of cost accounting in FirstOffice can be found here.
- This option is only used when you issue Deliveries directly from an Invoice (i.e. where no Sales Order exists). Otherwise, stock levels are depleted when Deliveries are issued from the Sales Order register.
- Turnover Incl. VAT.
- This option can be used in Russia. Check this box if you would like turnover to be recorded inclusive of VAT. In this case, whenever an Invoice is posted to the Nominal Ledger, the amount credited to the Sales Account will include VAT, and the VAT Amount will be debited from the same Account.
- VAT Code Control
- This option controls the choice of VAT Codes in Invoices. When you enter an Item in an Invoice, the VAT Code is taken from the Customer, Item, Item Group or the 'VAT' card of this setting. If you are using this option, this VAT Code must match that specified in the Sales Account (in the Account register). If this is not the case, the following warning message will appear when you try to save the Invoice :
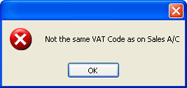
- The warning will not appear if a VAT Code has not been specified in the Account record.
- If you are using this option, it is recommended that you specify VAT Codes in all your Sales Accounts, and that you take care to specify the same VAT Codes in your Customers, Items and Item Groups and in this setting ('VAT' card), to prevent possible conflicts.
- Post Receipt VAT
- This option allows you to account for VAT based on Receipts (rather than Invoices) and On Account Receipts. An On Account Receipt is a Receipt with no Invoice Number or Prepayment Number. If you need to use this option, you should enter O/P Accounts for all your VAT Codes (in the VAT Codes setting in the Nominal Ledger), or at least a VAT (C/A) Account in the field above.
- The accounting of VAT based on Receipts is a requirement in the UK for users of the Cash VAT scheme. If you are using the UK Cash VAT scheme, you should also ensure the Post Prepayment VAT option below and the equivalent options in the Account Usage P/L setting are switched on. The Cash VAT scheme is described on the VAT Codes page. Users in Poland can also use this option and the Post Payment VAT option in the Purchase Ledger, but should not use the Post Prepayment VAT options.
- Users in Latvia should leave this option switched off but should turn on the Post Payment VAT option in the Account Usage P/L setting.
- This option cannot be used in Russia.
- The accounting of VAT based on Receipts is a requirement in the UK for users of the Cash VAT scheme. If you are using the UK Cash VAT scheme, you should also ensure the Post Prepayment VAT option below and the equivalent options in the Account Usage P/L setting are switched on. The Cash VAT scheme is described on the VAT Codes page. Users in Poland can also use this option and the Post Payment VAT option in the Purchase Ledger, but should not use the Post Prepayment VAT options.
- Post Prepayment VAT
- This option allows the posting of VAT from Prepayment Receipts, a requirement in the Baltic countries and for users of the Cash VAT scheme in the UK. A Prepayment Receipt is a Receipt without an Invoice Number but with a Prepayment Number specified on flip C. If you are using this option, you should also specify a Prepayment VAT Account in the field on the 'Exchange Rate' card.
- Exclude VAT on Cash Discount
- Use this option if the settlement discount percentage (defined in the Payment Terms setting) is to be applied to the Invoice total excluding VAT. Otherwise, it will be applied to the total including VAT. This option is likely to be used in the UK only. The check box applies to the Sales Ledger only.
- For example, you have a Payment Term with a 10% early settlement discount. If you are not using this option, when you enter an Item worth 100.00 in an Invoice, VAT will be calculated on the full 100.00. At the standard rate, this will give an Invoice total of 117.50. When you enter the Receipt, the settlement discount will be calculated to be 11.75. This figure will be debited to the Cash Discount Account specified above. If you are using this option, when you enter an Item worth 100.00 in an Invoice, VAT will be calculated on 90.00 (i.e. on 100.00 less the 10% discount), giving a figure of 15.75 at the standard rate. This will give an Invoice total of 115.75 (100 plus 15.75 VAT). When you enter the Receipt, the settlement discount will be calculated to be 10.00. This figure will be debited to the Cash Discount Account specified above.
- For example, you have a Payment Term with a 10% early settlement discount. If you are not using this option, when you enter an Item worth 100.00 in an Invoice, VAT will be calculated on the full 100.00. At the standard rate, this will give an Invoice total of 117.50. When you enter the Receipt, the settlement discount will be calculated to be 11.75. This figure will be debited to the Cash Discount Account specified above. If you are using this option, when you enter an Item worth 100.00 in an Invoice, VAT will be calculated on 90.00 (i.e. on 100.00 less the 10% discount), giving a figure of 15.75 at the standard rate. This will give an Invoice total of 115.75 (100 plus 15.75 VAT). When you enter the Receipt, the settlement discount will be calculated to be 10.00. This figure will be debited to the Cash Discount Account specified above.
- Base Price
- Use these options to specify whether the Base Prices in the Item records are to include VAT. VAT rates are defined in the VAT Codes setting in the Nominal Ledger.
Account Usage S/L - Exchange Rate Card
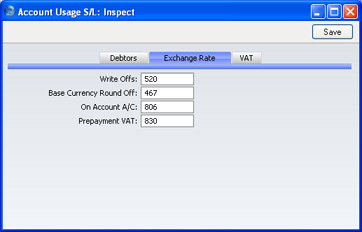
- Write Offs
- Bad debts that you write off using the 'New Write-off' Operations menu function of the Receipt and the 'Write off Invoices' Maintenance function will be debited to the Account specified here.
- Base Currency Round Off
- Under the Dual-Base system, all Nominal Ledger Transactions should be expressible, and should balance, in both Base Currencies. The Account entered here will be used for postings to ensure that this is the case. Usually, it will only be used for Base Currency 2 values.
- This Account can only be defined in the Account Usage S/L setting and is used for all Transactions.
- This Account is only used if you have the Dual-Base Currency Value Pack, but even if you do not have this Value Pack you need to specify a valid Account before you can save the Account Usage S/L setting.
- This Account can only be defined in the Account Usage S/L setting and is used for all Transactions.
- On Account A/C
- If you receive Prepayments or On Account Receipts from a particular Customer without reference to a specific Invoice (usually before you have raised the Invoice), you may want to use a special Account for such Receipts. Specify that Account here, and switch on the On Account check box on the 'Company' card of the Customer in question. When you enter and approve a Prepayment or On Account Receipt, its value will be credited to this Account.
- The Account specified here will be overridden if a separate such Account has been specified in the Customer Category to which a Customer belongs.
- The Account specified here will be overridden if a separate such Account has been specified in the Customer Category to which a Customer belongs.
- Prepayment VAT
- The Account specified here is used when the Nominal Ledger Transactions from Prepayment Receipts are to include a VAT element (i.e. if you are using the Post Prepayment VAT option on the 'Debtors' card). This is the case in the Baltic countries and Russia and for users of the Cash VAT scheme in the UK. When you record a Prepayment Receipt, you should specify the VAT Code and Amount on flip D. The VAT Amount will be debited to this Prepayment VAT Account and credited to the O/P Account for the VAT Code (or the VAT (C/A) Account specified on the 'Debtors' card) when you approve and save the Receipt.
Account Usage S/L - VAT Card
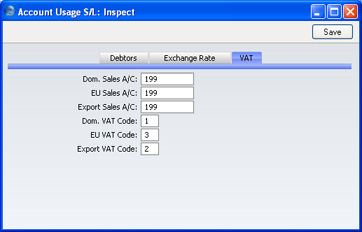
- Dom. Sales A/C, EU Sales A/C, Export Sales A/C
- When an Invoice is approved, the values excluding VAT of the Items are individually credited to a Sales Account.
- It can be useful to maintain more than one Sales Account to keep a record of the sales of different types of product. For this reason, you can specify a separate Sales Account for each Item. Enter here the Account Code of the Account that you wish to be used as your default Sales Account, to be credited when no Sales Account has been specified for a Price, Item or Item Group.
- You should define three default Sales Accounts: which one will be used in a particular Invoice will depend on the Zone of the Customer concerned (set on the 'Company' card of the Customer record). If you leave the EU and Export Sales Accounts empty, the Domestic Sales Account will be used for all sales, irrespective of Zone.
- It can be useful to maintain more than one Sales Account to keep a record of the sales of different types of product. For this reason, you can specify a separate Sales Account for each Item. Enter here the Account Code of the Account that you wish to be used as your default Sales Account, to be credited when no Sales Account has been specified for a Price, Item or Item Group.
- Dom. VAT Code, EU VAT Code, Export VAT Code
- VAT Codes determine the VAT Account that will be used when an Invoice is posted to the Nominal Ledger and the rate at which VAT will be charged. VAT Code records are set up using the VAT Codes setting in the Nominal Ledger.
- You can specify a separate VAT Code for each Item. Enter here the VAT Code that you wish to be used as a default, to be used where no VAT Code has been specified for a Customer, Item or Item Group. Normally, if your company is registered for VAT, this will be the VAT Code representing the standard rate. Otherwise, it will be a zero rate VAT Code.
- You should define three default VAT Codes: which one will be used in a particular Invoice will depend on the Zone of the Customer concerned (set on the 'Company' card of the Customer record).
- Note that, for Customers in the "Inside EU" and "Outside EU" Zones, VAT will not be charged on any Invoices raised, irrespective of the VAT Code specified here. If you want to charge VAT to such Customers, place them in the Inside EU (Post VAT)" and "Outside EU (Post VAT)" Zones.
- You can specify a separate VAT Code for each Item. Enter here the VAT Code that you wish to be used as a default, to be used where no VAT Code has been specified for a Customer, Item or Item Group. Normally, if your company is registered for VAT, this will be the VAT Code representing the standard rate. Otherwise, it will be a zero rate VAT Code.
Age Limits
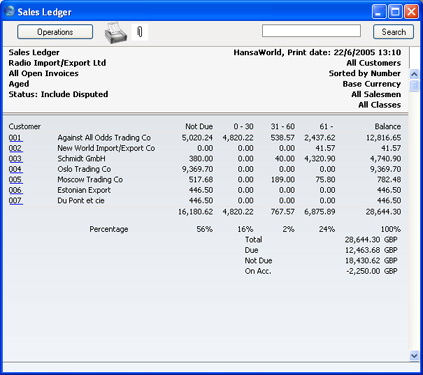
This setting allows you to define the two ageing periods that will be used when producing Aged Debtor and Aged Creditor reports.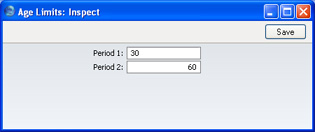
When you produce a Sales Ledger or Purchase Ledger report using the Aged option, outstanding Invoices will be grouped together according to their age, as illustrated below. Period 1 in this setting determines the end of the second column and the beginning of the third. Period 2 determines the end of the third column and the beginning of the fourth.
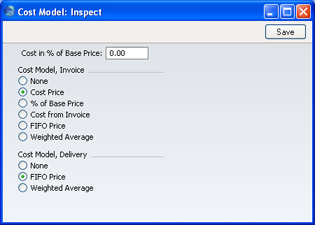
Cost Model
- if the Item belongs to an Item Group, and you are using the Use Item Groups for Cost Model option in the Cost Accounting setting in the Stock module, it will be the Cost Model specified on the 'Cost Model' card of the Item Group. If that Cost Model is "Default", then it will be the Cost Model, Invoice or the Cost Model, Delivery specified in this setting, depending on whether you created the cost accounting transaction from an Invoice or a Delivery;
- if the Item belongs to an Item Group, the Item Group does not have Cost and Stock Accounts, you are using the Use Item Groups for Cost Model option and you created the cost accounting transaction from an Invoice, it will be the Cost Model, Invoice specified in this setting;
- if the Item does not belong to an Item Group, or you are not using the Use Item Groups for Cost Model option, and you created the cost accounting transaction from a Delivery, it will be the Cost Model, Delivery specified in this setting;
- if the Item does not belong to an Item Group, or you are not using the Use Item Groups for Cost Model option, and you created the cost accounting transaction from an Invoice, it will be the Cost Model, Invoice specified in this setting.
If you have determined that cost accounting transactions will be created on Delivery, it is recommended that you choose a Cost Model, Invoice as well, just in case Stocked Items are sold from an Invoice without a Sales Order (i.e. where a Delivery record has not been created).
If you are using the Use Item Groups for Cost Model option in the Cost Accounting setting, it is recommended that you choose a Cost Model, Invoice and a Cost Model, Delivery here as well, for use as defaults and in case you sell an Item that does not belong to an Item Group.
- None
- Select this option if you do not wish to use cost accounting.
- Cost Price
- Use the Cost Price of the Item (visible on the 'Costs' card of the Item screen). If you choose this option, it is recommended that you also choose one of the Update Cost Price at Goods Receipt options (again, on the 'Costs' card of the Item), to ensure the Cost Price is always up-to-date.
- % of Base Price
- Calculate the cost by applying a specified percentage to the Base Price (i.e. the retail price) of the Item. Specify the percentage in the Cost in % of Base Price field, just above this Cost Model selection area. This option can be used in cases where a consistent gross margin is required.
- Cost from Invoice
- Use the Cost Price of the appropriate row of the Invoice.
- FIFO Price
- A true FIFO (First In First Out) cost is used, based on the cost prices recorded in Goods Receipts.
- As its name suggests, First In First Out requires that you must make certain that you enter all stock transactions in strict chronological order. Failure to do this may cause your FIFO values to become incorrect. Do not, for example, enter a Goods Receipt with yesterday's date if you have already entered one with today's. This applies to Deliveries and Stock Depreciations as well. It is also recommended that you always approve stock transactions when you save them for the first time. Do not, for example, go back to an earlier unapproved Goods Receipt and approve it if there are later approved ones, unless you change the date as well.
- As its name suggests, First In First Out requires that you must make certain that you enter all stock transactions in strict chronological order. Failure to do this may cause your FIFO values to become incorrect. Do not, for example, enter a Goods Receipt with yesterday's date if you have already entered one with today's. This applies to Deliveries and Stock Depreciations as well. It is also recommended that you always approve stock transactions when you save them for the first time. Do not, for example, go back to an earlier unapproved Goods Receipt and approve it if there are later approved ones, unless you change the date as well.
- Weighted Average
- Use the Weighted Average Cost Price of the Item (the average unit price of all previous purchases, visible on the 'Costs' card of the Item screen).
- If you set the Cost Model, Invoice to Weighted Average, Weighted Average prices will also be used in Stock Movements and Stock Depreciations. If you set the Cost Model, Invoice to any other option, FIFO prices will be used in these transactions.
! | If you choose the Cost Price, % of Base Price or Weighted Average options, make sure that the appropriate field contains values for each Item. Otherwise, cost accounting Transactions with a zero amount may result. |
Please refer to the Cost Accounting page for full details of this feature.
Credit Limit
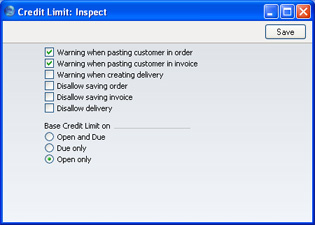
The warnings (first three options) will appear when you enter a Customer that has already exceeded their Credit Limit (set using the Sales Credit Limit field on the 'Terms' card of the Customer record) in a transaction. Saving (next three options) will not be allowed if the transaction will take the Customer over their Credit Limit.
You can use one of three methods to calculate a Customer's credit status:
- Open and Due
- The outstanding total from all unpaid Invoices will be compared with the Customer's Credit Limit.
- Due only
- The outstanding total from unpaid Invoices that have exceeded their Payment Terms only ('Due' Invoices) will be compared with the Customer's Credit Limit. For example, if a Customer has Payment Terms of 30 days, Due Invoices are those that have been outstanding for more than 30 days.
- Open only
- If there are any Due Invoices, the Customer will immediately be said to have exceeded their Credit Limit, irrespective of the value of those Invoices. If there are no Due Invoices, the outstanding total from unpaid Invoices that have not exceeded their Payment Terms only ('Open' Invoices) will be compared with the Customer's Credit Limit.
Customer Categories
Please click here for full details of this setting.Electronic Invoicing
This setting is used in Finland. Please refer to your local FirstOffice representative for details.Freight
This setting allows a fixed freight charge to be added to all Orders and Invoices automatically. The freight charge will be added both to Invoices created directly in the Sales Ledger and to those created from Sales Orders. The freight charge will be shown in the Freight field at the bottom of the 'Items' card of the Invoice and Order screens.
- Item
- Paste Special
Item register
- A record in the Item register for Freight must exist: enter its Item Number here. Note that the Item must have a Base Price specified. This Base Price will be the freight charge in each Invoice, and the VAT Code and Sales Account will also be taken from the Item.
- GP Percentage of Price
- Specify the percentage of the Freight price that is to represent the cost of the freight for inclusion in Gross Profit calculations (e.g. in the GP - Invoices report). If you do not enter a figure, Freight will not be included in such calculations, even if a Cost Price has been specified for the Item.
Interest
You can charge interest on overdue Invoices (those which remain unpaid once the Payment Terms have expired).You should raise Interest Invoices using the 'Create Interest Invoices' Maintenance function. Each time you run this function, it will create one new Invoice (an "Interest Invoice") for each Customer with an overdue Invoice. The Customer will be charged interest on each overdue Invoice, and can also be charged an invoicing fee (levied once per Interest Invoice, irrespective of the number of overdue Invoices). Interest will be charged from the Due Date of an Invoice, not from its Invoice Date.
You can control the operation of the 'Create Interest Invoices' function using this setting. Here you should determine the interest rate, the minimum amount that you wish to charge, the minimum numbers of days delayed, the Payment Terms for the Interest Invoice and the interest calculation method.
Check the Interest box on the 'Company' card of the Customer screen for each Customer that is to be charged interest for late payment.
! | If the Interest box is not checked for a Customer, no Interest Invoices will be issued to them by FirstOffice, no matter how late their payments are. |
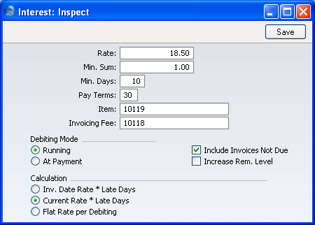
- Rate
- Enter the annual rate of interest to be used in interest calculations.
- If you are using the first or second Calculation option (below), enter an annual rate of interest. If you are using the third Calculation method, enter the interest rate that you wish to charge each time you raise an Interest Invoice.
- If you are using the first or second Calculation option (below), enter an annual rate of interest. If you are using the third Calculation method, enter the interest rate that you wish to charge each time you raise an Interest Invoice.
- Min. Sum
- You can indicate a minimum amount to charge. If the total interest (on all overdue Invoices and excluding any invoicing fee) is less than this minimum figure, no Interest Invoice will be raised.
- Min. Days
- This field is only used if the Debiting Mode (below) is At Payment. Enter the lowest number of days overdue needed before an Interest Invoice can be created.
- For example, if the Min. Days is 5, interest will not be charged on an Invoice that is paid when it is overdue by four days. If the Invoice is paid when it is overdue by six days, interest will be charged for all six days.
- For example, if the Min. Days is 5, interest will not be charged on an Invoice that is paid when it is overdue by four days. If the Invoice is paid when it is overdue by six days, interest will be charged for all six days.
- Pay Terms
- Paste Special
Payment Terms setting, Sales/Purchase Ledger
- Select the Payment Terms to be used for Interest Invoices. If left blank, the normal Payment Terms for the Customer will be used.
- Interest Item
- Paste Special
Item register
- An Item in the Item register. This Item will control the accounting of interest charges (Sales Account and VAT Code).
- Invoicing Fee
- Paste Special
Item register
- An Item in the Item register. The Base Price of this Item will be added to the Invoice as an invoicing fee (if any). This Item will also control the accounting of that invoicing fee (Sales Account and VAT Code). The invoicing fee is charged once per Interest Invoice, irrespective of the number of overdue Invoices.
- Debiting Mode
- Use these options to control when interest is to be charged on overdue Invoices.
- Running
- Interest Invoices are raised before the overdue Invoice is paid. Very late Invoices may therefore cause more than one Interest Invoice to be raised.
- For example, an Invoice becomes due on March 25th and is paid on May 10th. If you run the 'Create Interest Invoices' function at the end of every month, interest will be charged three times: at the end of March (for six days), at the end of April (for 30 days) and at the end of May (for nine days, making a total of 45 days).
- For example, an Invoice becomes due on March 25th and is paid on May 10th. If you run the 'Create Interest Invoices' function at the end of every month, interest will be charged three times: at the end of March (for six days), at the end of April (for 30 days) and at the end of May (for nine days, making a total of 45 days).
- At Payment
- The Interest Invoice is not raised until the overdue Invoice is actually paid, so it will contain a single interest charge for the entire overdue period.
- In the example above, interest will be charged once at the end of May, for the whole overdue period of 45 days.
- Running
- Calculation
- Select one option to determine how the interest is to be calculated.
- Invoice Date Rate * Late Days
- Interest is calculated based on the interest rate valid on the day when the original Invoice was issued. This interest rate is taken from the 'Delivery' card of the Invoice, and is treated as an annual rate.
- For example, the interest rate is 18.5%. An Invoice for 117.50 (including VAT) becomes due for payment on March 25th. Assuming the Min. Days to be zero, interest will be charged for the last six days of March as follows:
- 117.50 x 18.5% x 6/365 = 0.36
- Interest will be charged for April as follows:
- 117.50 x 18.5% x 30/365 = 1.79
- If the original Invoice is paid on May 10th, interest will be charged for the first nine days of May as follows:
- 117.50 x 18.5% x 9/365 = 0.54
- For example, the interest rate is 18.5%. An Invoice for 117.50 (including VAT) becomes due for payment on March 25th. Assuming the Min. Days to be zero, interest will be charged for the last six days of March as follows:
- Current Date Rate * Late Days
- This option is similar to the one above, with one exception. It uses the interest rate valid on the day when the Interest Invoice is issued. This interest rate is taken from this setting.
- Flat Rate Per Debiting
- Use this option if interest is to be charged based simply on the fact that an Invoice is overdue, not on the number of days it is overdue. In this case, the interest rate is an absolute rate, not an annual figure.
- This option uses the interest rate valid on the day when the Interest Invoice is issued, taken from this setting.
- Using the example above, interest will be charged for the last six days of March as follows:
- 117.50 x 18.5% = 21.74
- Interest will be charged for April as follows:
- 117.50 x 18.5% = 21.74
- If the original Invoice is paid on May 10th, interest will be charged for the first nine days of May as follows:
- 117.50 x 18.5% = 21.74
- This option uses the interest rate valid on the day when the Interest Invoice is issued, taken from this setting.
- Invoice Date Rate * Late Days
- Include Invoices Not Due
- Check this box if you would like Invoices which are not yet due for payment (i.e. unpaid Invoices whose Payment Terms have not yet expired) to be listed in Interest Invoices. Interest will not be charged on these Invoices. You might use this option if you want your Interest Invoices to act as statements as well.
- You should only use this option if the Debiting Mode (above) is Running. Make sure this check box is switched off if your Debiting Mode is At Payment.
- You should only use this option if the Debiting Mode (above) is Running. Make sure this check box is switched off if your Debiting Mode is At Payment.
- Increase Reminder Level
- Each Invoice contains a code (the Reminder Level) that indicates the number of times it has been subject to a Reminder, or included on a Customer statement. Check this box if you also want the Reminder Level to be updated when an Interest Invoice is raised.
- When sending Reminders the Reminder Level determines the message to be printed on the Reminder. These messages are entered using the Reminder Texts setting.
- The Reminder Level for each Invoice is visible on the 'Delivery' card of the Invoice screen.
- When sending Reminders the Reminder Level determines the message to be printed on the Reminder. These messages are entered using the Reminder Texts setting.
Item Groups
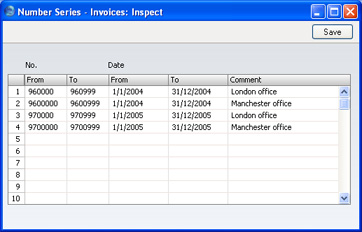
Please click here for full details of this setting.Number Series - Invoices
Each Invoice has its own unique identifying number, based on a sequential series. When you enter a new Invoice, the next number in the series will be used. If required, you can have a number of such sequences running concurrently, perhaps representing different years, different departments or different Salesmen.Use this setting to define these sequences, or Number Series. The different series should not overlap. If you leave the setting empty, Invoice Numbers will start at 1 and continue consecutively.
When you enter an Invoice, the next number in the first Number Series entered to this setting will be used as a default; change to the next number in any other Number Series using 'Paste Special'.
When you double-click 'Number Series - Invoices' in the 'Settings' list, the following window appears:
Number Series - Receipts
Use this setting to define Number Series for Receipts in a similar manner to that described for Invoices.Payment Modes
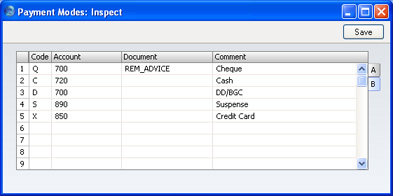
Payment Modes represent the different methods by which your Invoices will be paid by your Customers (and by which you will pay your Suppliers). Typical examples are cash, cheque, direct debit and credit card. For many businesses, the difference between such payment methods in terms of the way they are accounted for is minimal, but where appropriate, FirstOffice does allow each Payment Mode to debit a different Account and to be paid into a different bank account. Note that you can access this setting from both the Sales and Purchase Ledgers.You can enter many different Payment Modes, using the matrix on the 'Payment Modes' screen. To add a Payment Mode, click in the Code field of the first blank row and enter appropriate text. To remove a Payment Mode, click on the row number on the left of the row and press the Backspace key.
Payment Modes - Flip A
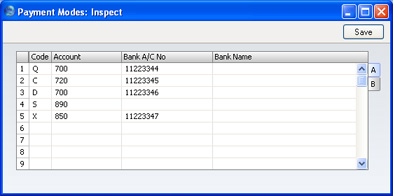
- Code
- Enter a unique code by which the Payment Mode is to be identified from elsewhere in FirstOffice.
- Account
- Paste Special
Account register, Nominal Ledger/System module
- Specify here the cash, bank or other Account to be debited by any Receipt and credited by any Payment using the Payment Mode.
- Bank A/C No
- Specify here the bank account number used for this Payment Mode. This account number can be printed on the payment document (specified on flip B).
- Bank Name
- Record the name of the bank where the account is held here.
Payment Modes - Flip B
- Document
- Paste Special
Form register, System module
- You can allocate a different payment document to each Payment Mode. This can be useful in the Purchase Ledger as it allows you to have a different design of Remittance Advice for each Payment Mode.
- Comment
- The comment entered here should be a brief description that will appear in the 'Paste Special' listing.
Payment Terms
Different Invoices can be assigned different terms for payment: last date for payment, Cash or Credit Note etc. Payment Terms are also used to establish systems of settlement discounts.The entries in this setting are used also in the Purchase Ledger when you are entering Purchase Invoices from your Suppliers.
On first selecting the setting, the 'Payment Terms: Browse' window is displayed, showing all Payment Terms previously entered. Double-click a Payment Term in the list to edit it, or add a new term by clicking the [New] button in the Button Bar.
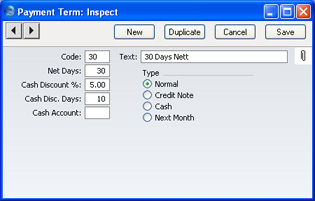
- Code
- Enter the unique Code by which the Payment Terms record is to be identified from elsewhere in FirstOffice. The Code may consist of one or two characters, and both numbers and letters can be used.
- Net Days
- The credit period in days. If the Type (below) is set to "Normal", when this Payment Term is used in Invoices and Purchase Invoices, the value entered here will be added to the Invoice Date to calculate the Due Date. If the Type is "Next Month" the Due Date will be the n:th day of the next month, where n is the number entered here.
- Cash Discount %
- If the Type is "Normal", enter the rate of discount for the cash discount, if any.
- Cash Discount Days
- Specify here the maximum number of days allowed for a cash discount term. For example, if the setting is 10 days, the customer gets the assigned discount if you receive payment within 10 days.
- Cash Account
- Paste Special
Account register, Nominal Ledger/System module
- If the Type is set to "Cash", enter the Account to be debited (when a cash sale is approved) or credited (when a cash purchase is approved). If this is blank, the Cash Account on the 'Debtors' or 'Creditors' card of the Account Usage S/L or P/L setting respectively will be used. Cash Notes are described below in the section describing the "Cash" Type.
- Text
- Enter the name for the Payment Term, to be shown in the 'Payment Terms: Browse' window and the 'Paste Special' list.
- Type
- The Payment Terms can belong to one of four types. The type determines how the due date is calculated.
- Normal
- A normal payment. The value in the Net Days field shows how many days the Due Date is from the Invoice Date.
- Credit
- This type is used for Credit Notes, to make sure that the accounts receivable and payable are updated correctly. You should have at least one Payment Term record of this type if you wish to raise Credit Notes.
- Cash
- This type is used for cash payment. The number of days is not relevant. Invoices with this Payment Term are known as Cash Notes.
- In the Sales Ledger, when you approve a Cash Note, a Nominal Ledger Transaction will be created which debits the Cash Account (or, if that is blank, the Cash Account on the 'Debtors' card of the Account Usage S/L setting) and credits the appropriate Sales Account for each Item on the Invoice. Therefore, no posting to a Debtor Account is made as the Cash Note is immediately treated as paid. There is no need to enter a Receipt.
- Cash Notes behave in a similar fashion in the Purchase Ledger. In this case, the Cash Account (or, if that is blank, the Cash Account on the 'Creditors' card of the Account Usage P/L setting) is credited. There is no need to enter a Payment.
- In the Sales Ledger, when you approve a Cash Note, a Nominal Ledger Transaction will be created which debits the Cash Account (or, if that is blank, the Cash Account on the 'Debtors' card of the Account Usage S/L setting) and credits the appropriate Sales Account for each Item on the Invoice. Therefore, no posting to a Debtor Account is made as the Cash Note is immediately treated as paid. There is no need to enter a Receipt.
- Next Month
- If you choose this type it means that the value in the field Net Days stands for that specific day of the month.
- Since it is a fixed date (if the field contains 15 it means the 15th of the month) instead of a certain number of days, this results in a credit period of between 15 and 45 days, depending on when the Invoice is created.
- Normal
Price Lists
Please click here for full details of this setting.Reminder Texts
You can print Reminders for sending to Customers whose Invoices have become overdue for payment. A separate Reminder document will be printed for each overdue Invoice, containing a message of increasing severity that depends on the number of previous Reminders. You can compose these messages in this setting.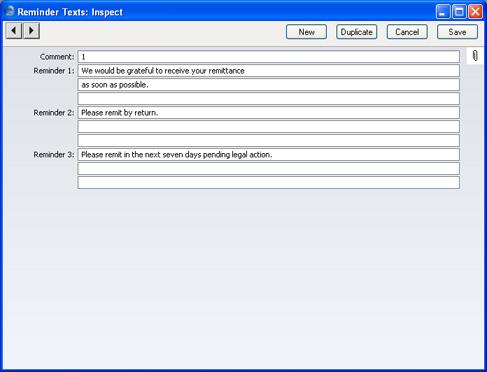
FirstOffice supports a single set of Reminder Texts. To enter your text, double-click 'Reminder Texts' in the 'Settings' list and then click [New] when the browse window appears. If a set of Reminder Texts already exists, a record will be shown in the browse window. Double-click to edit. In both cases, when the record is complete, click the [Save] button in the Button Bar to save it.
- Comment
- Enter a descriptive name for this set of Reminders.
- Reminder 1, 2, 3
- Use these fields to enter three messages of increasing severity.
- Each Invoice contains a Reminder Level (visible on the 'Delivery' card) indicating how many previous Reminders have been sent. When you next print a Reminder for an Invoice, the message it contains will be chosen depending on the Reminder Level of the Invoice. For example, if the Reminder Level of an Invoice is 2, the message will be taken from the Reminder 2 field in this setting, and so on. If the Reminder Level of an Invoice is greater than 3, a Reminder document will be printed, but it will not contain a message.
Units
Enter here the different shipping and pricing Units used in your business (e.g. single Items, pairs and dozens). Once you have entered your Units to this setting, you can assign them to your Items using the Unit field on the 'Pricing' card of each Item record. This is the quantity to which all prices refer. For example, if an Item is bought and sold in boxes of twelve, its Unit should be "Dozen". When the Item is included in a transaction of any kind (e.g. Goods Receipt or Invoice), the Quantity will refer to this Unit. If the Quantity in an Invoice is 2, this means "two boxes of twelve". The Base and Cost Prices of the Item will also refer to this Unit. If the Base Price is 85.00, this means "85.00 for a box of twelve".On double-clicking 'Units' in the 'Settings' list, the 'Units: Browse' window is displayed, showing all Unit records previously entered. Double-click an item in the list to edit, or add a new record by clicking the [New] button in the Button Bar. When the record is complete, click the [Save] button in the Button Bar to save it.
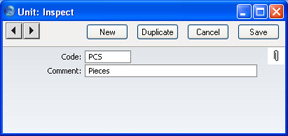
- Code
- Enter the unique Code by which the Unit record is to be identified from elsewhere in FirstOffice. You can enter up to five characters, and you can use both numbers and letters.
- Comment
- Here you enter the name for the Unit record as it will be shown in the 'Units: Browse' window and the 'Paste Special' list.