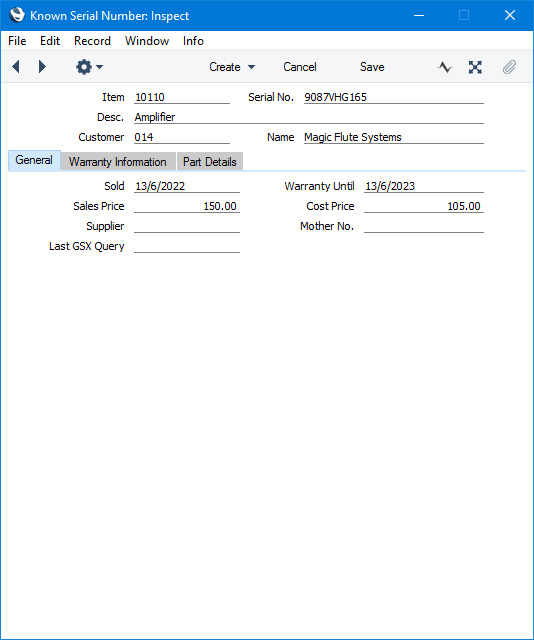
The Known Serial Number Register
The Known Serial Number register contains separate records for each Serial Numbered Item that has passed through your business. These are Items that you have sold and/or Items that you have repaired.When you enter a Serial Number in Activities, Contracts, Service Orders and Service Stock Transactions, the information in this register will cause all Item and Customer information to be brought in automatically. The register can also contain warranty information for each Serial Numbered Item that you have sold.
You can enter records to the Known Serial Number register in four ways:
- Whenever you sell an Item with a Serial Number, you can have it added to the Known Serial Number register. This will happen when you mark the Invoice or POS Invoice as OK and save. This feature is optional: if you need the Known Serial Number register to be updated in this way, select the Update Known Serial Number Register option in the Stock Settings setting.
The Known Serial Number register will only be updated from Invoices, not from Deliveries. In most cases, an Invoice resulting from a Sales Order will not include individual Serial Numbers but the Invoice will be able to fetch the Serial Number(s) from the Delivery and update the Known Serial Number Register correctly. However, if you have invoiced a partial Delivery for a Serial Numbered Item, subsequent Invoices will not update the Known Serial Number Register. For example, if the quantity in a row in an Order for a Serial Numbered Item is four and you deliver and invoice two units, records for those two units will be created in the Known Serial Number register. When you deliver and invoice the remaining two units, the Known Serial Number will not be updated. You can avoid this issue using the following methods:
- When entering Orders, list Serial Numbered Items in individual rows in which the quantity is one, especially if partial delivery and partial invoicing is likely.
- Select the Invoice Based on Delivery option in the Order Settings setting in the Sales Orders module. This will cause the delivered Serial Numbers to be copied to the Invoice, allowing the Known Serial Number register to be updated correctly.
- Create Invoices from Deliveries not from the governing Sales Orders.
- When entering Orders, list Serial Numbered Items in individual rows in which the quantity is one, especially if partial delivery and partial invoicing is likely.
- Whenever you mark a Service Stock Transaction as OK and save, the Item/Serial Number(s) in the record will be added to the Known Serial Number register if they aren't already there.
- Whenever you mark an Items In record that you have created from a Service Order as Accepted and save, the Item/Serial Number(s) in the record will be added to the Known Serial Number register if they aren't already there. Similarly, marking an Items Out record that you have created from a Service Order as Sent and save will add the Item/Serial Number(s) to the Known Serial Number register if needed.
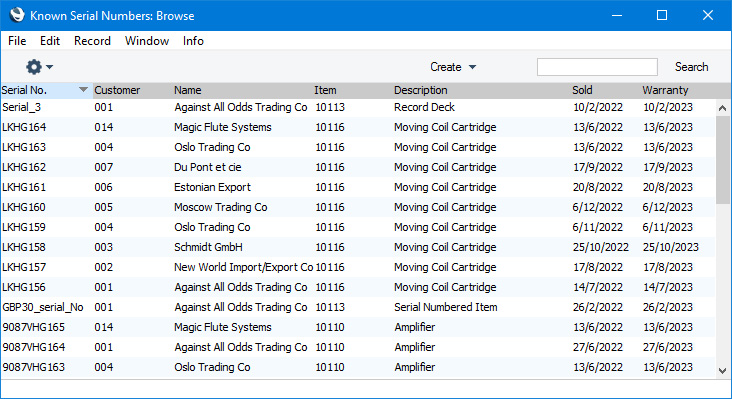
- If you are using the Update Known Serial Number Register option mentioned in point 1, marking a Stock Transfer record that includes an Item with a Serial Number as OK and saving will cause a record for that Item/Serial Number to be added to the Known Serial Number register. This record will then be updated whenever you move this Item out of and in to your internal stock using Items Out and Items In records. From an Items Out record, the Customer in the Items Out record will be copied to the Known Serial Number record, so you will be able to see where it is currently situated. From the Stock Transfer and the Items In record, the Customer in the Known Serial Number record will be changed to the text "Rental Item". As the Customer is shown in the 'Known Serial Numbers: Browse' window, opening this browse window will show you at a glance whether Serial Numbered units are available for rent (marked with the text "Rental Item" in the Name column) or are out with a Customer (the Customer Number and Name will be shown).
- You can import information to the Known Serial Number register.
- You can enter information directly to the Known Serial Number register, as described on this page.
- Item
- Paste Special
Item register
- Enter the Item Number of the Item. When you press Tab or Return, the Item Name will appear in the Description field below.
- Serial No.
- Enter the Serial Number of the Item here. You can only enter one Known Serial Number record for a particular Item/Serial Number combination.
- Desc.
- The Item Name will be placed here after you have entered the Item Number in the field above.
- Customer
- Paste Special
Customers in Contact register
- Enter here the Contact Number of the Customer. Usually this will be the Customer that owns the Item/Serial Number (e.g. the Customer to whom you have sold it), but in the case of a Rental Item it can also be the Customer that is currently renting the Item/Serial Number. When you press Tab or Return, the Customer Name will appear in the Name field to the right.
- Name
- The Customer Name will be placed here after you have entered the Customer Number in the field to the left.
- Sold
- Paste Special
Choose date
- Specify here the date when the Customer purchased the Item.
If the record was created automatically from another record, the following date will be placed here:
- from an Invoice or POS Invoice row, the Transaction Date.
- from a Service Stock Transaction row, the Sold Date on flip C.
- from a Stock Transfer row, no date will be transferred.
- from an Items Out row, no date will be transferred.
- from an Items In row, the Purchase Date on flip B.
- from an Invoice or POS Invoice row, the Transaction Date.
- Warranty Until
- Paste Special
Choose date
- Specify here the date when the warranty on the Serial Numbered Item expires.
- If the record was created automatically from another record, the following date will be placed here:
- from an Invoice or POS Invoice row, this date will be calculated by adding the number of Warranty Months specified on the 'Recipe' card of the Item record to the Invoice Transaction Date.
- from a Service Stock Transaction row, the Warranty Ends date on flip C.
- from a Stock Transfer row, no date will be transferred.
- from an Items Out row, no date will be transferred.
- from an Items In row, the Warranty End date on flip B.
- If you use the Serial Number in a Service Order, the Invoicing Type will be set to "Warranty" automatically if the Service Order date is earlier than this Warranty Until date.
- If you need Warranty Until dates to be printed on Service Order forms, add the "Warranty Until, Row " field to your Form Template design.
- If the record was created automatically from another record, the following date will be placed here:
- Sales Price
- The price the Customer paid when buying the Item. If the record was created automatically from another record, the following price will be placed here:
- from an Invoice or POS Invoice row, the Unit Price (in the Currency of the Invoice).
- from a Service Stock Transaction row, the Unit Price on flip A.
- from a Stock Transfer row, no price will be transferred.
- from an Items Out row, no price will be transferred.
- from an Items In row, the Purchase Price on flip B.
- from an Invoice or POS Invoice row, the Unit Price (in the Currency of the Invoice).
- Cost Price
- If the Customer purchased the Item from your business, enter the Cost Price of the Item here. If the record was created automatically from another record, the following price will be placed here:
- from an Invoice or POS Invoice row, the Cost Price (in your home Currency).
- from a Service Stock Transaction row, the Unit Cost on flip A.
- from a Stock Transfer row, no cost will be transferred.
- from an Items Out row, no cost will be transferred.
- from an Items In row, the Cost on flip C.
- from an Invoice or POS Invoice row, the Cost Price (in your home Currency).
- Supplier
- Paste Special
Suppliers in Customer register
- If the Customer purchased the Item from your business, enter your Supplier here. If the Customer did not purchase the Item from your business and you want to record the company that they did purchase it from, you could do so using this field.
- If the record was created automatically from a Service Stock Transaction row or from a row in an Items In record, the Supplier from flip D or flip C respectively will be copied here.
- If the record was created automatically from a Service Stock Transaction row or from a row in an Items In record, the Supplier from flip D or flip C respectively will be copied here.
- Mother No.
- Paste Special
Known Serial Number register
- If the Item is part of a larger Item, enter the Serial Number of the larger Item here.
- Image, Exploded View, Manual
- Use these fields to enter URLs to an image, exploded view and manual for the Item. The URL that you enter should include http:// or https://.
- If you need to be taken to one of these URLs in a new tab in your default browser, place the insertion point in the field containing the URL that you need and then select 'Open selected Link in Browser' from the Operations menu (Windows/macOS) or Tools menu (iOS/Android).
---
Go back to:
- Home page for Service Orders manual
- Home page for Standard ERP manual
Work Flow using Known Serial Numbers
It is possible to run a service department using the Known Serial Number register as a basis, as follows:- When a call comes in or an Item is brought in for repair, open the Known Serial Number register and search for the Serial Number in the 'Known Serial Numbers: Browse' window.
- If the Serial Number is already in the Known Serial Number register, Customer, Item and warranty information will immediately be available. Highlight the record in the browse window and select 'Serial Number History' from the Operations menu (Windows/macOS) or Tools menu (iOS/Android) to see the previous history of the Serial Number.
- If the Serial Number is not in the Known Serial Number register, create a new record with Customer, Item and warranty information.
- You can create a Service Order for the Item/Serial Number using one of two methods:
- Highlight the Known Serial Number record in the browse window and select 'Service Order' from the Create menu (Windows/macOS) or + menu (iOS/Android). A new Service Order will be created and opened immediately for processing.
- You can work through Activities. Highlight the Known Serial Number record in the browse window and select 'Activity' from the Create or + menu.
A new Activity opens, containing Customer, Item and Serial Number information taken from the Known Serial Number register. Enter Text and Person(s) as appropriate.
Specify an appropriate Activity Type and Result combination, tick Done and save the Activity. This will cause a Service Order to be created automatically, containing the Customer, Item, Serial Number and warranty information. An appropriate Activity Type and Result combination is one for which you have entered a record in the Activity Consequences setting in which you have selected the Generate Service Order option.
The new Service Order and the Activity will be connected to each other through the Link Manager so you can open the Service Order from the Link Manager in the Activity. Another way to open the Service Order is to place the cursor in the Service Order field on the 'Service' card in the Activity and press F2 (Windows) or the ⌘-Shift-V key combination (macOS). The Service Order opens.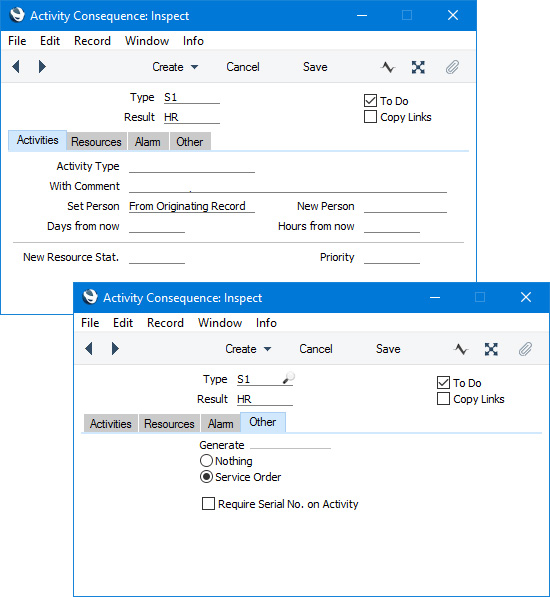
If you need a second Activity to be created automatically at the same time as the Service Order, specify an Activity Type in the Activity Consequence record (on the 'Activities' card). If this field is empty as in the illustration above, a second Activity will not be created. If a second Activity is created, it will include Item and Serial Numbers and the Service Order Number of the new Service Order.
- Highlight the Known Serial Number record in the browse window and select 'Service Order' from the Create menu (Windows/macOS) or + menu (iOS/Android). A new Service Order will be created and opened immediately for processing.
- If you need to receive the repair item into the workshop, you can create a Service Stock Transaction, either from the Service Order record or by entering one directly to the Service Stock Transaction register. The repair item thus enters the repair cycle as described here: please follow the link for more details.
The Known Serial Number register in Standard ERP:
- Introduction
- Work Flow using Known Serial Numbers
- Operations menu
- Create menu
- Home page for Service Orders manual
- Home page for Standard ERP manual
Operations Menu - Known Serial Numbers

If you are using Windows or macOS, you can open the Operations menu by clicking the button with the 'cog' icon (shown highlighted in the illustration above). If you are using iOS or Android, you can access the Operations menu functions through the Tools menu (with 'wrench' icon).
Before using the function on the Operations menu in the 'Known Serial Numbers: Browse' window, you should highlight a record in the browse window. The function will then be applied to that record. If you are using iOS or Android, you can highlight a record in the browse window by searching for it.
Please follow the links below for details about the functions on the Operations menu:
The Known Serial Number register in Standard ERP:
- Introduction
- Work Flow using Known Serial Numbers
- Operations menu
- Create menu
- Home page for Service Orders manual
- Home page for Standard ERP manual
Operations Menu - Known Serial Number - Serial Number History
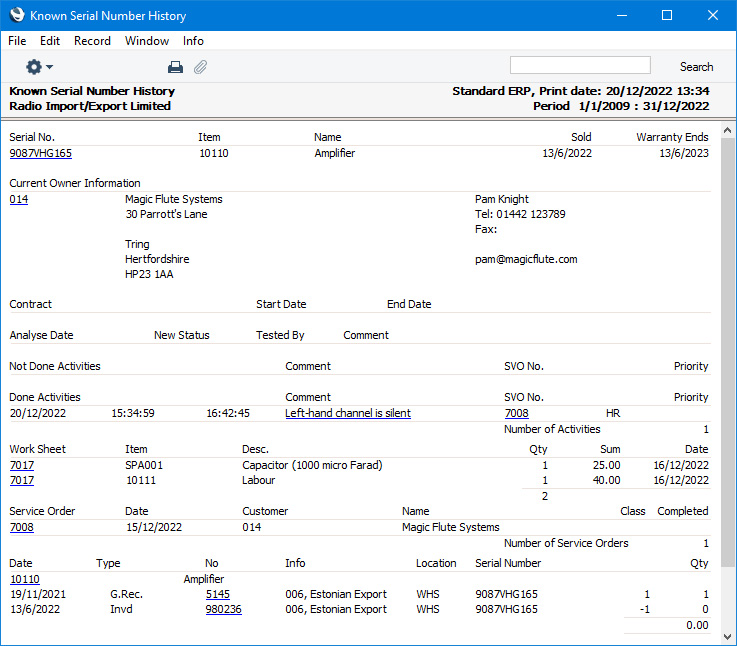
This page describes the 'Serial Number History' function on the Operations menu in the 'Known Serial Numbers: Browse' window and in the Known Serial Number record window. If you are using iOS or Android, the 'Serial Number History' function is on the Tools menu (with 'wrench' icon).---
The 'Serial Number History' command prints a Known Serial Number History report to screen. This is a comprehensive report showing the full history of the Serial Numbered Item currently open in a record window or of the first Serial Number highlighted in the 'Known Serial Numbers: Browse' window. If you are using iOS or Android, you can highlight a Serial Number in the browse window by searching for it. You can also produce this report from the Operations menu in the 'Paste Special' list of Known Serial Numbers (Windows/macOS only).
As is shown in the example illustration below, the report is structured as follows:
- Basic Item, Customer and warranty information. Drill down from the Serial Number to the Known Serial Number record and from the Customer Number to the Customer record.
- Contract status. To appear in this section, the Item and Serial Numbers must be quoted in the Original Item and Original Serial No. fields on flip E of the Contract. Drill down from the Contract Number to the Contract record.
- Batch Quality Control history. Drill down from the Analyse Date to the Batch Quality Control record.
- Activity history. Separate sections are provided for Activities that you have marked as Done and those that you have not marked as Done. To appear in this section, the Item and Serial Numbers must be quoted in the Item and Serial No. fields on the 'Service' card of the Activity. Drill down from the Comment to the Activity record and from the Service Order Number if there is one to the Service Order record.
- Work Sheets recording previous work on the Item/Serial Number. Drill down from the Work Sheet Number to the Work Sheet record.
- Original sale information including the sales Invoice issued by you to the Customer and the Goods Receipt that originally received the Item into your stock. Drill down from the Invoice Number to the Invoice record, and from the Goods Receipt Number to the Goods Receipt record.

The Known Serial Number register in Standard ERP:
- Introduction
- Work Flow using Known Serial Numbers
- Operations menu, including:
- Serial Number History
- Open selected Link in Browser
- Serial Number History
- Create menu
- Home page for Service Orders manual
- Home page for Standard ERP manual
Operations Menu - Known Serial Number - Open selected Link in Browser
This page describes the 'Open selected Link in Browser' function on the Operations menu in the Known Serial Number record window. If you are using iOS or Android, the 'Open selected Link in Browser' function is on the Tools menu (with 'wrench' icon).---
If you have entered URLs in the Image, Exploded View and/or Manual fields in a Known Serial Number record, you can use the 'Open selected Link in Browser' function to be taken to the URL in a new tab in your default browser. Place the insertion point in the relevant field (Image, Exploded View or Manual) and select 'Open selected Link in Browser' from the Operations menu (Windows/macOS) or Tools menu (iOS/Android). A new tab in your default browser will be opened immediately, taking you to the specified web page.
---
The Known Serial Number register in Standard ERP:
- Introduction
- Work Flow using Known Serial Numbers
- Operations menu, including:
- Serial Number History
- Open selected Link in Browser
- Serial Number History
- Create menu
- Home page for Service Orders manual
- Home page for Standard ERP manual
Operations Menu - Known Serial Number - Serial Number History
This page describes the 'Serial Number History' function on the Operations menu in the 'Known Serial Numbers: Browse' window and in the Known Serial Number record window. If you are using iOS or Android, the 'Serial Number History' function is on the Tools menu (with 'wrench' icon).---
The 'Serial Number History' command prints a Known Serial Number History report to screen. This is a comprehensive report showing the full history of the Serial Numbered Item currently open in a record window or of the first Serial Number highlighted in the 'Known Serial Numbers: Browse' window. If you are using iOS or Android, you can highlight a Serial Number in the browse window by searching for it. You can also produce this report from the Operations menu in the 'Paste Special' list of Known Serial Numbers (Windows/macOS only).
As is shown in the example illustration below, the report is structured as follows:
- Basic Item, Customer and warranty information. Drill down from the Serial Number to the Known Serial Number record and from the Customer Number to the Customer record.
- Contract status. To appear in this section, the Item and Serial Numbers must be quoted in the Original Item and Original Serial No. fields on flip E of the Contract. Drill down from the Contract Number to the Contract record.
- Batch Quality Control history. Drill down from the Analyse Date to the Batch Quality Control record.
- Activity history. Separate sections are provided for Activities that you have marked as Done and those that you have not marked as Done. To appear in this section, the Item and Serial Numbers must be quoted in the Item and Serial No. fields on the 'Service' card of the Activity. Drill down from the Comment to the Activity record and from the Service Order Number if there is one to the Service Order record.
- Work Sheets recording previous work on the Item/Serial Number. Drill down from the Work Sheet Number to the Work Sheet record.
- Original sale information including the sales Invoice issued by you to the Customer and the Goods Receipt that originally received the Item into your stock. Drill down from the Invoice Number to the Invoice record, and from the Goods Receipt Number to the Goods Receipt record.
The Known Serial Number register in Standard ERP:
- Introduction
- Work Flow using Known Serial Numbers
- Operations menu, including:
- Serial Number History
- Open selected Link in Browser
- Serial Number History
- Create menu
- Home page for Service Orders manual
- Home page for Standard ERP manual
Create Menu - Known Serial Numbers - Activity, Workflow Activity
This page describes the 'Activity' function on the Create menu in the 'Known Serial Numbers: Browse' window and the 'Workflow Activity' function on the Create menu in the Known Serial Number record window. If you are using iOS or Android, both functions are on the + menu.---
Create an Activity from a Known Serial Number record can be useful if, for example, you need to schedule a repair to an Item/Serial Number and/or if you want to create a Service Order for such an Item.
You can create an Activity from a Known Serial Number record using the following methods:
- Highlight the Known Serial Number record in the 'Known Serial Numbers: Browse' window, and then select 'Activity' from the Create menu (Windows/macOS) or + menu (iOS/Android). If you are using iOS or Android, you can highlight a record in the browse window by searching for it. An Activity will be created for the Known Serial Number record that you highlighted and will be opened automatically for checking and approval. If you highlighted several records before selecting the function, an Activity will only be created for the first highlighted record.
- Open the Known Serial Number record in a record window and select 'Workflow Activity' from the Create or + menu. Save any changes you have made to the Known Serial Number before selecting the function. The new Activity will be opened automatically for checking and approval.
- Open the Service Order in a record window and then open the 'Workflow Manager' window. Click or tap the [+] button in this window to create a new Activity. Again, the new Activity will be opened automatically for checking and approval.
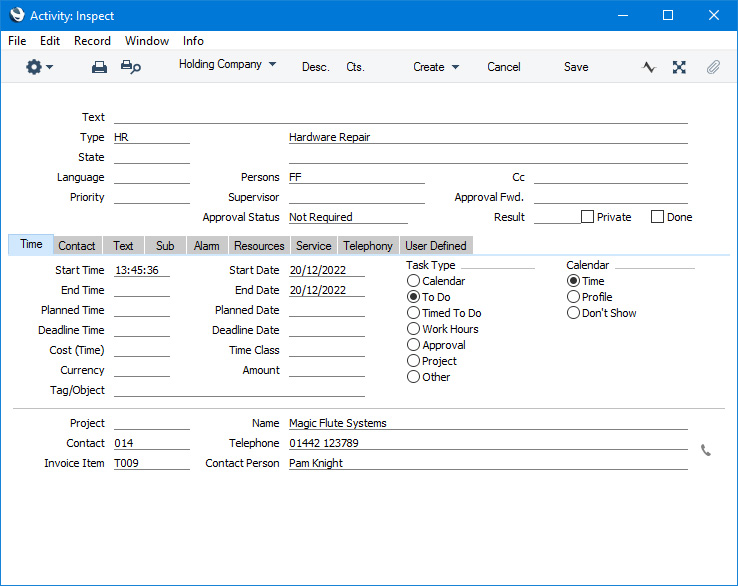

After amendment if necessary, save the record in the Activity register by clicking the [Save] button (Windows/macOS) or tapping √ (iOS/Android). You can then close it using the close box (Windows/macOS) or by tapping < (iOS/Android). Alternatively, if you no longer require the Activity, remove it using the 'Delete' function on the Record menu (which has a 'cog' icon if you are using iOS or Android. In either case, you will be returned to the Known Serial Number window.
The 'Activity: Inspect' window is fully described here.
---
The Known Serial Number register in Standard ERP:
- Introduction
- Work Flow using Known Serial Numbers
- Operations menu
- Create menu, including:
- Activity, Workflow Activity
- Service Order
- Activity, Workflow Activity
- Home page for Service Orders manual
- Home page for Standard ERP manual
Create Menu - Known Serial Numbers - Service Order
This page describes the 'Service Order' function on the Create menu in the 'Known Serial Numbers: Browse' window. If you are using iOS or Android, the 'Service Order' function is on the + menu.---
You can create a Service Order for an Item with a particular Serial Number from the Known Serial Number record for that combination using one of two methods:
- Highlight the Known Serial Number record in the browse window and select 'Service Order' from the Create menu (Windows/macOS) or + menu (iOS/Android). A new Service Order will be created and opened immediately for processing. This method is described on this page.
- You can work through Activities. Highlight the Known Serial Number record in the browse window and select 'Activity' from the Create or + menu.
A new Activity will open, containing Customer, Item and Serial Number information taken from the Known Serial Number register. Enter Text and Person(s) as appropriate.
Specify an appropriate Activity Type and Result combination, tick Done and save the Activity. This will cause a Service Order to be created automatically, containing the Customer, Item, Serial Number and warranty information. An appropriate Activity Type and Result combination is one for which you have entered a record in the Activity Consequences setting in which you have selected the Generate Service Order option.
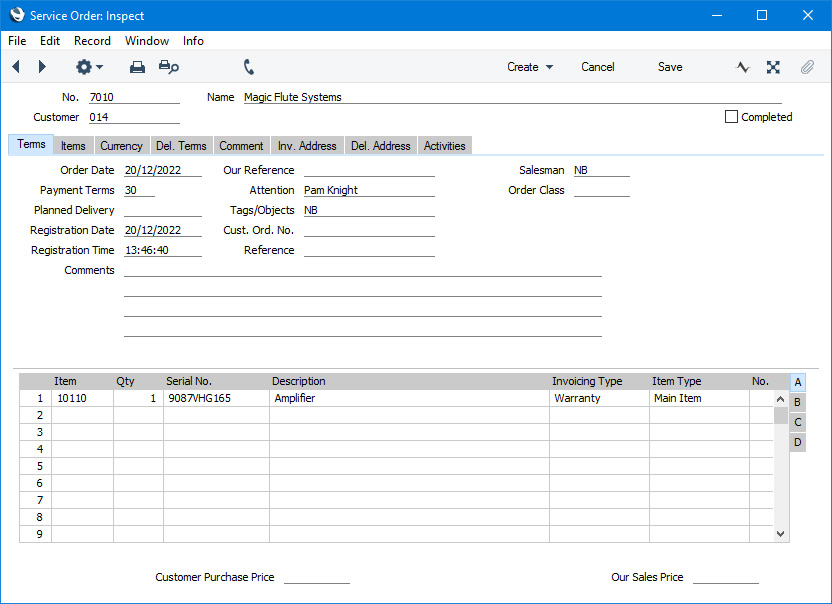
After creating the Service Order, proceed with the Service Order workflow as described on the Entering a Service Order page.
---
The Known Serial Number register in Standard ERP:
- Introduction
- Work Flow using Known Serial Numbers
- Operations menu
- Create menu, including:
- Activity, Workflow Activity
- Service Order
- Activity, Workflow Activity
- Home page for Service Orders manual
- Home page for Standard ERP manual