Balance Sheet
The Balance Sheet shows the assets, liabilities and capital of the company at a given point in time. You can use the Balance Sheet model supplied with FirstOffice, or you can define your own, possibly editing the standard definition to suit your needs.Setting up a Balance Sheet
You can define the structure of the Balance Sheet to suit your requirements. The following example illustrates the set-up process.To change the report definition of the Balance Sheet, first select 'Settings' from the File menu and double-click 'Report Settings' in the subsequent list. Then, highlight 'Balance Sheet' in the list on the left-hand side of the 'Report Settings' window and click the [Definition] button. The 'Definition of Balance Sheet: Browse' window is opened.
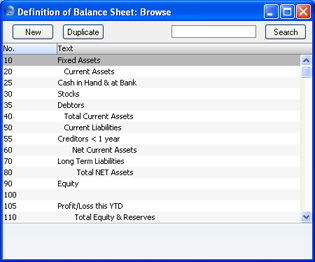
Double-click the first row, "10: Fixed Assets".
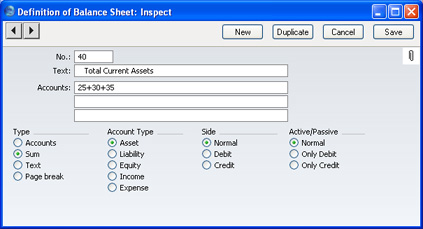
The 'Definition of Balance Sheet Definition: Inspect' window is opened with the current definition of the row.
The number identifies the row in the Balance Sheet, and the text "Fixed Assets" is printed in the report as a heading for a group of Accounts.
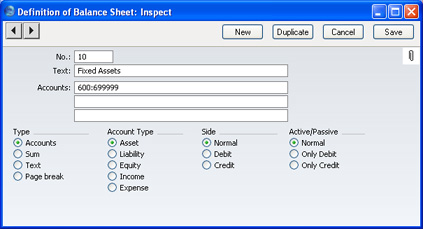
Of the four Type options, "Accounts" has been selected to indicate that each of the Accounts in the number interval will be presented individually. After the last Account in the group, a total for the group will be printed.
The Account Type is "Asset". The Account Type concept is explained on the page describing the Accounts setting.
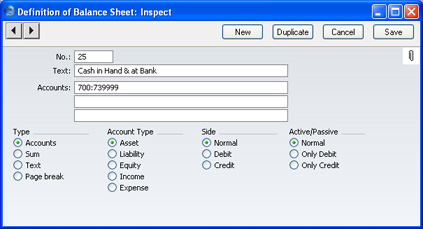
The Side and Active/Passive options are described on the Special Features of the Balance Sheet page.
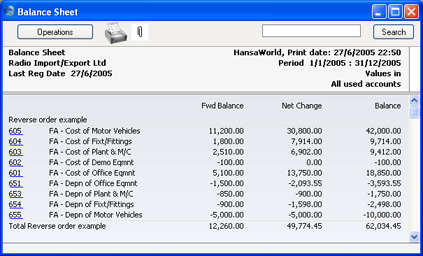
The Accounts field consists of three rows, with room for a definition 300 characters long. As alternatives to specifying a range of Accounts, you can also specify a number of individual Accounts, or ranges of Accounts, separated by commas. If you enter a range of Accounts with the highest number first, the Accounts in that range will be presented in reverse order. For example, the sequence "605:601,626,651:655" will appear as follows in the printed report:
! | If you move from record to record by clicking the [Next Record] or [Previous Record] buttons, remember that any changes you make will be saved. If you don't want to save the changes, you must use the close box, or click [Cancel]. |
When you have finished with the last row, if you want to save your changes, click [Save], or else close the window with the close box. Then, close the list of definitions using the close box once again.
The new Balance Sheet report is now ready to print.
! | FirstOffice comes with a standard Chart of Accounts and a set of Report Definitions. This is a well-structured Chart, with systematic groupings of Accounts. It is suitable without any changes for most small or medium companies, but it is also easily modified by you or your financial adviser. |
If you stay within the structure of the Chart (e.g. avoid putting Liability Accounts among the Assets!), there is no need to alter the definitions. But remember, it is a good idea to print a test Balance Sheet to see if your definitions produce exactly what you expect.
Setting up a Balance Sheet - Inserting a Row in the Balance Sheet
- Click the [Settings] button in the Master Control panel and double-click 'Report Settings' in the subsequent list. Then, highlight 'Balance Sheet' in the list on the left-hand side of the 'Report Settings' window and click the [Definition] button.
The 'Definition of Balance Sheet: Browse' window is opened.
- Click [New] or highlight a row similar to the one you are creating and click [Duplicate].
An empty form or a copy of the highlighted row is opened.
- Enter the information for the new row.
Remember to give the new row a number that will insert it in the right place in the Balance Sheet. (If you want to insert a row between e.g. rows 30 and 40, you can use 35.)
- Click [Save] and close the window, or click the close box to cancel.
You will now be brought back to the 'Definition of Balance Sheet: Browse' window, where the new row is shown in its proper place in the list.
Setting up a Balance Sheet - Deleting a Row from the Balance Sheet
- Click the [Settings] button in the Master Control panel and double-click 'Report Settings' in the subsequent list. Then, highlight 'Balance Sheet' in the list on the left-hand side of the 'Report Settings' window and click the [Definition] button.
The 'Definition of Balance Sheet: Browse' window is opened.
- Double-click the row you want to remove, to show its definition window.
- Select 'Delete' from the Record menu.
The row is deleted from the Balance Sheet and the definition for the following row is shown in its place.
- Close the window.
You will be returned to the 'Definition of Balance Sheet: Browse' window.
! | You cannot undo the deletion of a row in the Balance Sheet. |
Printing a Balance Sheet
Click the [Reports] button in the Master Control panel and then double-click 'Balance Sheet' in the 'Reports' list. The 'Specify Balance Sheet' window is opened.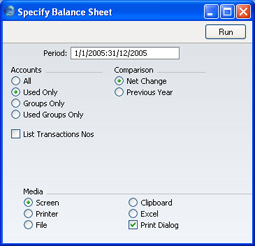
- Period
- Paste Special
Reporting Periods setting
- Enter the period for the Balance Sheet you want to print. FirstOffice will suggest the first period in the Reporting Periods setting as a default.
- Accounts
- Select how you want the Accounts printed in the report.
- All
- This option will show all Accounts that have been included in the Balance Sheet definitions.
- Used Only
- This option will only show Accounts that have been used. This includes Accounts that have balances brought forward from a previous period but that have not been used in the report period.
- Groups Only
- This option does not show balances for individual Accounts. Instead, it simply shows an overall balance for each row as entered in the Balance Sheet definitions.
- Used Groups Only
- This option only shows balances for rows as entered in the Balance Sheet definitions that have been used.
- All
- Comparison
- Choose to compare with Net Change or the Previous Year.
- List Transaction Nos
- With this box checked, the Transaction Numbers of all Transactions that fall within the reporting period, together with debit and credit totals, will be listed at the bottom of the report.
When printed to screen, the Balance Sheet has FirstOffice's Drill-down feature. Click on the Account Number of any Account in the report to open the Nominal Ledger Report for the same Account and period. From the Nominal Ledger report, you can click on any Transaction Number to open an individual Transaction record.
Special Features of the Balance Sheet
This page has no relevance for those companies that practise standard western accounting conventions.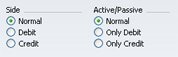
To complicate things even further, in some countries it is customary to distinguish between four different "states" of a book entry: Debit+, Debit-, Credit+ and Credit-. In modern western accounting systems, a book entry is either debit or credit, regardless of the class of the account, i.e. we have a simple arithmetic definition of balances.
In those environments where all these special rules are used, the preparation of balance reports tends to become complicated and labour consuming. These special functions of FirstOffice allow the far-reaching automation of many of these routine tasks. This is how it works.
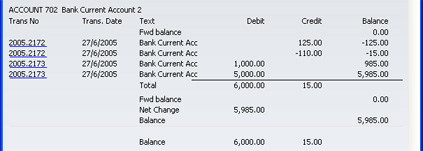
Let us start with the following Nominal Ledger report, showing the actual debit and credit balances for two Accounts.
Account 702 - Bank Current Account 2:


With Side:Debit and Active/Passive:Only Credit selected, once again nothing will be shown.
The combination Side:Credit and Active/Passive:Normal shows the credit column balances for both Accounts:
