Entering a Purchase Invoice
To enter a new Purchase Invoice, open the 'Purchase Invoices: Browse' window as described here and click [New] in the Button Bar or use the Ctrl-N (Windows) or ⌘-N (Macintosh) keyboard shortcut. Alternatively, highlight a Purchase Invoice similar to the one you want to enter and click [Duplicate] on the Button Bar.
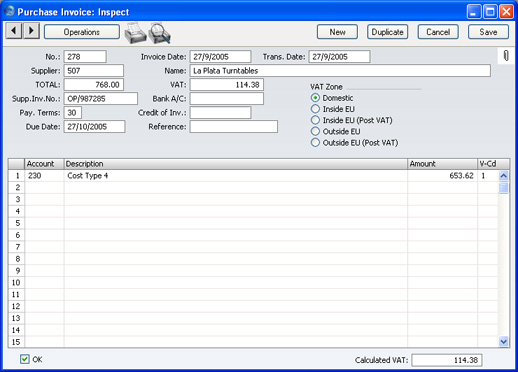
The 'Purchase Invoice: New' window is opened, empty if you clicked [New] or with a copy of the copied Purchase Invoice. In the case of the copy, the Invoice and Transaction Dates of the new Purchase Invoice will be the current date, not the date of the copied Purchase Invoice, and the Supplier Invoice Number will not be copied. Complete the Purchase Invoice record as described below, then save it using the [Save] button and close the window by clicking the close box. Then, close the browse window using the close box again.
- No.
- The number of the Invoice in your Purchase Ledger is provided automatically by FirstOffice following on from the Number of the last Purchase Invoice entered. Note that this is not the number given to the Invoice by the Supplier but a unique identifier that is used by FirstOffice whenever it is necessary to refer to the Invoice.
- When you start using FirstOffice, the Purchase Invoice Number sequence will start at 1 and continue consecutively. If you want the sequence to start from another number, change the Number of the first Invoice: FirstOffice will then continue the sequence from there. You can then change the Number of any subsequent Invoice if you want to use another number sequence. Note that you must change the Invoice Number before you save the Purchase Invoice: it cannot be changed afterwards.
- Invoice Date
- Paste Special
Choose date
- This date, together with the Payment Terms, will determine when the Invoice will become due for payment. The date of the previous Purchase Invoice entered is used as a default.
- Trans. Date
- Paste Special
Choose date
- The Transaction Date for the Nominal Ledger Transaction. You may thus separate Invoice and Transaction Dates in your ledger. It determines the accounting period for the Invoice.
! | If you enter different Invoice and Transaction Dates, there will be a timing difference between the Purchase and Nominal Ledgers so long as the Invoice remains unpaid. This will be apparent when comparing the Aged Creditors report with the Creditor Control Account. | |
- Supplier
- Paste Special
Suppliers in Customer register
- Enter the Supplier Number or use the 'Paste Special' function. When you press Return, the Supplier's name, address and other information will be entered into the appropriate fields.
- Name
- The Supplier's Name is entered after you have entered the Supplier Number.
- TOTAL
- The total amount to pay for this Invoice, including any taxes. Before you can save the Purchase Invoice, this figure must equal one of the following, depending on the Zone of the Invoice:
- Domestic, Inside EU (Post VAT) and Outside EU (Post VAT)
- the sum of the Amounts of the rows plus VAT before the Purchase Invoice can be saved.
- Inside EU
- the sum of the Amounts of the rows.
- Outside EU
- the sum of the Amounts of the rows. No VAT is calculated in this case.
The Zone is taken from the Customer record for the Supplier.
- VAT
- Enter the VAT amount from the Purchase Invoice.
- There is no need to enter a figure to this field, but if you do enter one, it should equal the VAT sum for each row (shown in the Calculated VAT field in the footer) before you can save the Purchase Invoice. This field therefore provides a control figure.
- If the Invoice is from the Inside EU or Outside EU Zones, you should leave this field blank. In the case of the Inside EU Zone, VAT is calculated using the VAT Code of each row and is shown in the Calculated VAT field in the footer.
- Supp. Inv. No.
- The Supplier's invoice number.
- Bank A/C
- Default taken from
Customer
- The Supplier's bank account number is brought in from the 'Account' card of the Customer record for the Supplier. If necessary, it can be changed to allow payment to be sent to a different account.
- Pay. Terms
- Paste Special
Payment Terms setting
- Default taken from Customer (Purch. Pay Terms)
- Payment Terms entered here will be used to calculate the Due Date (below).
- Payment Terms are also the means by which Cash Notes and Credit Notes are distinguished from ordinary Invoices. Using 'Paste Special', select a Payment Term record of the "Cash" or "Credit Note" type respectively. When the record is then approved and saved, the appropriate Nominal Ledger Transaction will be created. In the case of Cash Notes, this will credit the Cash Account (as specified in the Payment Term record or in the Account Usage P/L setting) rather than the Creditor Account, while in the case of Credit Notes, the Transaction will be a reversal of the original Invoice Transaction.
- Cash Notes are immediately treated as paid and so will not appear in your creditor reports. There is no need to enter a Payment against them. If you need to reverse a Cash Note, use a negative Cash Note, not a Credit Note.
- When you select a Payment Term of the "Credit Note" type, enter the number of the Invoice to be credited in the Credit of Inv. field, using 'Paste Special' if necessary to bring up a list of open (unpaid) Invoices.
- Credit of Inv.
- Paste Special
Unpaid Purchase Invoices
- If you are entering a Purchase Credit Note, (a "debit note") enter here the number of the Purchase Invoice being credited. The Purchase Invoice being credited cannot itself be a credit note.
- Remember to specify a Payment Term of type "Credit Note" in the Payment Terms field: you must leave the Credit of Inv. field blank when the Payment Term is of any other type.
- Due Date
- The last day for payment of this invoice, calculated by FirstOffice using the Invoice Date and the Payment Terms. You can change the Due Date, even after the Invoice has been approved. If you receive an extended credit time for this Invoice, it will be re-scheduled in your Purchase Ledger.
- VAT Zone
- Default taken from
Customer
- This information is taken from the Customer record for the Supplier, and indicates the origin of the Supplier. The selection of a VAT Code for each row depends on the Zone of the Supplier. The Zone cannot be changed for an individual Invoice: any change should be made in the Customer register before entering Invoices.
- VAT is calculated as follows:
- Domestic, Inside EU (Post VAT) and Outside EU (Post VAT)
- VAT is calculated using the VAT Code of each row. In any Nominal Ledger Transaction resulting from the Invoice, VAT is debited to the Input Account from the VAT Code and credited to the Creditor Account.
- Inside EU
- Invoices received from other countries in the EU do not carry VAT. However, depending on the nature of the Invoice, VAT can be payable.
- VAT is calculated using the VAT Code of each row. In any Nominal Ledger Transaction resulting from the Invoice, VAT is debited to the Input Account from the VAT Code and credited to the Output Account from the VAT Code. Therefore, it is recommended that a dedicated VAT Code be used for VAT on EU Acquisitions, with an Output Account that is not used in any other VAT Code.
- It is usually recommended that you leave the VAT field in the header empty when entering Purchase Invoices from inside the EU.
- Outside EU
- VAT is not calculated. Any Nominal Ledger Transaction resulting from the Invoice will not include a VAT element.
The remainder of the Purchase Invoice screen contains a grid that you can use to list the Purchase Invoice Items and Costs. To add rows to a Purchase Invoice, click in any field in the first blank row and enter appropriate text. To remove a row, click on the row number on the left of the row and press the Backspace key. To insert a row, click on the row number where the insertion is to be made and press Return.
- Account
- Paste Special
Accounts setting
- Specify the Cost Account to be debited by the Purchase Invoice. Enter an Account number and press Enter. The Account name will be entered automatically to the Description field.
- If the Customer record for the Supplier has a Cost Account specified on the 'Account' card, this will be entered as a default.
- You can also enter the Code of an Autotransaction to this field. Autotransactions are used to automate the entry of frequently used Transactions, not only reducing labour but also ensuring the correct Accounts are used every time. Autotransactions are fully described here.
- Description
- Default taken from
Account
- The Account name is entered automatically. The text can be changed.
- Amount
- The amount to be debited to the Cost Account.
- A convenient way of quickly entering the correct value is to move the cursor into the field and then to press the Enter or Return key. FirstOffice will enter the correct value to balance the Invoice, taking the TOTAL and any previous rows into account.
- V-Cd
- Paste Special
VAT Codes setting
- The VAT Code entered here will determine the rate at which VAT will be charged on this Item and the Input VAT Account to be debited.
- A default is offered, depending on the Zone of the Supplier. If the Supplier is in the Domestic Zone, the VAT Code will be taken from the Account record or, if none is specified there, from the Account Usage P/L setting. Otherwise, the VAT Code will be that of the appropriate Zone specified in Account Usage P/L (that of the Account will be ignored).
- OK
- When you check this box and save the record by clicking [Save], the Purchase Invoice will be approved and entered into the Purchase Ledger, and a corresponding Transaction will be created in the Nominal Ledger. Because of these consequences, you will no longer be able to make changes to the Purchase Invoice except to the Due Date field.
- References in these web pages to approved Purchase Invoices are to Purchase Invoices whose OK check box has been switched on.
- Calculated VAT
- The VAT sum, calculated from the Purchase Invoice rows. This figure is calculated automatically as you add rows to the Purchase Invoice.
- This figure is rounded up or down according to rounding rules set in the Round Off setting. In the Nominal Ledger Transaction resulting from this Purchase Invoice, any amounts lost or gained in this rounding process are posted to the Round Off Account specified in the Account Usage S/L setting.
|