Entering a Receipt
To open the Receipt register, click the [Receipts] button in the Master Control panel, or use the Ctrl-2 (Windows and Linux) or ⌘-2 (Macintosh) keyboard shortcuts.

The 'Receipts: Browse' window is opened, showing Receipts already entered.
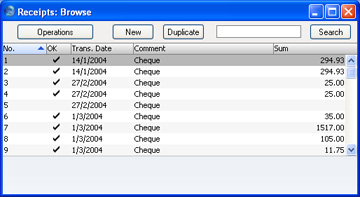
Receipts are numbered consecutively. In the list, the Receipt Number is followed by a check mark if the Receipt is approved, by the Date, any Comment and the total value of the Receipt.
To enter a new Receipt, click [New] in the Button Bar or use the Ctrl-N (Windows) or ⌘-N (Macintosh) keyboard shortcut. Alternatively, select a Receipt similar to the one you want to enter and click [Duplicate] on the Button Bar.
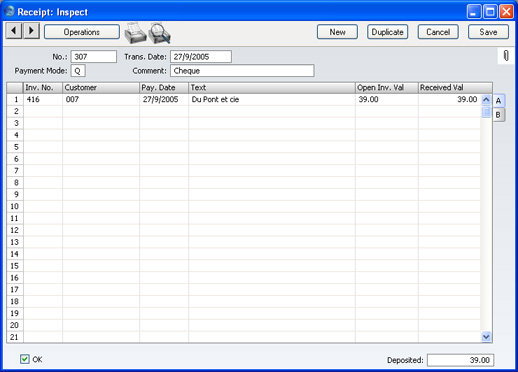
The 'Receipt: New' window is opened, empty if you clicked [New] or with a copy of the copied Receipt. Complete the Receipt record as described below, then save it using the [Save] button and close the window by clicking the close box. Then, close the browse window using the close box again.
The principle for entering a Receipt is that you know at least:
- How much has actually been received; and
- any extra fees charged by the bank.
First a run-through of the fields.
- No.
- The Serial Number of a new Receipt is provided automatically by FirstOffice following on from the Number of the last Receipt entered.
- When you start using FirstOffice, the Serial Number sequence will start at 1 and continue consecutively. If you want the sequence to start from another number, change the Number of the first Receipt: FirstOffice will then continue the sequence from there. You can then change the Number of any subsequent Receipt if you want to use another number sequence. Note that you must change the Serial Number before you save the Receipt: it cannot be changed afterwards.
- Trans. Date
- Paste Special
Choose date
- The Transaction Date for the Receipt: the date when the Receipt is posted to your Nominal Ledger.
- Payment Mode
- Paste Special
Payment Modes setting
- The Payment Mode is the method of payment (e.g. cheque, credit card or cash). It determines the Nominal Ledger Account that will be debited by the Receipt.
- On a single Receipt it is possible to enter payments from different Customers against different Invoices.
- However, it is not possible to enter payments across Payment Modes.
- Comment
- Default taken from
Payment Mode
- The text for the Payment Mode. This text may be changed.
- Use the grid area that takes up most of the screen to list the Invoices being paid by the Receipt. A single Receipt can be allocated to several Invoices, but all payments on a single Receipt must use the same Payment Mode. The Payment Mode reflects not only the payment method (i.e. cheque, cash or credit card) but also the Bank Account debited. So, all payments received in a single day and paid into a particular Bank Account can be entered using a single Receipt record.
- Each record in the Receipt register results in one Nominal Ledger Transaction, with bank or other institution as debit Account (taken from the Payment Mode).
- You can also bring Invoices into a Receipt by opening the 'Invoices: Browse' window, selecting a range of Invoices by clicking while holding down the Shift key, and then dragging them to the Invoice No field in the first empty Receipt row. You can also copy a list of Invoice Numbers in a spreadsheet or word processor and paste them in the Invoice No field in the first empty row.
Flip A
- Inv. No.
- Paste Special
Open, approved Invoices, Invoice register
- The number of the Invoice being paid. When you enter an Invoice Number, the Open Invoice Value (the amount outstanding) is shown, and this figure is also brought in to the Received Value field as a default.
- Note that when you use 'Paste Special', only unpaid Invoices will appear in the selection list. However, Invoices against which an unapproved Receipt has been entered are treated as unpaid and thus will be listed. Sorting the 'Paste Special' selection by Customer will allow you quickly to find the Invoice that is being paid.
- If the Receipt is an On Account Receipt from a Customer with an account (marked using the On Account box on the 'Terms' card of the Customer screen) for which an Invoice has not yet been raised, leave this field blank. This is fully described on the On Account Receipts page.
- Customer
- Paste Special
Customers in Customer register
- Default taken from Invoice
- Entered by FirstOffice when you enter an Invoice Number.
- Pay. Date
- The date when the payment was made. If you are not using the Allow Trans. Date Changing option in the Transaction Settings setting, this date must be the same as the Transaction Date (in the header) and cannot be changed independently.
- Text
- FirstOffice will enter the Customer's Name, as entered in the Customer register. You may change this if you wish.
- Open Inv. Value
- The outstanding amount of the Invoice being paid. This field cannot be changed.
- Received Val
- Default taken from
Outstanding amount on Invoice
- The amount paid. You can change the default figure in the event of partial payments or overpayments.
Flip B
- VAT Code, VAT Value
- These fields are only used if you are using the Post Receipt VAT option in the Account Usage S/L setting. This will be the case for users of the Cash VAT scheme in the UK, and may be the case for users in Poland.
- If you are using the Post Receipt VAT option, your output VAT liability is calculated from your Receipts, not from your Invoices. In this case, the VAT Code and VAT Value will be brought in to these fields automatically when you enter an Invoice Number on flip A (the VAT Code comes from the first row of the Invoice). When you approve and save the Receipt, the VAT amount will be moved from the temporary VAT Output Account to the final one (the O/P Account), as specified in the VAT Codes setting.
- The Post Receipt VAT option also adds a VAT element to On Account Receipts. Once again, the O/P Account for the VAT Code is credited and the Output Account for the VAT Code is debited with the VAT amount.
- Take care with these fields when entering On Account Receipts. As On Account Receipts do not have an Invoice Number, you must enter a VAT Code manually if you are using the Cash VAT scheme (i.e. if you are using the Post Receipt VAT option). The VAT Value will then be calculated from the Received Value. The Nominal Ledger Transaction resulting from the Receipt will not have a VAT element if the VAT Code or VAT Value is blank.
Footer
- OK
- You can approve a Receipt by clicking this check box. When you click [Save] to save the Receipt, the Bank Account specified for the Payment Mode will be debited and the Debtor Control Account of the Invoice(s) being paid will be credited. No further modifications to the Receipt will be possible.
- References in these web pages to approved Receipts are to Receipts whose OK check box has been switched on.
- Deposited
- The sum of the Received Values: the total for this Receipt.