Creating a new Autotransaction
Open the 'Settings' list by clicking the [Settings] button in the Master Control panel or by selecting 'Settings' from the File menu. Then, double-click 'Autotransactions' in the 'Settings' list. A list of existing Autotransactions appears. Click [New] in the Button Bar to enter a new record. When the Autotransaction has been entered, save it using the [Save] button and close the window by clicking the close box. Then, close the browse window using the close box again.
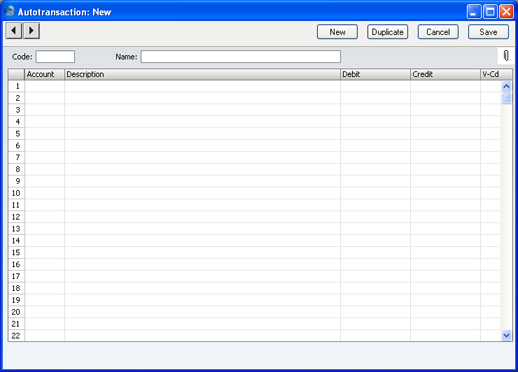
- Code
- This is the code that identifies this particular template. The code can consist of up to six alphanumeric characters. Each template must have a unique code, and you should use codes that do not duplicate Account numbers.
- When entering Nominal Ledger Transactions, specify this code instead of an Account to signify that this Autotransaction is to be used.
- Name
- Assign a descriptive name to the template, e.g. "Sales VAT included". The name is then shown in the 'Autotransactions: Browse' window.
- Account
- Paste Special
Accounts setting
- Enter the Account numbers for the template, one per row.
- You can enter the hash sign (#) to this field, to signify that the Account number, Description and amount are to be copied from the preceding line of the Transaction when you use the template. # is obtained using Alt-3 on a UK Macintosh keyboard.
- You can enter the exclamation mark (!) to this field, to signify that the previous line of the Transaction is to be overwritten by the result of the Autotransaction. See the following example for a detailed description of how this works.
- You can link an Autotransaction with a particular Account number. Enter the code of the Autotransaction in the Auto. Trans. field of the Account record (in the Accounts setting). When you enter the Account number in a Transaction record, the Autotransaction will be entered on the following rows automatically.
- Description
- Enter text to describe each Transaction here. You can also enter a # sign to copy text from the preceding line of the Transaction.
- Debit, Credit
- You can either enter a fixed amount here (e.g. a salary or a rent), or a formula for a calculation. You can enter a percentage as a number followed by a % sign. The Autotransaction will then apply the specified percentage to the amount on the preceding line of the Transaction. If you enter a number followed by two % signs (e.g. 30%%), the result of the percentage calculation will be rounded to the nearest whole number.
- If you enter the amount or percentage in the Debit field, the calculated amount will be entered in the same column as the original amount. If you enter it in the Credit field, the calculated amount will be entered in the opposite column.
- You can balance all the preceding lines of the Transaction by entering an equal sign (=) in the Debit or Credit field.
- V-Cd
- Paste Special
VAT Codes setting
- Enter any VAT Code to be entered to the Transaction row. This can be used to control the definition of reports.
The following example shows a template that distributes an amount across four Accounts on a percentage basis after you have entered that amount in a Transaction. You might use such a template to allocate shares of overhead costs to Accounts representing four departments.
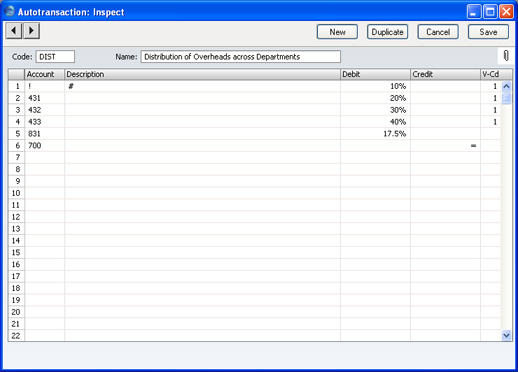
The first row contains an exclamation mark in the Account field and a percentage in the Debit field. The exclamation mark indicates that when the Autotransaction is specified in a Transaction, the amount of the previous row of the Transaction is to be overwritten by a figure determined by the application of the Autotransaction (in this case, by a percentage of the original figure). That figure will be on the same side (debit or credit) as the original, as the percentage has been entered to the Debit field of the Autotransaction. In other words, the original figure entered will be reduced by 90%. The # sign in the Description field signifies that the original Description will be retained.
The second line of the Autotransaction will again refer to the original figure and calculate a percentage from it, on the same side (debit or credit) as the original, using a new line in the Transaction. This figure will be posted to Account 431. The third and fourth lines of the Autotransaction will have a similar effect, creating new lines in the Transaction with different percentages of the original figure, posting to Accounts 432 and 433 respectively.
The fifth line calculates VAT from the original figure at the standard rate of 17.5% and places it in a new row in the Transaction, posting to the VAT Inputs Receivable Account on the same side (debit or credit) as the original figure.
The final line of the Autotransaction contains an Account number and an equal sign (=) in the Credit field. This signifies that the sum of the previous lines of the Transaction is to be posted to that Account. The posting will be on the opposite side (debit or credit) to the original figure, since the equal sign is in the Credit field.
When you enter a Transaction, begin by entering the Account code for the relevant expense category, and the amount excluding VAT. On the second row, enter the code of the Autotransaction in the Account field.
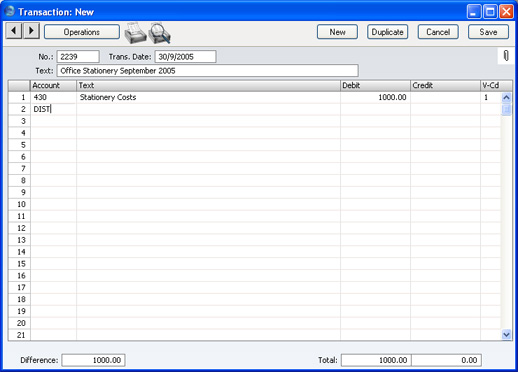
Press Return. The Autotransaction is entered by FirstOffice, and the amounts are recalculated as follows:
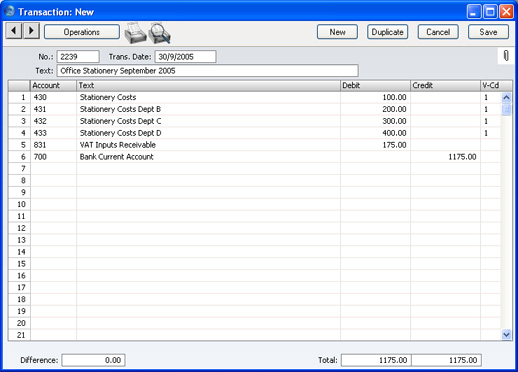
The example Autotransaction is designed to be used from the Nominal Ledger and is therefore double-sided to produce a balancing Transaction.
It may be that you will enter many overhead costs will be entered in the Purchase Invoice register from the Suppliers' Purchase Invoices. You can enter Autotransaction Codes to the Account field of a Purchase Invoice row in the same way as illustrated above for Transactions, so in our example Purchase Invoices can also be distributed across departments. However, the Autotransaction that you use in this situation should be single-sided: it should not have the final balancing line posting to the Bank Account. When you post the Purchase Invoice to the Nominal Ledger, a balancing posting to a Creditor Account will be made automatically as normal. Payment will reach the Bank Account when the Purchase Invoice is paid. In addition, any Autotransaction used in the Purchase Ledger will not need to calculate VAT because that will be handled by the VAT Code.
You can also enter single-sided Autotransactions in the Account field in a Sales Invoice row.