Hotel - Preparation
This page itemises the steps that you need to carry out in the main database to prepare it for hotel use.
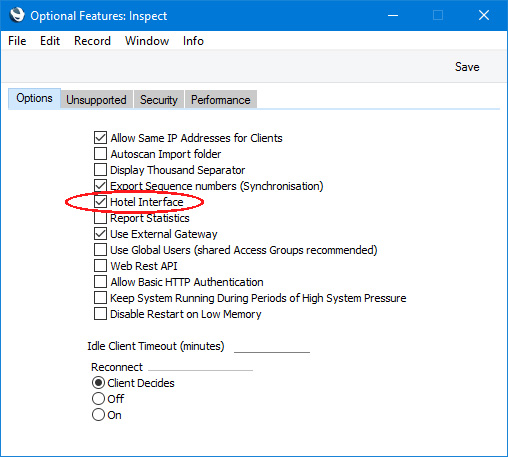
To enable all the features in the Hotel module, select the Hotel Interface option in the Optional Features setting in the System module. You will need to restart your client after selecting this option, but there is no need to restart the server. The option will immediately be effective in other clients that are started after you select it.
Configuring Rooms, Room Packages and Room PricingFollow these steps to configure a system of room pricing:
- Prices and VAT To specify whether Room rates and the prices of Items sold through Reservations (Room Bookings) include VAT, use the Base Price options on the 'Invoicing' card in the Hotel Settings setting.
- End of Day While in the Hotel Settings setting, specify the End of Day time on the 'Check In/Out' card. If a Reservation ends after this time, an extra day will be charged.
- Room Locations If you have more than one hotel building, enter separate records for each one in the Room Locations setting. This setting is described here.
- Room Types Enter separate records for each Room Type (e.g. single, double, twin) in the Room Types setting. You can specify separately for each Room Type whether Rooms will be charged by the hour or by the day. You must enter at least one record in this setting, so enter a single record if all your Rooms are similar. If you are using Room Locations, enter separate Room Type records for each Location. This setting is described here.
- Rooms Enter separate records for each Room in the Room register. Assign each Room to a Room Type and, if necessary, to a Room Location. The Room register is described here.
- Items for Room hire In the Item register, enter separate Items for each Room rate i.e. for each Room Type/charge rate combination (e.g. for double room/weekday, double room/weekend, single room/weekday, single room/weekend, etc). The Base Prices in these Items should include or exclude VAT depending on the option you selected in step 1, and should represent hourly or daily rates depending on how you configured your Room Types in step 4. These Items should be Plain or Service Items.
- Additional Items Remaining in the Item register, enter Items as needed for other Items that may be supplied when Rooms are hired e.g. champagne on arrival, massage, access to swimming pool, breakfast, etc. Again, the Base Prices in these Items should include or exclude VAT depending on the option you selected in step 1.
- Room Packages A Room Package is a list of everything that you will always supply when a Room is hired except the Room itself. Example Packages might be room hire only, bed and breakfast and honeymoon, and breakfast would perhaps be an Item that you will always supply or at least include in the bed and breakfast Package. Enter separate records for each Package in the Room Packages setting. You must enter at least one record in this setting. This setting is described here.
- Invoice Items An Invoice Item connects a Room Type, a Room Package and an Item. The Item contains the Room rate for the Room Type/Room Package combination. You can enter several Invoice Item records for the same Room Type/Room Package combination, allowing you to set different rates for weekends and holidays, and different rates depending on the number of Guests in a Room. The Invoice Items setting is described here. You can further refine your pricing structure using Classification Terms or Price Rules.
Preparation for Reservations (Room Bookings)Follow these steps to prepare Standard ERP to work with Reservations:
- Room Status At all times each Room will have a Status that signifies whether it is available for checking in. You should define Room Statuses using the Room Status setting. As a minimum, you should enter two records in this setting: one Status that will be assigned to a Room to signify that it is available for checking in; and one Status that will signify that a Room has just been vacated and needs to be cleaned so is not immediately available.
After entering these records, go to the 'Reservation Status' card in the Hotel Settings settng to specify which Room Status is the Available Status and which one is the Dirty Status.
The Room Status setting is described here.
- Reservation Status The life of a Reservation or Room Booking will usually see it pass through several stages. As it does so, its Status will be changed automatically, to signify the stage it has reached. For example, a Reservation may begin as an enquiry, then be confirmed, then the Guests will check in and finally the Guests will check out. Alternatively, from being an enquiry or being confirmed, a Reservation might be cancelled.
Use the Reservation Status setting to define the Reservation Statuses that you need. You should at least enter separate records representing the enquiry, confirmed, check in, check out and cancelled stages.
After entering these records, go to the 'Check In/Out' card in the Hotel Settings settng to specify which Reservation Status is to be used to signify that a Reservation has checked in and which one is the Checked Out Status. You can also specify a Default Status on the 'Reservation Status' card,to be copied to each new Reservation.
The Reservation Status setting is described here.
- Reservation Status Sequences After entering the Reservation Statuses that you need as mentioned in the previous step, you should use the Reservation Status Sequences setting to specify the order in which the Statuses are to be used. For example, you can specify in the Reservation Status Sequences setting that a Reservation can proceed from being an enquiry to being confirmed or to being checked in, but not to being checked out. The Reservation Status Sequences setting is described here.
- Local Machine If you have more than one Room Location (step 3 above) you can use the 'Hotel' card in the Local Machine setting in the User Settings module separately on each client machine to specify the Room Location in which the machine is situated. This will mean that when the Resource Planner is opened on a machine, it will show the Rooms and Room Types in the relevant Location.
If you assign a member of staff to an Access Group in which you have given Full access to the 'Limit User to Hotel Room Location' Action, that member of staff will only be able to book Rooms that are in the Room Location specified in the Local Machine setting on the machine they are using.
If you would like to use different pricing in each Room Location, specify a Price List on the 'POS' card in the Local Machine setting on each machine.
The Local Machine setting is described here.
- Down Payments If you will issue Down Payment Invoices for Reservations (e.g. Invoices for deposits), use the Down Payments setting to specify the percentage of the value of a Reservation that is to be requested as the deposit, the Payment Term to be used in Down Payment Invoices and the Sales Account that is to be credited with Down Payment amounts. Please refer here for more details.
- Guest Service Types If you offer services to your guests, such as wake-up calls, placing flowers and/or champagne in the Room, providing a daily newspaper, etc., enter separate records for each service in the Guest Service Types setting. A Guest Service is an instruction to the relevant department (e.g. the front desk or housekeeping) to provide the service. If you need to charge for a service, you will need to enter records in the Item register for each one to set the pricing (as mentioned in step 7 above). Guest Service Types are described here.
- Checklists If you entered Guest Service Types in the previous step and you would like a reminder list to appear on screen whenever a Reservation checks in (or checks out), use the Checklists setting to specify the Guest Service Types that are to be included in the list. As well as providing a reminder, receoptionists will also be able to book Guest Services from the list.
Having entered your Checklists, use the Check In Message and Check Out Message fields on the 'Check In/Out' card in the Hotel Settings setting to specify the Checklists that will be used by default. You can also specify that different Checklists will be used with each Room Package.
Checklists are described here.
- Updating Check In and Check Out Times in Reservations The default Check In and Check Out Times in new Reservations will be copied from the Check In and Check Out Time fields in the Hotel Settings setting. By default, these times won't be changed on check in or on check out. If you would like these times to be updated when checking in and checking out, assign the check-in staff to Access Groups in which you have denied access to the 'Check In before or after Planned Date' and 'Check In after Planned Date' Actions respectively.
- Work in Progress The Work in Progress feature allows daily sales (i.e. daily sales that have not been invoiced yet) to be recorded in the Nominal Ledger. If you will need to use this feature, please refer here for details about configuration and workflow.
- SiteMinder Please refer here for details about connecting your Standard ERP database to the SiteMinder online booking portal.
WorkflowsPlease refer to the following pages for desciptions of some of the major features in the Hotel module together with example working routines or workflows:
---
Go back to:
|