
 Introduction to Settings in the System Module
Access Groups
Active Users
Auto Actions
Backup Settings
Bank Holidays
Base Currency
Base Currency Rates
Cloud Security
Company Date and Numeric Format
Company Info
Configuration
Conversions - Master, Conversions - Accounts and VAT Codes
Conversions - Master, Conversions - Activity Types
Conversions - Master, Conversions - Contact Classifications
Conversions - Master, Conversions - Contacts
Conversions - Master, Conversions - Currency Codes
Conversions - Master, Conversions - Items
Conversions - Master, Conversions - Locations
Conversions - Master
Conversions - Master, Conversions - Suppliers
Conversions - Master, Conversions - Tags/Objects
Conversions - Master, Conversions - Users
Countries
Countries Regions
Currency Round Off
Days and Months
Departments
Discount Options
Display Groups
Exchange Rates Settings
Form Settings
Global Locking
Global Warnings on UnOKed Records
Internet Enablers
Journaling
KPIs
Languages
Locking
Locking Exceptions
Nature of Business
Number Series Defaults
Opened Record History
Optional Features
Page Setup
Password Security
Print Conditions
Printers
- Defining when Printers are to be used
- Setting up a Print Server
- Setting up a Fax Server
Remote Backups
Reporting Periods
Round Off
Sales Groups
Single Functions
Special Days
Styles
Sub-ledger Control Accounts
Task Manager Access
User Warnings on UnOKed Records
Values in Text
VAT Reg. Number Masks
Weeks Introduction to Settings in the System Module
Access Groups
Active Users
Auto Actions
Backup Settings
Bank Holidays
Base Currency
Base Currency Rates
Cloud Security
Company Date and Numeric Format
Company Info
Configuration
Conversions - Master, Conversions - Accounts and VAT Codes
Conversions - Master, Conversions - Activity Types
Conversions - Master, Conversions - Contact Classifications
Conversions - Master, Conversions - Contacts
Conversions - Master, Conversions - Currency Codes
Conversions - Master, Conversions - Items
Conversions - Master, Conversions - Locations
Conversions - Master
Conversions - Master, Conversions - Suppliers
Conversions - Master, Conversions - Tags/Objects
Conversions - Master, Conversions - Users
Countries
Countries Regions
Currency Round Off
Days and Months
Departments
Discount Options
Display Groups
Exchange Rates Settings
Form Settings
Global Locking
Global Warnings on UnOKed Records
Internet Enablers
Journaling
KPIs
Languages
Locking
Locking Exceptions
Nature of Business
Number Series Defaults
Opened Record History
Optional Features
Page Setup
Password Security
Print Conditions
Printers
- Defining when Printers are to be used
- Setting up a Print Server
- Setting up a Fax Server
Remote Backups
Reporting Periods
Round Off
Sales Groups
Single Functions
Special Days
Styles
Sub-ledger Control Accounts
Task Manager Access
User Warnings on UnOKed Records
Values in Text
VAT Reg. Number Masks
Weeks
 Tutorials for Standard Accounts Tutorials for Standard Accounts
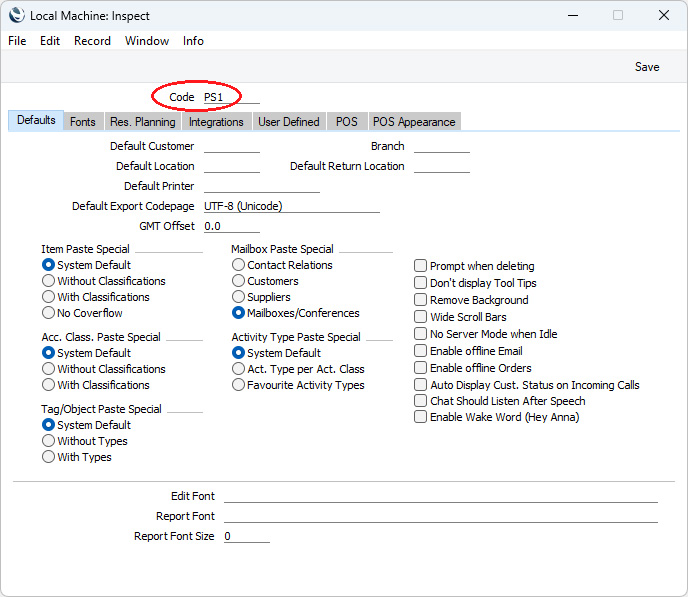
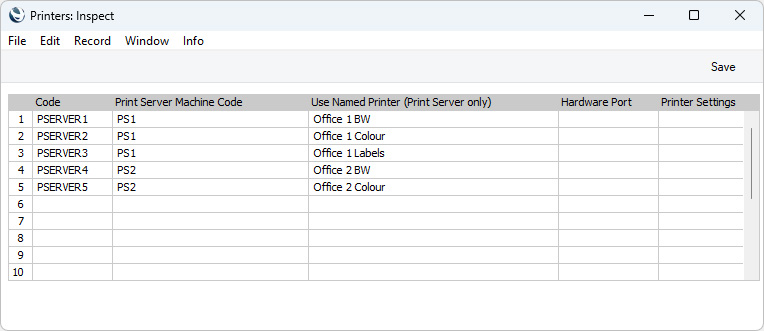
Search HansaManuals.com HansaManuals Home >> Standard ERP >> System >> Settings Previous Next Entire Chapter in Printable Form Search This text refers to program version 2026-07-28 Printers - Setting up a Print Server In some larger installations it can be useful to set up a print server to look after the printing of forms. You can do this using a dedicated Standard ERP client. This client will periodically interrogate the data server for print jobs. When you print a form, it will be held momentarily on the data server until it is fetched by the print server. The print server will then look after communications with the printer, allowing the data server to be made available for the next data processing task more quickly.The Standard ERP client that will act as the print server can run on a dedicated machine but it can also be run on one of the other client machines. Each print server can be connected to several printers . To configure a Standard ERP print server, follow these steps:
Print Server
Specifying that Forms should be printed on the Print Server
Go back to:
|