Single- and Multi-Page Form Templates
This page describes designing Form Templates to cater for the printing of multi-page documents.
---
When you design a Form Template, you should consider what is to happen when the printing of a document requires more than one page. Two options are available:
- The "simple" option, where the same page design is used for each page.
- The "multi-page" option allows the use of up to four page designs, as follows:
- First
- The first page of a multi-page document.
- Middle
- The pages between the first and last pages in a multi-page document.
- Last
- The last page of a multi-page document.
- Single
- The sole page of a single-page document.
When you add an element of any kind (i.e.
text,
line, frame, field,
picture or
page sum) to a Form Template design, you can use the
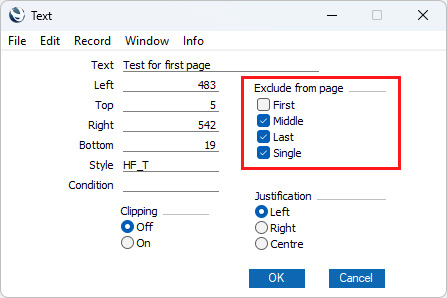
Exclude From Page check boxes to specify the pages on which the element is to be printed. If you do not tick any of these boxes, the element will be printed on every page. This will be the case when using the "simple" option. If you want the element to be printed on certain pages only, tick one or more of the boxes. For example, if the element is to be printed on all pages except the first, tick the First box. If it is only to be printed on the first page, tick every box except the First box (i.e. it will be excluded from all pages except the first). The text element in the illustration below will be printed on the first page only:
To help with the design process, you can choose to display the elements from a particular page only. To do this, select 'First Only', 'Middle Only', 'Last Only' or 'Single Page Only' as appropriate from the Operations menu. For example, select 'First Only' to view the elements that are to be printed on the first page (i.e. those whose First box has not been ticked). Select 'View All' to see all elements, irrespective of the page on which they are to be printed.
The number of pages printed will vary from record to record, depending on the number of rows that the record has. An Invoice with one Item will be printed on a single page (i.e. using those elements whose Single box is not ticked). An Invoice with 100 Items (i.e. 100 rows) will be printed over several pages. You should specify the maximum number of rows that can be printed on each page by selecting 'Properties' from the Operations menu. This opens the 'Form Template Properties' window, which has four fields under the overall heading of Matrix Rows On:
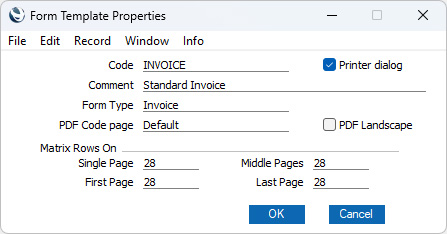
In the case of the "simple" option, you should enter the same number to each of these four fields. Otherwise, enter different numbers as appropriate. For example, in an Invoice Form Template, First and Single are set to 5, Middle to 6 and Last to 7. Invoices will be printed as follows, depending on the number of rows:
| Invoice rows | Pages | Type of Page |
| Up to 5 | 1 | Single |
| 5-12 | 2 | First and Last |
| 13-19 | 3 | First, Middle and Last |
| 19-25 | 4 | First, 2 x Middle, Last |
If you do not want any matrix rows to be printed on a particular page type, enter "-1" in the relevant field. Entering "0" will signify that you want every matrix row to be printed.
If you specify that you want matrix rows to be printed on a particular page type, ensure that you have added some matrix fields to that page type. For example, if you have specified that ten matrix rows will be printed on the first page, ensure you have added some matrix fields that you have not excluded from the first page to print those rows. If you do not add any fields to the first page, the print engine will still try to print the ten rows on the first page and will start the next page with row 11. The effect will be that the first ten rows will not be printed.
Printing Cash Receipts (Till Slips)
If you need to print POS Invoices or Bar Tabs on continuous stationery (e.g. on till rolls) the design of the Form Template will depend to some extent on the printer that you are using. Some suggestions are:
- The width of a till roll is typically 600 pixels. Some suggestions about positioning are:
- Left
- There is often no need to leave a margin on the left-hand side as the printer will do this automatically. You can therefore position elements on the extreme left (e.g. with 0 as the Left coordinate).
- Top
- Again, there is often no need to leave a margin at the top as the printer will often add about 80 pixels itself.
- Right
- Printers will usually add a smaller margin on the right compared to the left, so it is recommended that you do not go further than about 590 or 595 as the Right coordinate.
- Bottom
- The printer will often add about 60 pixels at the bottom before cutting the page.
- The approximate number of characters that fit in a 600 pixel line are:
- MS Sans Serif 6
- 65
- MS Sans Serif 8
- 44
- MS Sans Serif 10
- 36
- MS Sans Serif 12
- 30
- MS Sans Serif 14
- 26
- MS Sans Serif 16
- 23
- It is usually recommended that you specify that no matrix rows will be printed on the first, single and last pages (i.e. in the 'Properties' window, enter "-1" in the Single Page, First Page and Last Page fields) and that one row will be printed on the middle page (enter "1" in the Middle Pages field):
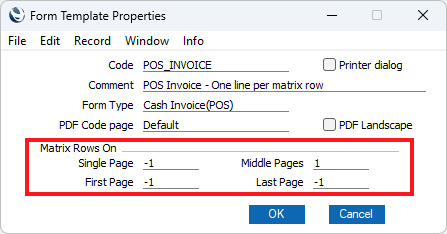
This will mean that every till receipt will be printed using the first page, an appropriate number of middle pages (one for each row in the POS Invoice or Bar Tab being printed), and the last page.
- While the 'Properties' window is open, ensure the Printer dialog option is not ticked. In a Point of Sales or Restaurant environment, it will probably not be necessary for cashiers to process a printer dialogue for every till receipt.
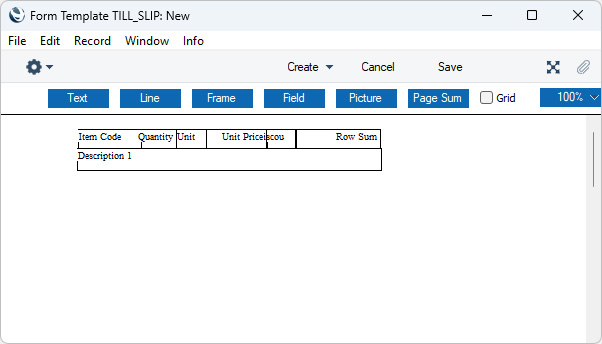
- Place the header information including any column headings on the first page only:

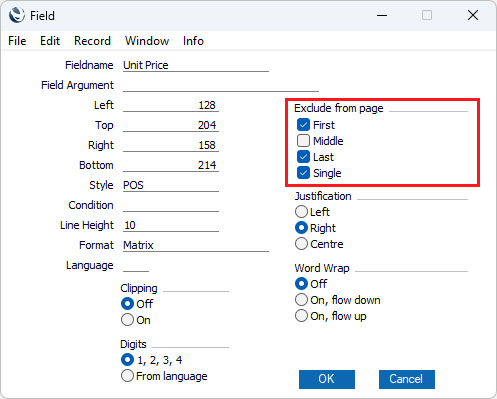
- Place the row fields (fields that print information from each row in the POS Invoice or Bar Tab being printed) on the middle page only, starting from the top of the page and aligning them horizontally with the column headings on the first page. Remember to set the Format to "Matrix":
When printing till slips, the Line Height is less important than is usually the case for row fields, as noted below.
- You can place the "Description 1" field above or below the fields that will print the Item Number, quantity and price information. This will give more space for long Item Names.
- Because each middle page will print a single row in the POS Invoice or Bar Tab being printed (i.e. because each row will be printed on its own page), the vertical space given to each row will not be determined by the Line Height in the row fields. Instead, it will be determined by the space taken up by what is being printed on the page. For example, if you place the "Description 1" field above or below the other fields as mentioned above, the vertical space given to the row will be deepened automatically. If you added a second "Description 1" field (e.g. to print the Item Name in a different Language) underneath the existing one, the vertical space given to the row will again be deepened automatically.
If you need to add space between rows, add a text element to the middle page, at a distance below the fields that matches the space that you need. The text element can be a space or an underline. If it is an underline, add a Style with a small font size, enter 600 as the Left coordinate and any number greater than 600 as the Right coordinate to minimise the effect on the print-out.
- Place the totals and footer information on the last page, again starting at the top of the page.
- Depending on the printer, you may also need to select 'PC Printer' from the Operations menu, enter "1" in the Rows Per Page field and tick the End Page with Form Feed (FF) option, as well as specifying a Codepage.
- In a mixed network with Windows and macOS tills, you may need a separate Form Template for each operating system. If so, you can ensure the appropriate Form Template will be printed from each till using Languages. Assign a Language (for example, Mac or Windows) to each cashier (in their Person records) and then enter a row for each Language/operating system in the 'Form Definition' window:
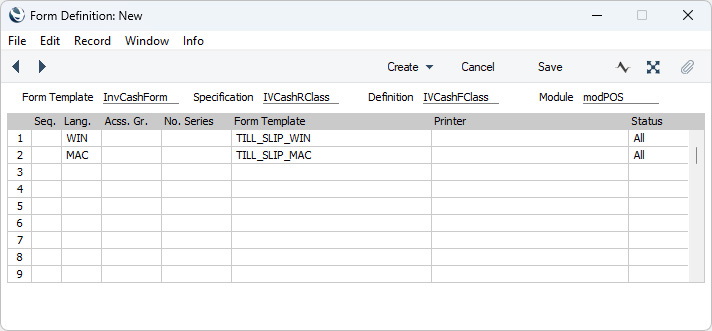
Please refer to the Printing Forms page for more details about the 'Form Definition' window.
- If you need POS Invoices to be printed automatically when cashiers click or touch the "Finish" button, specify in the Auto Actions setting in the System module that POS Invoices are to be printed At OK.
- If you need Bar Tabs to be printed automatically when they are finished, add a "Finish and Print" button to the Bar Tab window.
Page Sums
If you need running totals to be printed on each page, add page sums to the Form Template. For example, when printing a multi-page Invoice, you can use page sums in the following ways:
- You can add a page sum to the top of the Middle and Last pages that will print the total value of the preceding pages.
- You can add a page sum to the bottom of the First and Middle pages that will print the total value of the page in question, or total value of the page in question and all preceding pages.
Please refer
here for details about page sums.
Page Numbers
If you need a page number to be printed on each page, add the "Page Number" field to the Form Template design.
---
The Form Template register in Standard ERP:
Go back to: