Entering a Stock Depreciation record - Matrix
This page describes the fields in the matrix in the Stock Depreciation window. Please refer here for a description of the header.
---
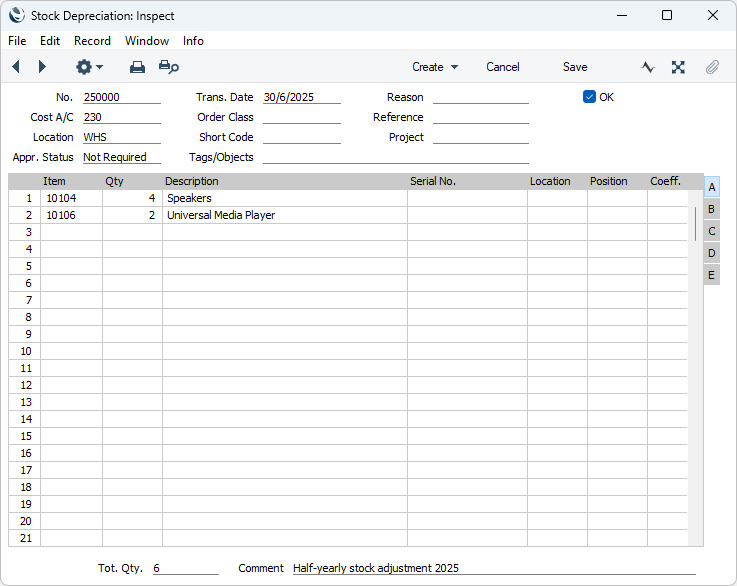
Use the grid that takes up most of the Stock Depreciation window to list the Items that are to be removed from stock. This grid is divided into five horizontal flips. When you click (Windows/macOS) or tap (iOS/Android) on a flip tab (marked A-D), the two or three right-hand columns of the grid will be replaced.
If you are using Windows or macOS, you can add rows to a Stock Depreciation record by clicking in any field in the first blank row and entering appropriate text. To remove a row, click on the row number on the left of the row and press the Backspace key. To insert a row, click on the row number where the insertion is to be made and press Return.
If you are using iOS or Android, you can add rows by tapping the + button below the matrix. To remove a row, long tap on the row number on the left of the row and select 'Delete Row' from the resulting menu. To insert a row, long tap on the row number where the insertion is to be made and select 'Insert Row' from the resulting menu.
Flip A - Item
- Paste Special
Item register
- Enter the Item Number, Alternative Code or Bar Code of the Item that is to be removed from stock. You can also add Items to a Stock Depreciation record musing the 'Item Search' function on the Operations menu (Windows/macOS) or Tools menu (iOS/Android). In all cases, descriptive and other information will be brought in from the Item record.
- If you specify a Plain or Service Item, its value will not be included in the resulting Nominal Ledger Transaction unless you are using the Cost Accounting for Plain and Service Items option in the Cost Accounting setting.
- Qty
- Specify here the number of units of the Item that are to be removed from stock.
- If you enter a quantity that is greater than the stock level of the Item in the selected Location and if you are using the Queued Cost Model (FIFO or LIFO), only the value of the units in stock will be included in the resulting Nominal Ledger Transaction. The FIFO/LIFO value of the units that are not in stock will not be known and can't be calculated and so will not be included in the Transaction. As the stock balance of the Item will be reduced in full (i.e. negative stock will be created), this will create an imbalance between the Stock List and the stock valuation in the Nominal Ledger. If you are using one of the other Cost Models, the value of all the removed units will be included in the Nominal Ledger Transaction, so the risk of an imbalance is reduced (but not removed). It is therefore recommended that you prevent the creation of negative stock by selecting the Do Not Allow Over Delivery option in the Stock Settings setting. You must select this option if you are using the Queued Cost Model (FIFO or LIFO) because of the consequences just described.
- If you are using the Do Not Allow Over Delivery option and you enter a quantity that is greater than the stock level of the Item in the selected Location, you will be able to save the Stock Depreciation providing you have not marked it as OK. You will not be able to save the record after marking it as OK.
- If the Item is a Plain or Service Item, no check for negative stock will be carried out, whatever the setting of the Do Not Allow Over Delivery option. The quantity of the Item in the Location will be adjusted accordingly.
- Negative quantities are not allowed.
- Description
- The Item Name will be brought in from the Item register when you enter the Item Number. You can change it if necessary.
- Serial No.
- Paste Special
Serial Numbers of Items in stock
- If the Item uses Serial Numbers or batch numbers, you must enter a valid number here.
- Usually you must enter Items with Serial Numbers at the Unit level on separate rows each with a Qty of 1, allowing you to enter Serial Numbers individually. However, you can use a single row for a Qty greater than 1 if you are using the Generate Bulk Serial Numbers automatically option: this option is described two paragraphs below.
- If you enter a Serial Number in a new row, other details such as the Item Number and Name, Location and, if appropriate, Position will be brought in automatically.
- If you are using the Generate Bulk Serial Numbers automatically option in the Serial Number Tracking setting, you will be able to enter a range of Serial Numbers in this field automatically. If you have already entered a Qty and then enter the first Serial Number in this field, it will be overwritten by a range of Serial Numbers, separated by a colon (:)when you move to the next field. If you change the Qty, the number of Serial Numbers in the range will be updated automatically. If you change the last Serial Number in the range, the Qty will be updated. This field can only contain a range if you are using the Generate Bulk Serial Numbers automatically option.
- If you have not specified a Location, the 'Paste Special' list will show the Serial Numbers of Items in every Location, with an indication of the Location in which each Serial Number is stored. However, if you have specified a Location in the header or on flip A, the 'Paste Special' list will only show the Serial Numbers stored in that Location.
- If you would like the Best Before Date and/or Batch Status of each Serial Number to be shown in the 'Paste Special' list, select the Show Best Before Dates and/or Show Batch Status options respectively in the Item Settings setting in the Sales Ledger. You can record Best Before Dates from Goods Receipts and Production records and using the Batch Specifications setting in the Stock module, and you can update Best Before Dates and record the Batch Status of each Serial Number using the Batch Quality Control setting in the Service Orders module.
- The 'Paste Special' list will not be shown if you are using the No Serial No. on Goods Receipts option in the Stock Settings setting. In this case, it will not be compulsory to enter a Serial Number but, if the Item has Serial Numbers at the Unit level, the Qty must still be 1. If you do enter a Serial Number, no check will be carried out that it is valid (i.e. one that is currently in stock).
- The stock value of an Item with Serial Numbers is controlled by the Cost Price for Serial Number option. This option is in the Cost Accounting setting in the Stock module, but you can override it in the Item records ('Cost Model' card). If you are not using this option, the cost of sales value will be calculated using the usual Cost Model, even though this may not be appropriate for the Serial Number chosen (e.g. if you are using the FIFO Cost Model, the oldest cost of sales value will be used, even if the chosen Serial Number is not the oldest one). If you are using the Cost Price for Serial Number option, the cost of sales value will be the actual Cost Price of the selected Serial Number. The cost of sales value will be placed in the FIFO and Row FIFO fields on flip C when you mark the Stock Depreciation as OK and save.
- No default Serial Numbers will be offered, so you will need to enter them yourself. There is no automatic FIFO or LIFO allocation.
- Location
- Paste Special
Locations setting, Stock module
- Enter a Location if different from the Location entered in the header.
- If you have specified a Location in this field, the figures in the 'Item Status' window will refer to this Location. If this field is empty, those figures will refer to the Location specified in the header. If you have not specified a Location here or in the header, the figures will refer to all Locations. This will be the case even if you have specified a Main Location in the Stock Settings setting.
- Position
- Paste Special
Position register, Warehouse Management module
- You can only use this field if you are using the Warehouse Management module. If so and if you have selected the Require Position option in the Location specified in the header or in the field immediately to the left, you must enter here the Position from where the Item is to be removed.
- The Position must be in the correct Location, and it must contain sufficient stock of the Item. If you specify a Position that does not meet these criteria, the Stock Depreciation row will be split into two. For example, if the Quantity is 52 and the specified Position contains 25, the Stock Depreciation row will be split into two rows with Quantities of 25 and 27. You can then specify a second Position on the second row if necessary. If the Position has no stock of the Item, or is in the wrong Location, the first row after splitting will have a blank Quantity, and the second row will have the full Quantity.
- The 'Paste Special' list will only show Used Positions (Positions that are not empty).
- Coeff.
- Default taken from
Item
- The Unit Coefficient of the Item is shown here, taken from the 'Stock' card of the Item record. If you are maintaining stock quantities using different units of measurement, this coefficient is the ratio between those units of measurement.
Flip B- Short Code
- Paste Special
Account Short Codes setting, Nominal Ledger
- You can use Short Codes to help reduce errors when selecting Cost Accounts and Tags/Objects. You can also use them if you do not want the members of staff who work with Stock Depreciations to have any access to the Account and Tag/Object registers (which means that they will not be able to use 'Paste Special' to choose Accounts and Tags/Objects). Enter a Short Code here to bring the appropriate Account and Tag(s)/Object(s) into the Stock Depreciation row.
- One use of Short Codes is to control the choice of Cost Account depending on the purpose of the Stock Depreciation. For example, you may wish to use a different Cost Account depending on the reason for removing an Item from stock (e.g. for marketing, for internal use, for use in Projects or for other purposes). Defining and using Short Codes will help you choose the correct Cost A/C in each case.
- Cost A/C
- Paste Special
Account register, Nominal Ledger/System module
- You can enter an individual Cost Account for each row, to override the default Cost A/C entered in the Stock Depreciation header.
- You can bring in a Cost Account by specifying an Account Short Code in the Short Code field to the left.
- If you created the Stock Depreciation using the Stocktaking Comparison' Maintenance function, if the Type of the Location is "Production", if the Item belongs to an Item Group and if you are using the Use Item Groups for Cost Accounts option in the Cost Accounting setting, the Usage Variance Account in the Item Group will appear here. In effect, this Account will be used for wastage resulting from the Production process.
- Tags/Objects
- Paste Special
Tag/Object register, Nominal Ledger/System module
- Default taken from Item or Item Group
- You can assign up to 20 Tags/Objects, separated by commas, to a row in a Stock Depreciation record, to be transferred to the consequent Nominal Ledger Transaction. Usually these Tags/Objects will represent the Item.
- In the Nominal Ledger Transaction generated from a row in a Stock Depreciation record, any Tags/Objects specified here will be assigned to all debit postings to the Cost (Stock Loss) Account resulting from a row. If you are using the Tag/Object on Stock Account option in the Cost Accounting setting, these Tags/Objects will also be assigned to all credit postings to the Stock Account. For both of these assignments, these Tags/Objects with those of the parent Stock Depreciation (shown in the header).
- By default, you will not be able to specify Tags/Objects belonging to the same Tag/Object Type in the header and in any of the rows. If you need to be able to do this, select the Allow Tag/Objects of same type on Header and Rows option in the Account Usage Stock setting. As just mentioned, the header and row Tags/Objects will be merged for all postings: if the merged set of Tags/Objects includes Tags/Objects belonging to the same Tag/Object Type, the Tag/Object from the row will be used and the one from the header will be discarded.
- You can bring in a Tag/Object by specifying an Account Short Code in the field immediately to the left.
Flip C- FIFO
- The unit value of the Item, to be subtracted from your Nominal Ledger Transaction stock valuation. If the Qty in the row is greater than one, this field will show the average unit cost value. This figure will be brought in automatically when you save the Stock Depreciation record after marking it as OK.
- This figure will usually be calculated using the Cost Model specified in the relevant Item or Item Group record. If that Cost Model is Default, the Primary Cost Model specified in the Cost Accounting setting will be used. Despite its name, the field therefore shows the unit FIFO, LIFO, Weighted Average or other value of the Item, depending on the Cost Model. The exception is when the Item requires Serial Numbers and you are using the Cost Price for Serial Number option: please refer to the description of the Serial No. field on flip A above for details.
- Row FIFO
- The total stock value of the Items in the row (unit cost from the FIFO field multiplied by Qty). This figure will be brought in automatically when you save the Stock Depreciation record after marking it as OK.
Flip D- Recipe
- If the Item is a Structured Item whose Paste Components During Entry box has not been ticked, its Recipe will be shown here. You should not change it. The Recipe will result in the stock levels of the components being reduced when you save the Stock Depreciation record after marking it as OK.
- Project
- Paste Special
Project register, Job Costing module
- You can link a Stock Depreciation row to a Project by entering a Project Number here. When you save the Stock Depreciation after marking it as OK, a record will be created in the Project Transaction register in the Job Costing module. This Project Transaction will be used by the 'Create Project Invoices' Maintenance function to charge the Customer for the depreciated Item. In some circumstances it can be useful to use this method instead of raising an Order and Delivery when supplying consumables as part of a Project.
- If the Project has been assigned any Tags/Objects, they will not be copied to the Tags/Objects field on flip B, but they will appear in the resulting Project Transaction.
- You can use this field if you want to connect the Stock Depreciation row to a different Project to the one specified in the header, or if there is no Project in the header.
- Base Price
- This field shows the unit Base Price (retail price) of the Item in your home Currency, taken from the Item record.
Flip E- Width, Height, Depth
- Default taken from
Item
- These fields contain the dimensions of the Item.
- If the Item is one that is bought and sold by area or volume, you can have the Depreciation Quantity calculated by multiplying the dimensions together. If you would like to use this feature, follow these steps:
- Select the Enable Quantity Calculation option in the Item Settings setting in the Sales Ledger.
- Select the Calculate Quantity option in the Unit that has been assigned to the Item. If the Item is bought and sold by area, choose the Two Dimensions option in the Unit record. If the Item is bought and sold by volume, choose the Three Dimensions option
- In the Stock Depreciation row, enter the Width and Height (if the Item is sold by area) or the Width, Height and Depth (if the Item is sold by volume). The Qty in the row will be calculated automatically.
- Please refer to the page describing the Units setting for details and an example.
Footer- Tot. Qty
- The Tot. Qty field shows the total number of units in the Stock Depreciation record (i.e. the sum of the quantities in the Qty field in the rows).
- Comment
- Record any comment about the Stock Depreciation record here, such as the reason for its entry.
---
The Stock Depreciation register in Standard ERP:
---
Go back to:
|