Using the Resource Planner - Configuration
This page describes configuring the Resource Planner so that it can be used with Reservations in the Hotel module. Please refer to the following pages for more details about using the Resource Planner with Reservations:
---
To configure the Resource Planner for use with Reservations, follow these steps:
- Select the Hotel Interface option in the Optional Features setting in the System module. After selecting this option, quit Standard ERP on the machine you are using and restart for the change to take effect.

- Using the Resource Planner setting in the Resource Planning module, choose to display Reservations in the Resource Planner.
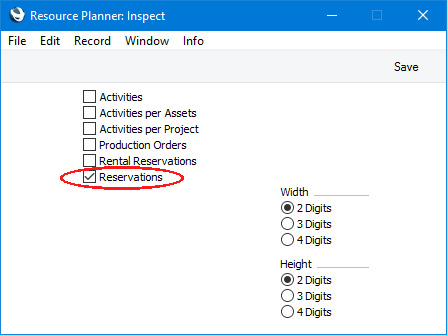
You can also specify the size of the cells in the Resource Planner using the Width and Height options.
- Initially the Resource Planner will display the number of available Rooms belonging to each Room Type. The next step is to enter separate records for each Room Type (e.g. single, double, twin) in the Room Types setting. This setting is described Room Types.
- Enter separate records for each Room in the Room register. Assign each Room to a Room Type. The Room register is described here.
- The life of a Reservation will usually see it pass through several stages. As it does so, its Status will be changed automatically, to signify the stage it has reached. For example, a Reservation may begin as an enquiry, then be confirmed, then the Guests will check in and finally the Guests will check out. Alternatively, from being an enquiry or being confirmed, a Reservation might be cancelled.
The next step is to use the Reservation Status setting to define each Status. You should at least enter separate records representing the enquiry, confirmed, check in, check out and cancelled stages. You can assign a different colour to each Reservation Status, so that you can identify Reservations of each Status in the Resource Planner.
- After completing the previous step, use the Reservation Status Sequences setting to specify the order in which the Reservation Statuses can be used.
- In the Hotel Settings setting, specify Check In and Check Out Times on the 'Check In/Out' card and Available, Dirty and, if needed, Closed Statuses on the 'Reservation Status' card.
- You can specify that the Resource Planner window will be opened automatically when particular members of staff log in to your Standard ERP system. You will need to do this separately on each machine that the members of staff will use. Change to the User Settings module and open the Login Shortcuts register:
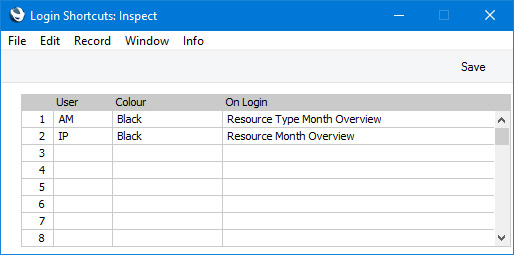
Specify each Person in the first column using 'Paste Special' if necessary, and enter "Resource Type Month Overview" or "Resource Month Overview" in the third column, again using 'Paste Special' if necessary. This column determines the window each Person will see when they first log in. Any Person not listed will see the standard Navigation Centre.
The "Resource Type Month Overview" option will cause the 'Month Overview of Room Types' window (the first Resource Planner window) to be opened automatically on log-in. The "Resource Month Overview" option will cause the 'Overview Rooms' window (the second Resource Planner window) to be opened automatically on log-in.
- If you have separate hotel buildings (i.e. separate Room Locations) you may need the Resource Planner to display Room availability in a particular Location when it is opened on a particular client machine. For example, the Resource Planner on a client machine in Location 1 should display Room availability in Location 1, while the Resource Planner on a client machine in Location 2 should display Room availability in Location 2.
To do this, open the Local Machine setting in the User Settings module, go to the 'Hotel' card and specify a Room Location:
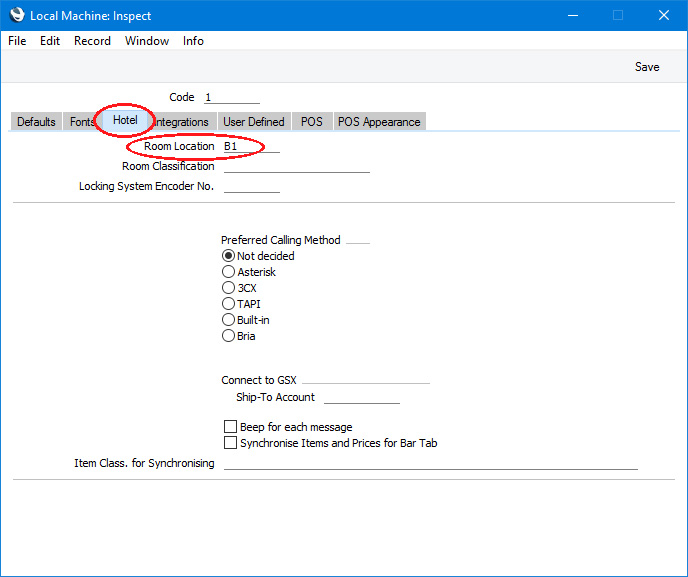
As with the previous step, you will need to do this separately on each machine.
---
Go back to: