Printing Cash Transactions
There are several occasions when you may want to print a cash transaction: to view a test print-out to check the transaction before you finally approve it; to produce a copy for your own files, or to send a receipt to the Customer or payment notification to the Supplier.
To print a single cash transaction, open the transaction in a record window and click on the Printer icon in the Button Bar (Windows/macOS only) or select 'Print' from the File menu (all platforms). If you want to print to screen, click the Preview icon (Windows/macOS only).
If you want to print a range of cash transactions, follow the instructions below:
- Ensure you are in the Cash Book module and then:
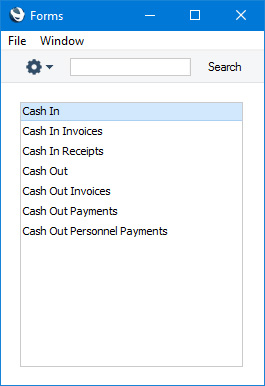
- If you are using Windows or macOS, click the [Forms] button in the Navigation Centre or use the Ctrl-D/⌘-D keyboard shortcut. Then, double-click 'Cash In' or 'Cash Out' as appropriate in the resulting list.
- If you are using iOS or Android, tap the [Routines] button in the Navigation Centre and then tap [Forms]. Tap 'Cash In' or 'Cash Out' as appropriate in the 'Forms' list window.
- The 'Specify Cash In' or 'Specify Cash Out' (depending on which option you selected in step 1 above) window will be shown.
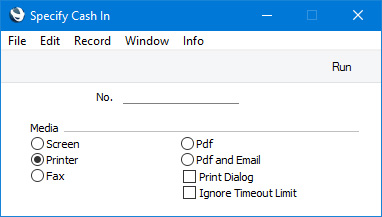
- Enter the Cash In or Cash Out Number of the single cash transaction that you need to be printed, or the highest and lowest Cash In or Cash Out Numbers of a range of transactions separated by a colon (:).
- Press [Run] in the Button Bar to start the printing, or cancel by closing the window.
When you print a cash transaction using either of the methods described above, it will be printed using a Form Template. The Form Template contains the graphic layout design of the printed output i.e. it determines where on the page each piece of information will be placed. Therefore, before you can begin printing cash transactions, you should design Cash In and Cash Out Form Templates (step 1 below), and then specify that the particular Form Template will be used when printing Cash In and Cash Out records (steps 2-6). You can only follow this process using Windows or macOS, not iOS or Android.
- Design the Cash In and Cash Out Form Templates using the Form Template register in the System module Use the 'Properties' function on the Operations menu to name the Form Templates (in this description, we have used the names "CSHIN" and "CSHOUT") and to assign then Form Types of "Cash In" and "Cash Out" respectively. A full list of the fields you can include in the Template design can be found here.
A file containing samples of each Form Template including a sample "CSHIN" and "CSHOUT" is supplied with Standard ERP: if you want to use these samples as templates for your own designs, import the "UKForms.txt" file as described on the Importing Set-up Data page.
- Having designed the Cash In and Cash Out Form Templates, you should now specify that they should be used when printing Cash In and Cash Out records respectively. Select the Cash Book module using the [Switch Module] button in the Navigation Centre or the Ctrl-0 (Windows) or ⌘-0 (macOS) keyboard shortcuts.
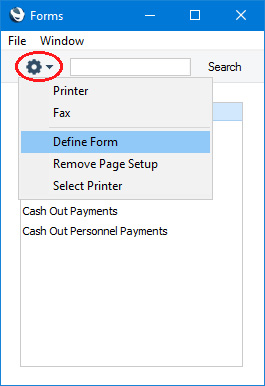
- Click the [Forms] button in the Navigation Centre or use the Ctrl-D/⌘-D keyboard shortcut. The 'Forms' list window will be opened: highlight 'Cash In' or 'Cash Out' as appropriate.
- Select 'Define Form' from the Operations menu (with 'cog' icon):
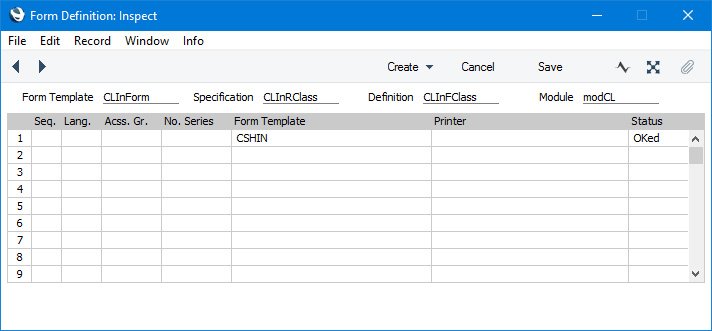
- In the subsequent 'Form Definition' window, enter "CSHIN" or "CSHOUT" as appropriate in the Form Template field in the first line (you can use 'Paste Special' to ensure the spelling is correct).
If you only want to be able to print cash transactions that have been marked as OK, enter "OKed" in the Status column in every row in the 'Form Definition' window. This will prevent the printing of cash transactions that have not yet been marked as OK. If you have also used Access Groups to specify which users are able to mark Cash In and/or Cash Out records as OK, this feature helps prevent the fraudulent creation and printing of unauthorised cash transactions.
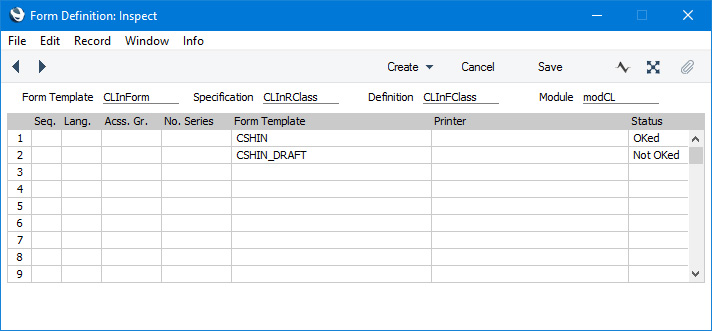
You can also use this feature to use a different Form Template when printing cash transactions that have not been marked as OK, as shown below:
- Click [Save] to save the Form definition. From now on, the Cash In or Cash Out Form Template that you have designed will be used when you print Cash In or Cash Out records using the 'Forms' function and the Printer icon.
---
The Cash In and Cash Out registers (Cash Transactions) in Standard ERP:
Go back to: