Business Communicator Window - Asterisk
To call a Contact through an Asterisk-based switchboard, first open the 'Business Communicator' window:
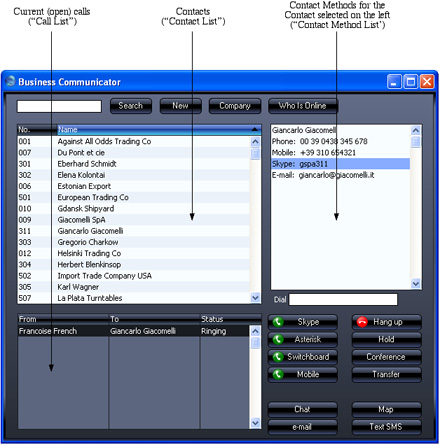
Click on the Contact in the Contact list and then click on their telephone or mobile number in the Contact Method list (you cannot call a SIP address using Asterisk). Alternatively, enter a telephone number in the Dial field. Then, click the [Asterisk] button.
A call will be established between you and the Contact. First, your SIP client (softphone (e.g. EyeBeam, X-Lite) or hardphone) will ring. When you answer, the Contact's telephone will ring.
You cannot use the [Asterisk] button to answer an incoming Asterisk call. You can only do this using your soft- or hardphone.
Communication through an Asterisk-based switchboard requires the following:
- You must have configured your HansaWorld Enterprise database to communicate through an Asterisk-based switchboard, as described immediately below.
- You must have a softphone application (e.g. EyeBeam, X-Lite) running and logged in to your Asterisk server, or a hardphone (e.g. USB telephone) correctly connected and logged in.
To configure your HansaWorld Enterprise database to communicate through an Asterisk-based switchboard, follow these steps:
- Ensure the Asterisk Management Interface has been enabled on your Asterisk server.
- Log in to your HansaWorld Enterprise system as a system administrator with access to the Technics module, as described here.
- Open the SIP Servers setting in the Technics module:
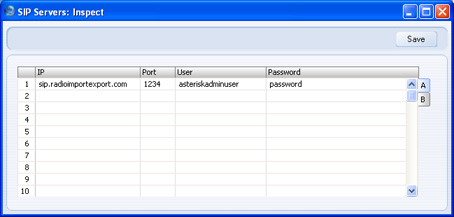
On flip A, enter the following details to allow your HansaWorld Enterprise server to log in to your Asterisk server(s) automatically:
- IP
- Enter the address of the Asterisk server. This can be its IP address or its domain name (e.g. sip.companyname.com).
- Port
- Enter the port number used by the Asterisk Management Interface on the Asterisk server.
- User, Password
- Enter the login details of the administrator account for the Asterisk Management Interface.
Save the SIP Servers setting and then restart the HansaWorld Enterprise server application. After restarting, it will connect to the Asterisk server(s).
- For each member of staff, create records in the Contact register containing their SIP user names.
The format of these user names must follow the model you used in the IP field in the SIP Servers setting in step 3. For example, if you entered the domain name of the Asterisk server in the IP field, each user name should use the format username@sip.companyname.com. If you entered the server's IP address in the IP field, include the IP address in each user name instead of the domain name (e.g. username@123.123.123.123).
The user names must be registered in the relevant Asterisk server.
The Contact records should also contain Extensions that other members of staff can call within the Asterisk server.
Connect these Contact records to the relevant Person or Global User records using the Contact Code field on the 'Access' card.
- The next step is to ensure incoming calls can be identified correctly so that they can be matched to numbers that are already in the database. For this matching process to be successful, the format of the originating telephone or mobile numbers of incoming calls must be the same as that of numbers in the database. Follow these steps:
- Log in again as a system administrator with access to the Technics module, return to the SIP Servers setting and go to flip B:
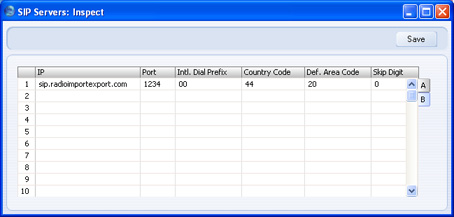
HansaWorld Enterprise will use the information in these fields to identify the originating telephone numbers of each incoming call made to each Asterisk server. After identification, it will use the Normalized Phone Numbers setting (step ii below) to attempt to match the telephone number to a record in the Contact register, and to open an Activity for that Contact.
- Intl. Dial Prefix
- Specify the international dialling code that must be dialled from the country where the Asterisk server is located. In Europe, this will be 00.
- Country Code
- Specify the country code of the country where the Asterisk server is located. For example, if the Asterisk server is located in the UK, this will be 44.
- Def. Area Code
- Specify the local area code of the area where the Asterisk server is located. This is only required in countries where you do not need to dial the area code when you are calling numbers in the same area. This is the case in the UK and Sweden.
- Skip Digit
- If the Asterisk server is located in a country where the first digit of telephone numbers is not dialled by incoming international callers, specify that digit here. For example, if the Asterisk server is located in the UK, this will be 0.
For example, if the Asterisk server is in London and receives a call from the London number 3222 1234, the effect of these fields will be to add the international dialling prefix, the country code and the area code less skip digit to produce 00442032221234. If it receives a call from the Reading number 0118 222 1234, the effect of these fields will be to add the international dialling prefix and the country code and to remove the skip digit, producing 00441182221234.
- Having ensured that incoming numbers all use the same format, you should now ensure the Contact numbers in the database also use the same format, so that they can be matched up. To do this, you will use the Telephony Settings setting.
Note that the SIP Servers setting is stored in Company 0, a partition of the database that stores information at database level (i.e. information that is available to every Company). Connecting to an Asterisk server and receiving and identifying incoming calls from that server are database level operations. This means you only need configure flip B of the SIP Servers setting once, and you can do so working in any Company. However, if you have more than one Company, you will need to configure the Telephony Settings setting separately in every Company. This allows for the possibility that different Companies might represent departments in different parts of the country (with different area codes) or even in different countries.
In each Company, open the Telephony Settings setting in the CRM module:
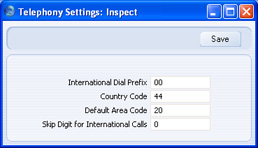
In configuring the Telephony Settings setting, bear in mind the telephone and mobile numbers that are already in the database, and also think about how users will enter telephone and mobile numbers in the future. For example, numbers local to the Company may have been entered without area codes. So, while the location of the Asterisk server will determine what you entered in the SIP Servers setting, the location of the Company will determine the country and area codes here.
Do not include the Skip Digit in the Default Area Code. For example, if the area code is 020 for London or 0118 for Reading, enter 20 (as shown in the illustration) or 118 respectively.
- If you already have Contacts in your database, you should now ensure that their telephone and mobile numbers are in the correct format. You can do this by running the 'Rebuild Number Recognition Register' Maintenance function. This will not change the numbers in the Contact records themselves. Instead, it will use the Telephony Settings setting to convert all numbers to the correct format and save them in a central setting in Company 0 known as the Normalized Phone Numbers setting.
To run this function, ensure you are in the CRM module, click the [Routines] button in the Master Control panel and then the [Maintenance] button in the 'Routines' window. Double-click 'Rebuild Number Recognition Register' in the subsequent list. The following window appears:
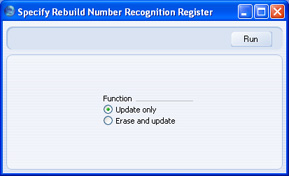
Choose the Erase and Update option and click the [Run] button. All numbers (i.e. telephone, mobile, alt phone and fax numbers) in the Contact register will be converted to the correct format and saved in the Normalized Phone Numbers setting. You can look at the contents of this setting in the CRM module:
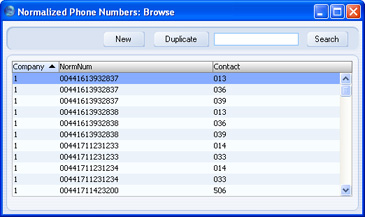
If a Contact for example has the London number 020 3222 1234 in the Contact register, the effect of the Maintenance function will be to add the international dialling prefix, the country code and the area code less skip digit to produce 00442032221234. This will match the incoming number described above in step 5 i. When you receive an incoming call from this number, HansaWorld Enterprise will find it in the Normalized Phone Numbers setting and match it to a record in the Contact register using the Contact Number. The Contact Name will then be shown in the Call list in the 'Business Communicator' window. When you answer the call, a new Activity will be created with the correct Contact Number and Name.
You only need run the 'Rebuild Number Recognition Register' function once, to make sure the Normalized Phone Numbers setting contains numbers for the Contacts already in your database. As you add new records to the Contact register or modify existing ones, the Normalized Phone Numbers setting will be updated automatically.
If you have more than one Company in your database, you need to configure the Telephony Settings setting separately in each Company, but you only need run the 'Rebuild Number Recognition Register' function once, from any Company. All numbers in every Company will be reformatted and copied to the Normalized Phone Numbers setting.
- Periodically, you should use the List Invalid Phone Numbers report in the CRM module to list telephone and mobile numbers containing illegal characters. If you print the report to screen, you can drill down to each Contact to make the correction. You should do this separately in each Company.
---
In this chapter:
|