Webshop - Individual Product Pages (More Info)
This page describes adding individual pages to the webshop for each Product. All the settings and registers mentioned on this page are located in the Webshop and CMS module unless otherwise specified.
---
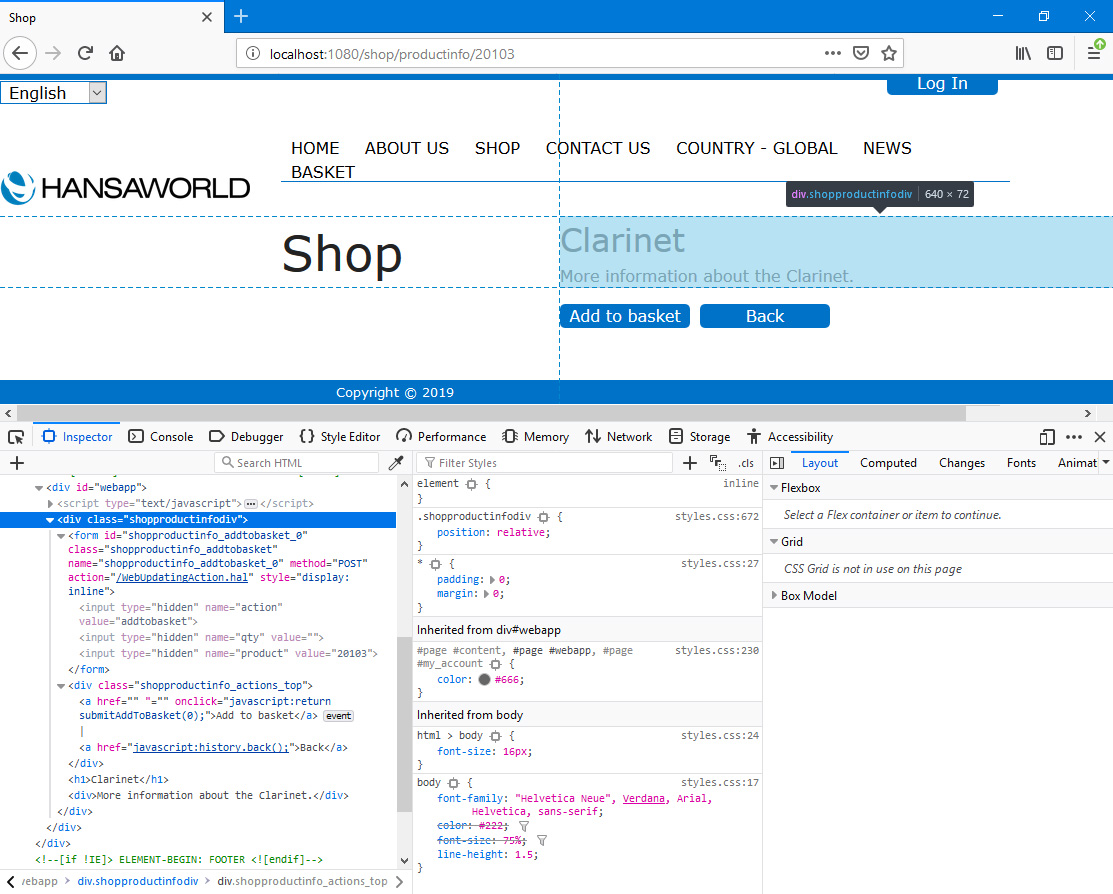
The Product listing page in the webshop includes a [More Info] button for each Product. This button will take the browser user to a page containing more detailed information about the Product in question. Users can also go to this page by clicking or tapping a Product Name or image in the Product listing.
You can record the more detailed information about each Product in one of two places:
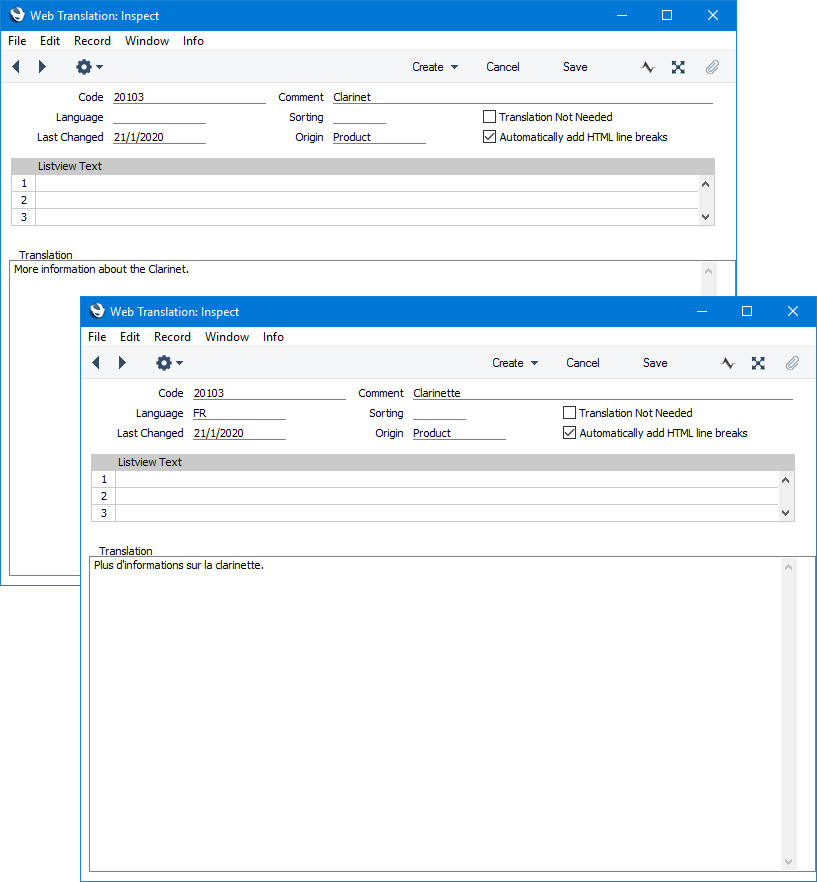
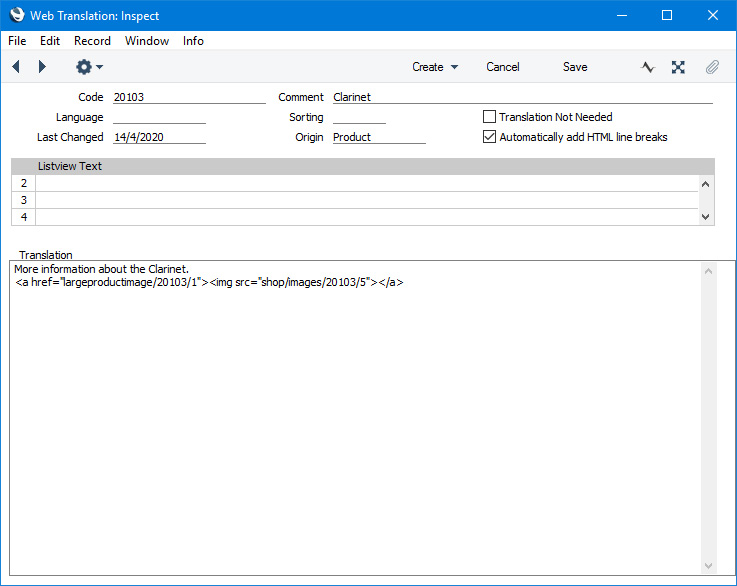
- Enter the text, images, etc in the Translation field in each Translation record connected to a Product:
When the user presses the [More Info] button or clicks or taps a Product Name or image, they will be taken to a page with a URL constructed as follows:
- /Webshop_App_Web_structure_name/productinfo/Product_Code
For example:
- http://domainname/shop/productinfo/20103
"productinfo" is hard-coded.
/productinfo/Product_Code is a sub-node of the "Webshop App" Node, indicating that the detailed Product information will be shown in the Webshop Area (i.e. in the <div id="webapp">), in its own <div class="shopproductinfodiv">. The page will be based on the Page specified in the Structure record for the "Webshop App" Node (step 1 on the Webshop page):
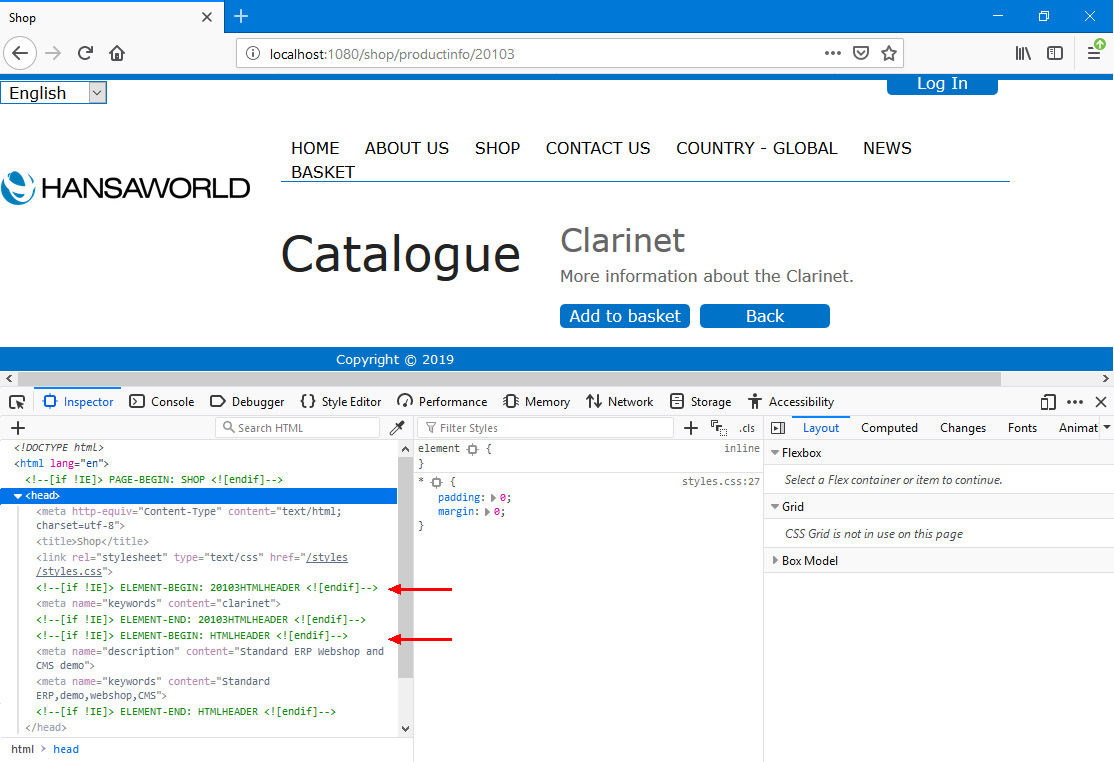
If you need product-specific meta tags to appear in the <head> section of the "More Info" page, create an Element and a connected Translation that contains the meta tags and then enter the Element Code in the HTML Head field in the Product record:
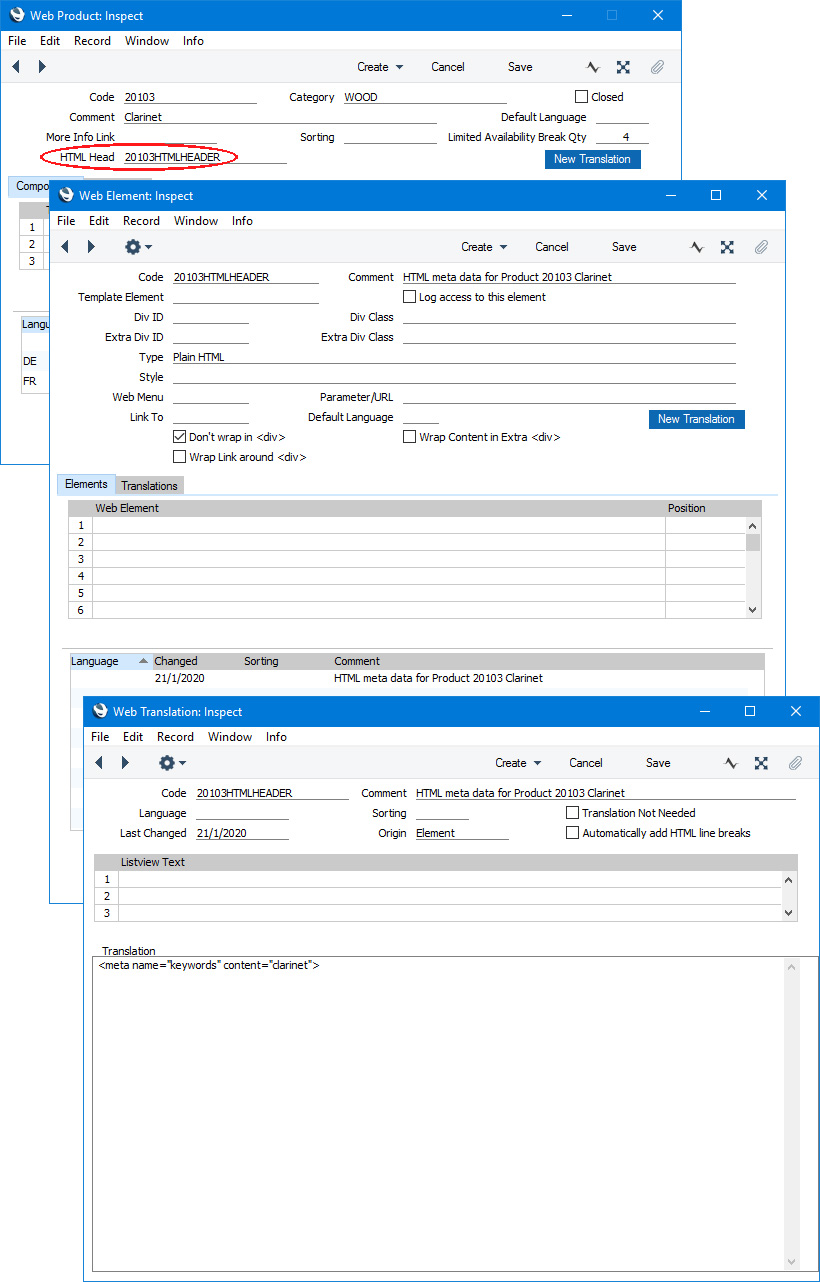
If you have also placed an Element in the "HTML Head" Rel. Position in the Page record for the webshop page, both Elements will be included in the <head> section of the "More Info" page, with the Product's Element appearing first.
Remember to select the Don't wrap in <div> option in the Element but not to select the Automatically add HTML line breaks option in the Translation.
You can use the Web Texts setting to change the following texts:
| Default Text | Web Text Code |
| | |
| More Info [button label] | 25511 |
| This product currently has no detailed information [shown for Products with no detailed information] | 25903 |
| Add to basket [button label] | 25510 |
| Back [button label] | 25509 |
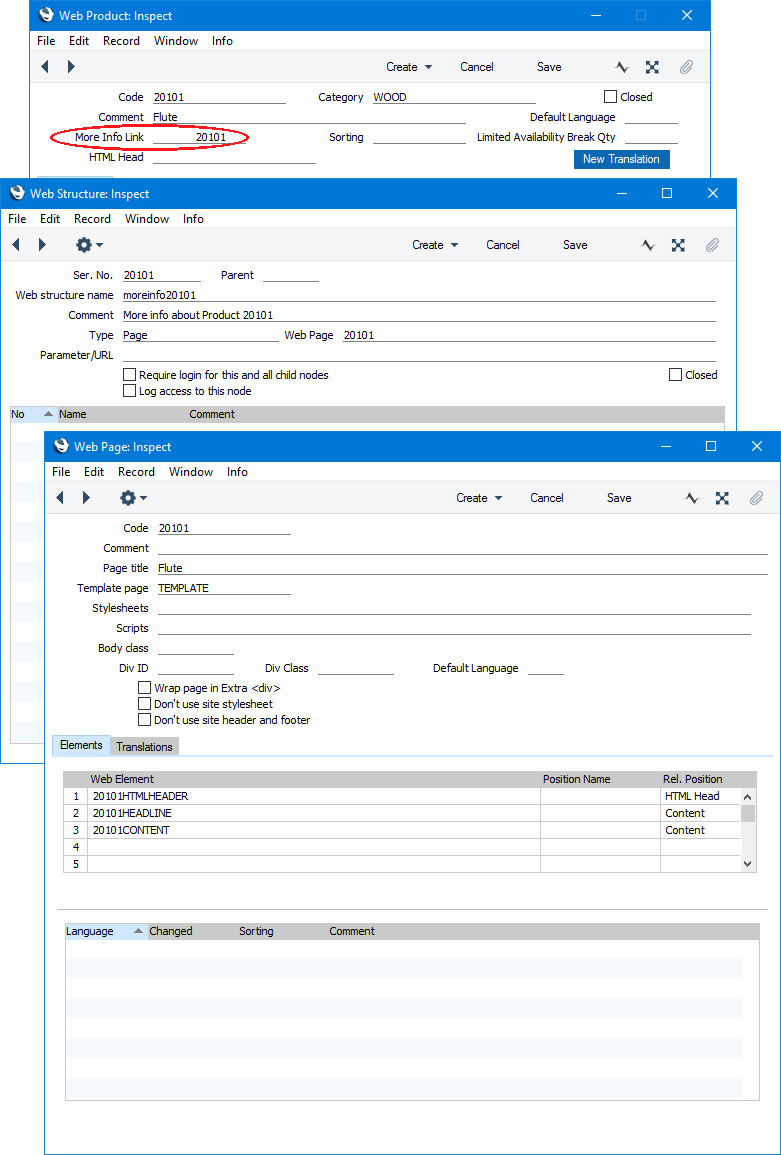
- You can add a separate node to display the detailed information. Add a new record to the Structure register, connect it to a Page and then connect the Page to Elements and Translations. Finally, enter the Code of the Structure record in the More Info Link field in the Product record:
In this case, the [More Info] button will take the browser user out of the webshop. Outside the webshop, the [Add to Basket] button will not be added automatically, but you can add one yourself. Add an Element in which the Type is "Webshop - Add to Basket Link" to the Page, and specify the Item Number in the Parameter/URL field:
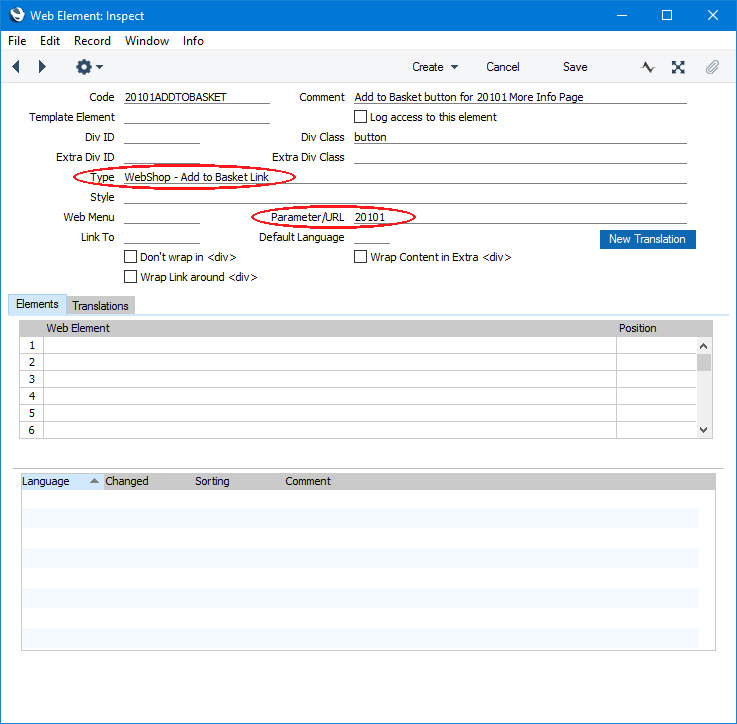
As you need to specify the Item Number in the Parameter/URL field, you will not be able to create a generic "Webshop - Add to Basket Link" Element but instead you will need to create separate Elements for each Product. The basket is described here.
You can also add a [Proceed to Checkout] button. Add an Element in which the Type is "Webshop - Checkout Link" to the Page. This Element can be a generic one as it doesn't require a Parameter/URL to be specified:
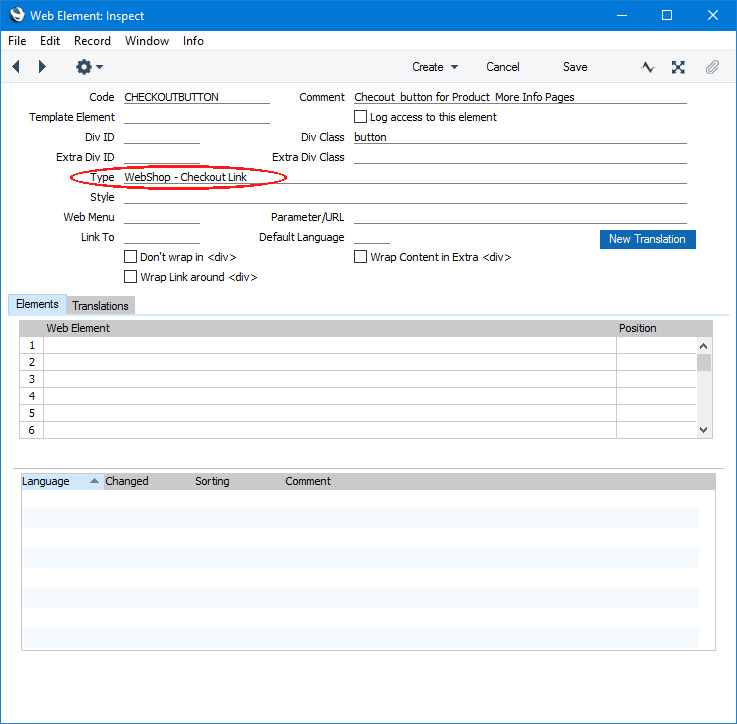
Note that the [Proceed to Checkout] button will be hidden if the basket is empty. The checkout page is described here.
There is no need to provide Translations for the "Webshop - Add to Basket Link" and "Webshop - Checkout Link" Elements. Instead, you can use the Web Texts setting to change and/or add translations for the button labels:
| Element Type | Default Text | Web Text Code |
| | |
| Webshop - Add to Basket Link | Add to basket [button label] | 25510 |
| Webshop - Checkout Link | Proceed to Checkout [button label] | 25508 |
The second method will be given priority. If you have entered the Code of a Structure record in the More Info Link field in a Product record, the [More Info] button will take the user to that node. Detailed Product information will only be taken from the Translation register if the More Info Link field in a Product record is empty. However, you may still need the Product to have connected Translations, because these Translations will supply the Product Name in each language and will also supply the
short description (again, in each language) if you are using that feature.
Images
With both of the methods described above, use one of the following options if you need an image or images to be displayed on a "More Info" page:
- Use a conventional <img src> tag to link to an image located on the server (as illustrated and described in step 2 on the Using Templates page).
- Use an <img src> tag to link to an image that you have attached to a Structure record whose Type is "Folder". Please refer here for details.
- Use an "Image" Element to display an image located on the server or attached to a "Folder" Structure record (as illustrated and described under the 'Webcust Folder' heading on the File Management page).
- Use a "Link" Element to link to an image located on the server or attached to a "Folder" Structure record (also as illustrated and described under the 'Webcust Folder' heading on the File Management page).
- Use an <img src> tag to link to an image that you have attached to the Product record. To do this, use the following syntax:
- /Webshop_App_Web_structure_name/images/Product_Code
For example, to refer to an image attached to Product 20103:
- <img src="/shop/images/20103">
If you have attached more than one image to a Product record, the first one alphabetically will be displayed. You can link to a specific image using the following syntax:
- /Webshop_App_Web_structure_name/images/Product_Code/Image_ID
For example, to refer to the fifth image alphabetically that is attached to Product 20103:
- <img src="/shop/images/20103/5">
If you would like to display a thumbnail image that is a link to a larger image, one method is to create a Structure record in which the Type is "Product Image App":
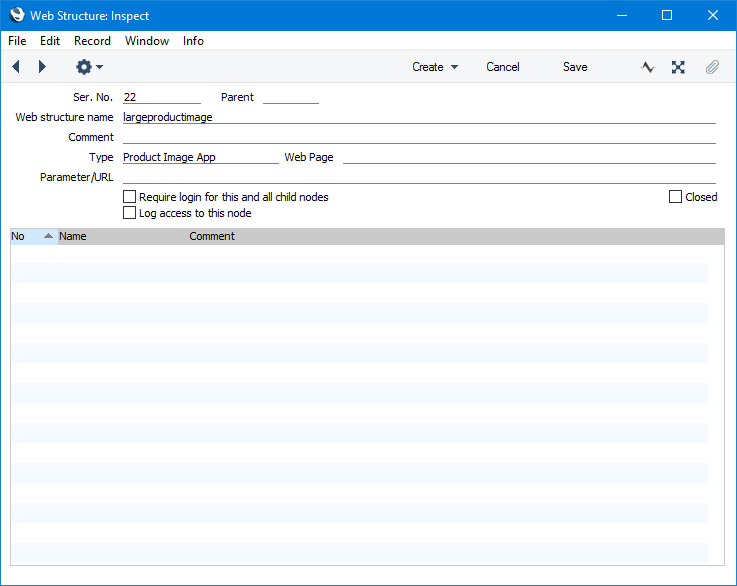
As shown in the illustration, you should specify a Web structure name, but there is no need to specify a Web Page or a Parameter/URL.
Include the Web structure name of the "Product Image App" Structure record in the anchor link using the following syntax:
- /Product_Image_App_Web_structure_name/Product_Code/Image_ID
For example:
- <a href="largeproductimage/20103/5"> <img src="shop/images/20103"> </a>
Both the thumbnail image and the full-size image should be attached to the Product record. In the example above, the full-size image is the fifth image attached to Product 20103, and the thumbnail is the first attached image.
---
The Webshop in Standard ERP:
Go back to: