Adding a "Contact Us" Page
This page describes adding a "Contact Us" page to a website using the following Element Types:
- Contact Us Form
- Contact Us Form - adjustable
- Create Mail Form
All the settings and registers mentioned on this page are located in the Webshop and CMS module unless otherwise specified.
---
If you would like to include a "Contact Us" page in your website, the following options are available:
- You can add a "Plain HTML" Element with a connected Translation that includes a "mailto" link to an email address.
- You can add "Contact Us Form" or "Contact Us Form - adjustable" Elements. These options are both described on this page. The "Contact Us - Form" Element includes pre-defined fields for the browser user to fill in, while the "Contact Us Form - adjustable" Element allows you to specify the fields that will be shown to the browser user. The "Contact Us Form - adjustable" Element also allows "Contact Us" Mails to be sent to different Mailboxes or Conferences depending on context (i.e. depending on the "Contact Us" page where they were created).
- You can add a "Create Mail Form" Element. This option is described towards the end of this page.
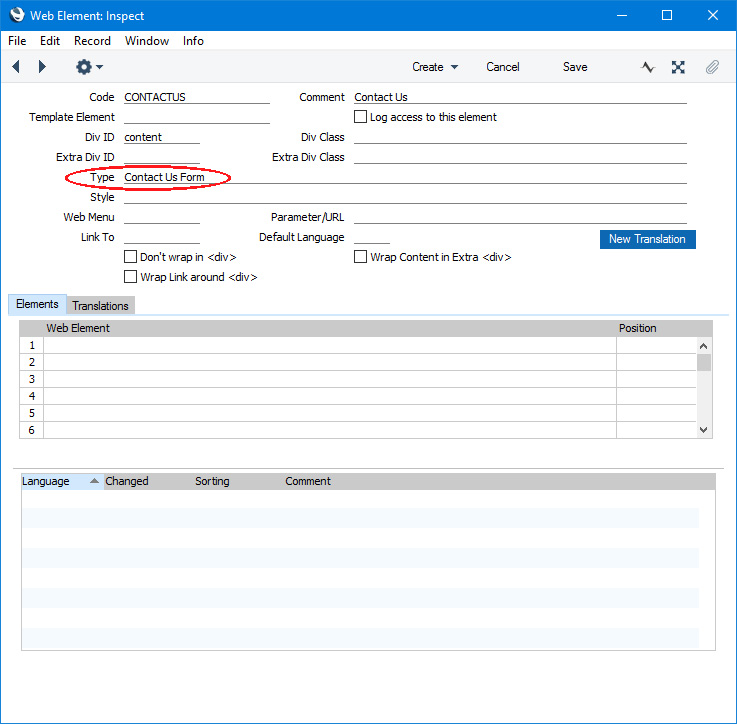
"Contact Us Form" Element
To use a "Contact Us Form" Element, follow these steps:
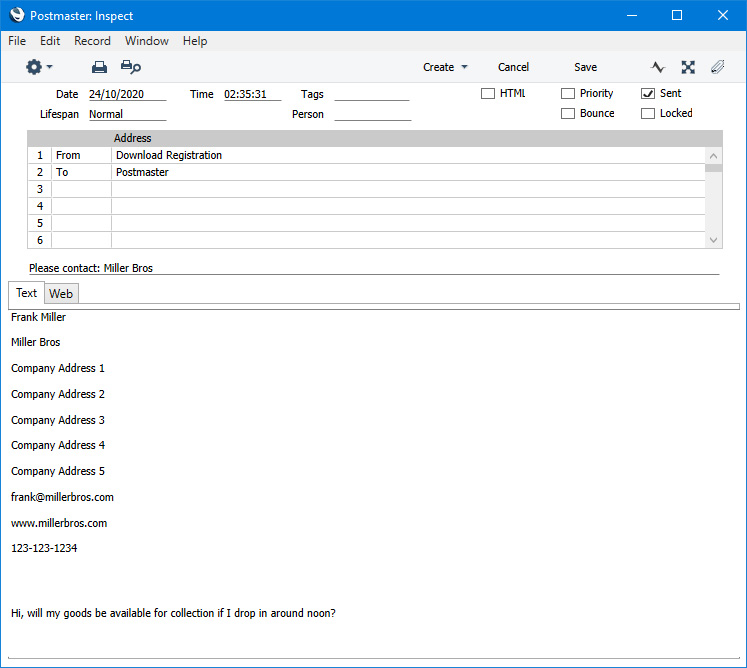
- By default, the sender of "Contact Us" Mails will be a Mailbox or Conference named "Download Registration", so ensure you have a Mailbox or Conference with this name. If you want to use a different Mailbox or Conference, add a record to the Web Texts setting for Web Text 25433 containing the Mailbox or Conference name.
- When a browser user uses the "Contact Us Form" Element, they will need to choose a country from a drop-down menu. This drop-down menu will list the records in the Countries on Web setting in which you have selected the Show on Web option. It will mandatory for the user to choose a country, so you must add at least one record to the Countries on Web setting.
- The receiver of a "Contact Us" Mail will be chosen as follows:
- If you have specified a Webmail Conference in the record in the Countries on Web setting for the country chosen by the user, that Webmail Conference will be the receiver of the "Contact Us" Mail.
- Otherwise, the receiver will be the Postmaster specified in the Mail and Conference Settings setting in the Email and Conferences module.
- You can add ReCAPTCHA to the "Contact Us Form" Element. Please follow the instructions in step 4 on the Customer Registration page. Select the Contact Us Form option in the Google ReCaptcha Settings setting.
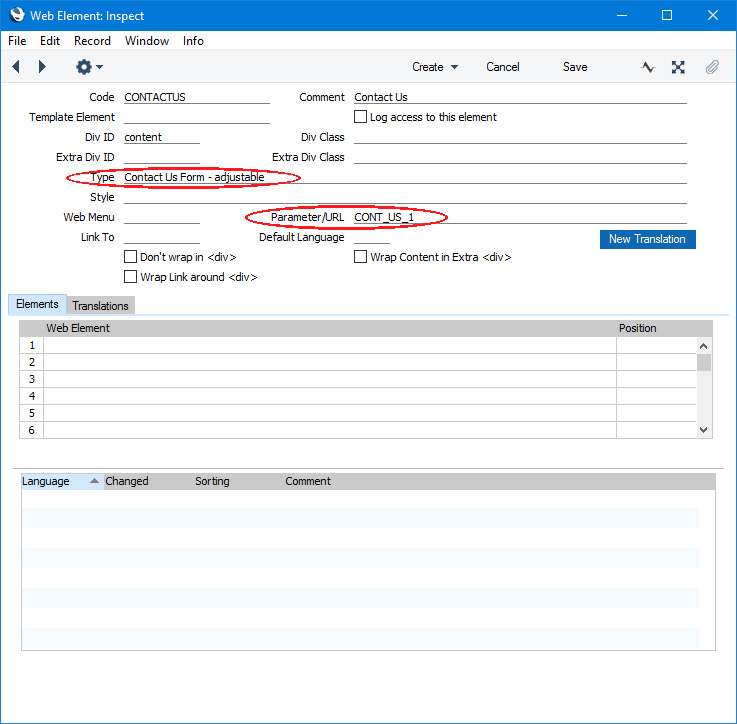
- Create a "Contact Us Form - adjustable" Element and add it to the appropriate Page or parent Element.
The fields listed in the "Contact Us Form" Element are hard-coded. If you need to change the field labels, the button label and the messages (e.g. the message that will be displayed if a browser user does not fill in the form correctly) (and/or enter translations), use the
Web Texts setting as mentioned towards the end of this page.
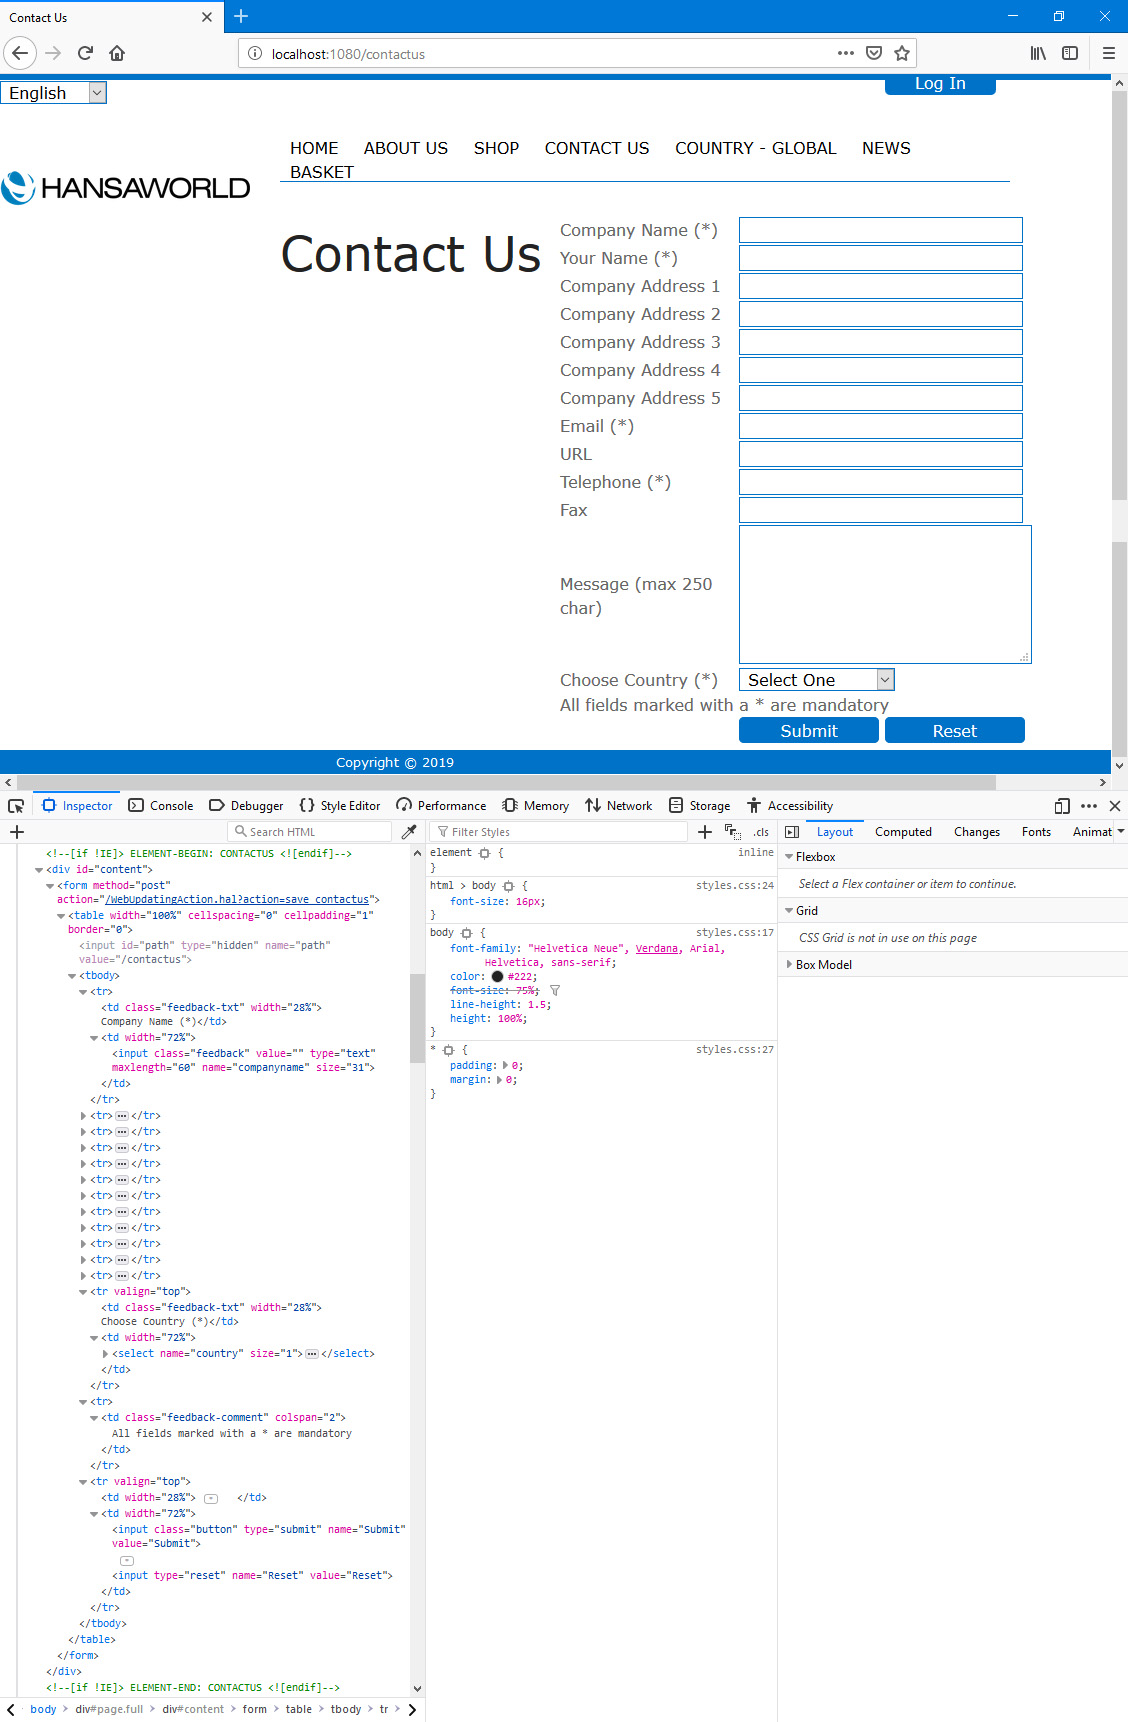
In this illustration, the following
<div> attribute is user-assigned (i.e. you can assign a different attribute or choose not to assign it at all):
- id="content" (specified in the "CONTACTUS" Element)
The following attributes are assigned automatically by Standard ERP (i.e. you will not be able to change these attributes, but you will be able to apply styling to them in your .css file):
- <td class="feedback-txt"> (used individually for each field label)
- <input class="feedback"> (used individually for each field)
- <td class="feedback-comment"> (used for the text "All fields marked with a * are mandatory" (Web Text 20066)
- <input class="button"> (wraps the [Submit] button (Web Text 20067))
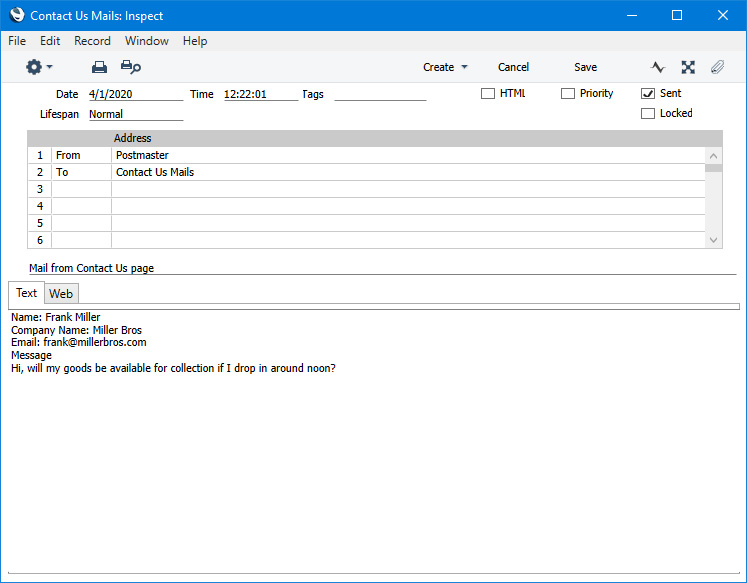
When a browser user fills in the fields and presses the [Submit] button, a Mail will be created in Standard ERP. The sender and recipient will be chosen as specified in steps 3 above, and Web Text 32420 (by default, "Please contact: ") will be used as the Subject of the Mail, followed by the company name supplied by the user.
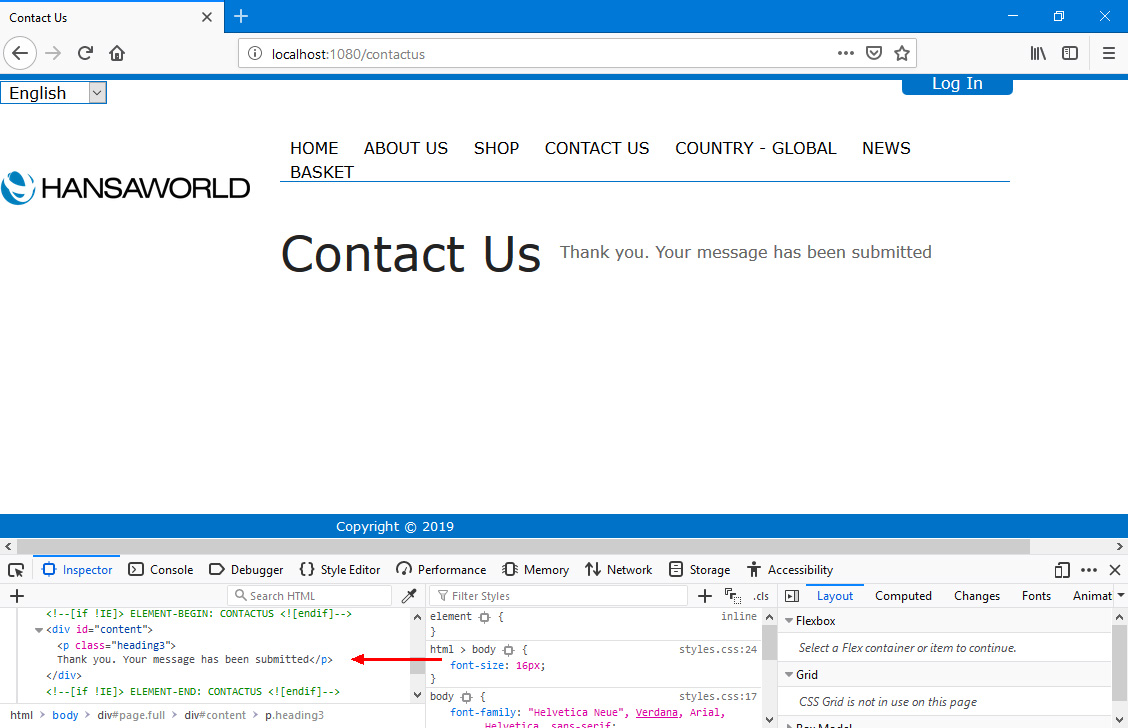
In the browser, the user will shown
Web Text 25432 (by default, "Thank you. Your message has been submitted") in
<p class="heading3">:
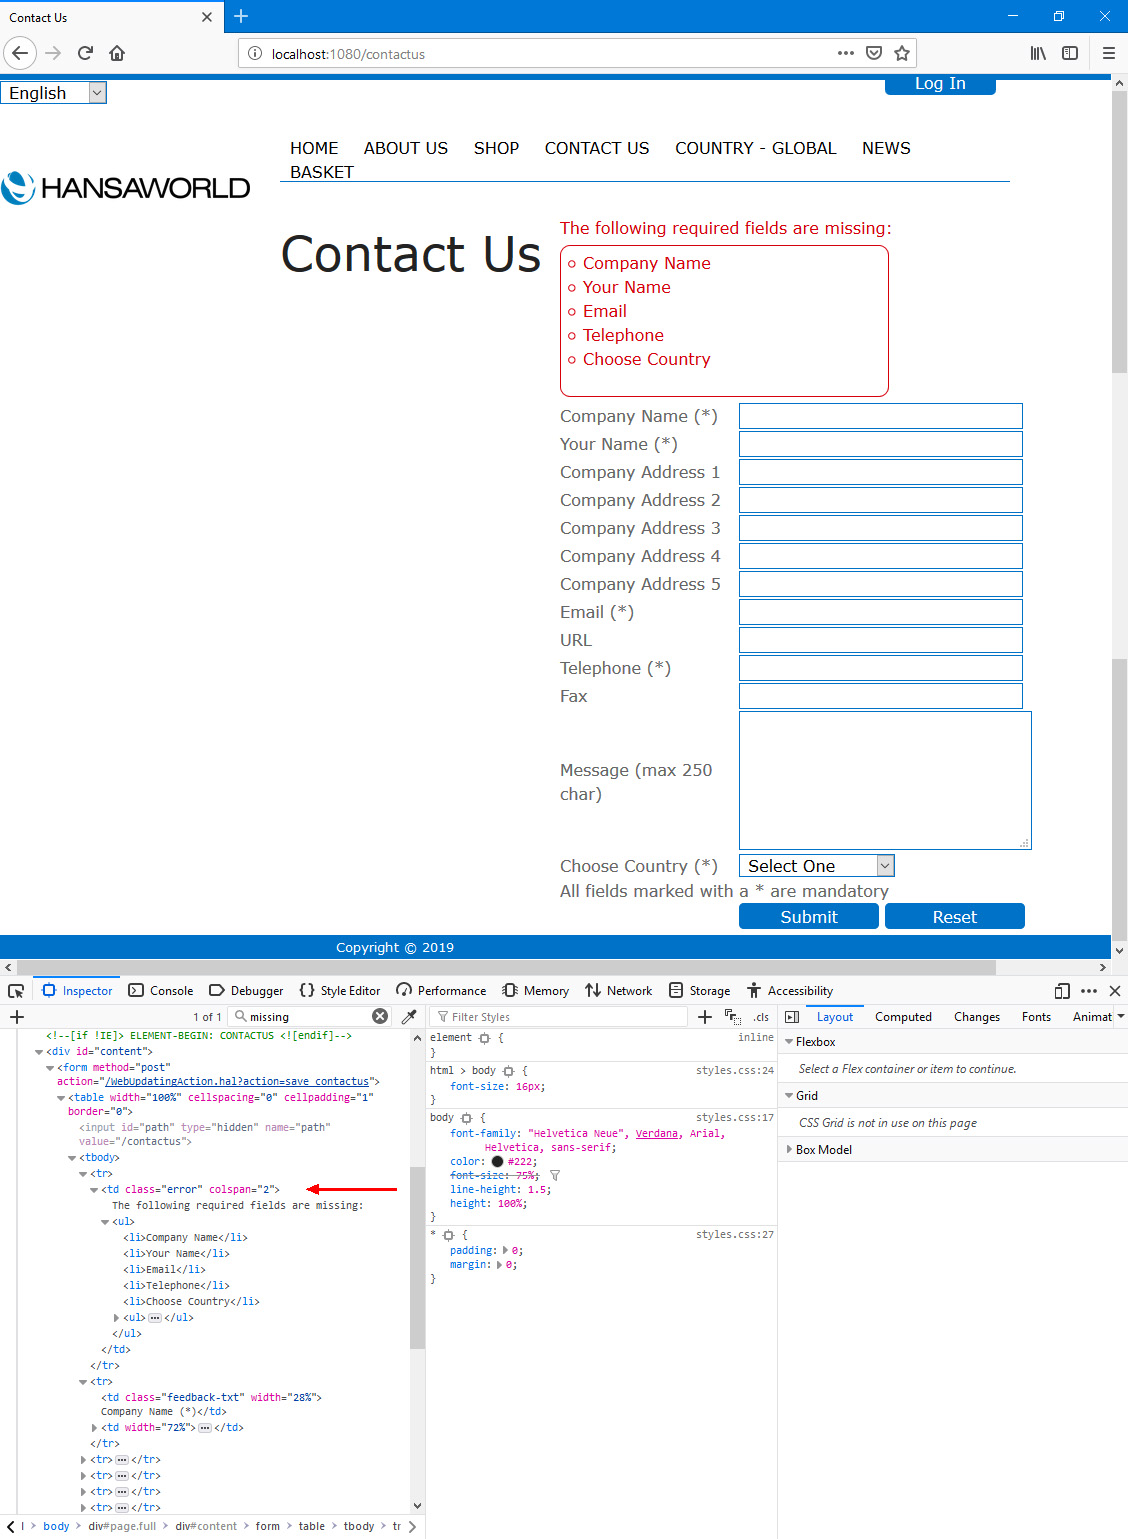
If the user has not filled in the form correctly when they press the [Submit] button, they will be taken back to the form where they will be shown an appropriate error message. The error message will be in
<td class="error">:
You can use the
Web Texts setting to change the following texts:
| Element Type | Default Text | Web Text Code |
| | |
| Contact Us Form | Your Name [field label] | 20058 |
| Contact Us Form | Company Name [field label] | 20059 |
| Contact Us Form | Email [field label] | 20060 |
| Contact Us Form | URL [field label] | 20061 |
| Contact Us Form | Telephone [field label] | 20062 |
| Contact Us Form | Fax | 20063 |
| Contact Us Form | Message (max 250 char) [field label] | 20064 |
| Contact Us Form | Choose Country [field label] | 20065 |
| Contact Us Form | Select One [first option in “Choose Country” drop-down menu] | 20055 |
| Contact Us Form | Company Address 1 [field label] | 20069 |
| Contact Us Form | Company Address 2 [field label] | 20070 |
| Contact Us Form | Company Address 3 [field label] | 20071 |
| Contact Us Form | Company Address 4 [field label] | 20072 |
| Contact Us Form | Company Address 5 [field label] | 20073 |
| Contact Us Form | All fields marked with a * are mandatory | 20066 |
| Contact Us Form | Submit [button] | 20067 |
| Contact Us Form | Reset [button] | 20068 |
| Contact Us Form | Please verify that you are human [used with ReCAPTCHA] | 30081 |
| Contact Us Form | The following required fields are missing: [do not include the final space] | 25002 |
| Contact Us Form | Thank you. Your message has been submitted | 25432 |
| Contact Us Form | Download Registration [name of Mailbox or Conference from which Mails will be sent] | 25433 |
| Contact Us Form | Please contact: [Subject of Mail, do not include the final space] | 32420 |
"Contact Us Form - adjustable" Element
To use a "Contact Us Form - adjustable" Element, follow these steps:
- Create a record in the Contact Us Form setting. In this record you should specify where "Contact Us" Mails should be received (i.e. the Mailbox or Conference to which "Contact Us" will be sent) and other details:
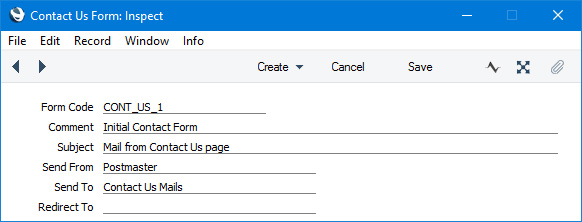
- Form Code
- Use this field to assign an arbitrary code to the Contact Us Form record.
- When you add the "Contact Us Form - adjustable" Element (step 4 below), you will quote this Form Code in that Element. This will connect the Element to the Contact Us Form record. If you will need more than one "Contact Us" page, this connection will allow "Contact Us" Mails to be sent to different Mailboxes or Conferences depending on context (i.e. depending on the "Contact Us" page where they were created). For example, you might have different "Contact Us" pages for new Customers, for technical queries and for queries about Orders or Invoices, and you will need Mails generated from these pages to be sent to different departments.
- Comment
- Enter a Comment to be shown in the 'Contact Us Form: Browse' window.
- Subject
- Enter the text that is to be the Subject in "Contact Us" Mails.
- Send From
- Paste Special
Mailboxes and Conferences
- Specify the Mailbox or Conference from where "Contact Us" Mails are to be sent.
- Send To
- Paste Special
Mailboxes and Conferences
- Specify the Mailbox or Conference that is to receive "Contact Us" Mails.
- Redirect To
- Paste Special
Structure register, Webshop and CMS module
- As an option, you can use this field to specify where browser users should be taken after they have filled in and submitted the "Contact Us" form.
- If you leave this field empty, the browser user will remain on your "Contact Us" page where they will be shown the "Form Submitted successfully" Web Text (Web Text 32503).
- Create separate records in the Contact Us Form Fields setting for each field that you need browser users to fill in when they send a "Contact Us" Mail:
- Form Code
- Assign the same Form Code to each record.
- As described in step 1, when you add the "Contact Us Form - adjustable" Element (step 4 below), you will quote this Form Code in that Element. This will connect the Element to the various Contact Us Form Field records: the Contact Us Form Field records with the same Form Code as the Element will be displayed inside the Element. If you will need more than one "Contact Us" page, this connection will allow you to display different fields on each "Contact Us" page depending on context.
- Field Type
- Paste Special
Choices of possible entries
- Use 'Paste Special' to choose whether a particular field is a string field or a text field, as follows:
- String Field
- Up to 255 characters (including the field name), will be displayed in browsers as a single-line field.
- Text Field
- Virtually unlimited number of characters, will be displayed as a multi-line field with a scroll bar.
- Comment
- Enter the name of the field that is to be shown in browsers. If necessary, enter translations of this name in the matrix below. Asterisks (*) will be added automatically to the names of fields that you mark as Required (below).
- Sorting
- Use this field to determine the order in which the fields will be listed in the "Contact Us Form - adjustable" Element. You can use any alphanumeric scale. For example, a field with "1" in its Sorting field will be listed above a field whose Sorting is "2". If you are shown a "Already registered" message when you try to save an individual record in the Contact Us Form Fields setting, the probable reason is that you are trying to save a record with a Sorting value that you have already used.
- Required
- Select this option if you need it to be mandatory that a particular field is filled in.
- You can add ReCAPTCHA to the "Contact Us Form - adjustable" Element. Please follow the instructions in step 4 on the Customer Registration page. Select the Contact Us Form option in the Google ReCaptcha Settings setting.
- Create a "Contact Us Form - adjustable" Element and add it to the appropriate Page or parent Element. Enter the Form Code that you used in steps 1 and 2 in the Parameter/URL field:
The "Contact Us Form - adjustable" Element will list the fields in the Contact Us Form Fields setting with the relevant Form Code automatically. The field labels will be taken from that setting so there is no need to provide a
Translation for this Element. If you need to change the button label and the messages (e.g. the message that will be displayed if a browser user does not fill in the form correctly) (and/or enter translations), use the
Web Texts setting as mentioned towards the end of this page.
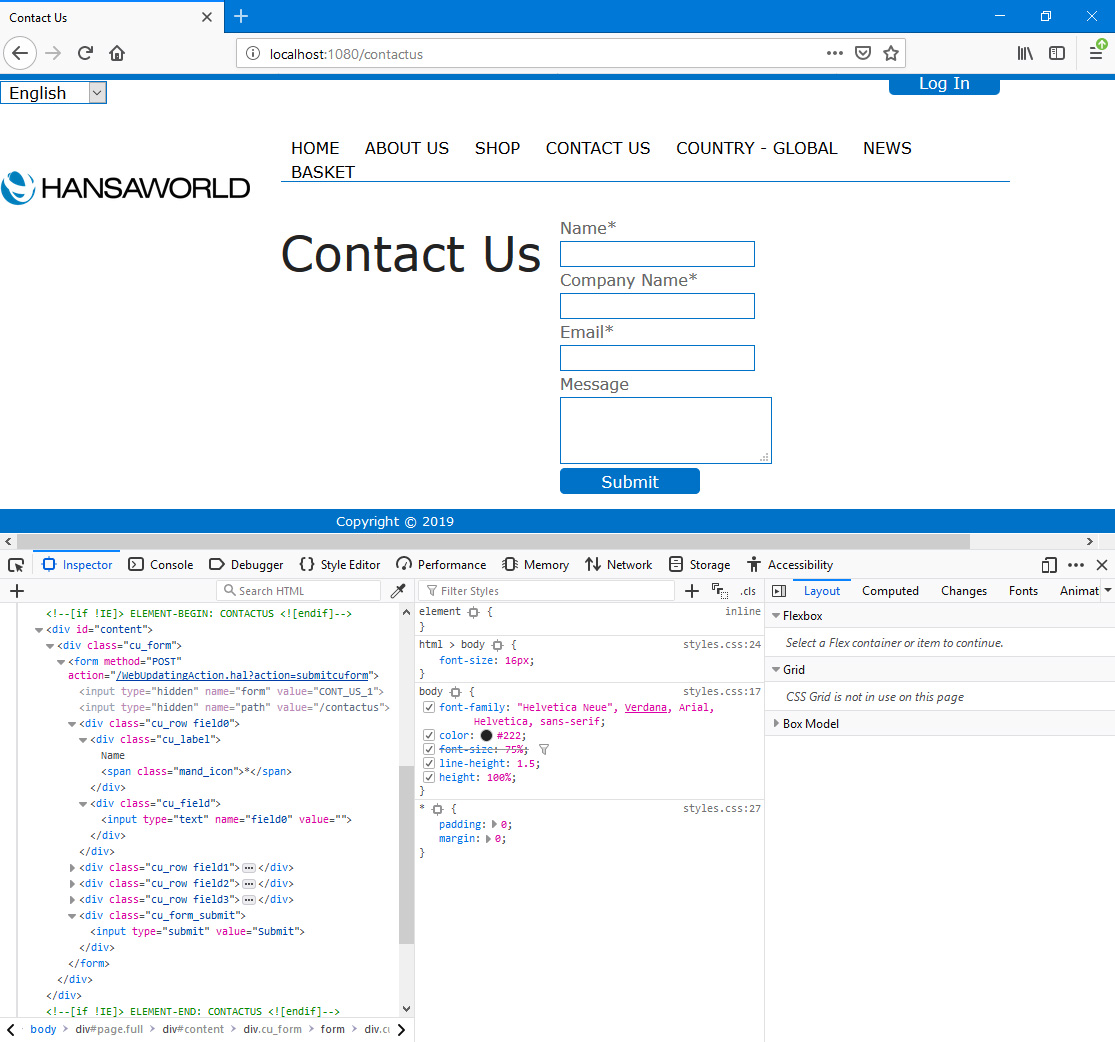
In this illustration, the following
<div> attribute is user-assigned (i.e. you can assign a different attribute or choose not to assign it at all):
- id="content" (specified in the "CONTACTUS" Element)
The following attributes are assigned automatically by Standard ERP (i.e. you will not be able to change these attributes, but you will be able to apply styling to them in your .css file):
- <div class="cu_form"> (wraps the fields and the button)
- <div class="cu_row_field0">, <div class="cu_row_field1">, <div class="cu_row_field2">, etc (individual <divs> that wrap each field and its label)
- <div class="cu_label"> (used individually for each field label)
- <div class="cu_field"> (used individually for each field)
- <div class="cu_form_submit"> (wraps the [Submit] button (Web Text 32505))
When a browser user fills in the fields and presses the [Submit] button, a Mail will be created in Standard ERP. The sender, recipient and Subject of the Mail will be taken from the record in the Contact Us Form setting that is connected by Form Code with the "Contact Us Form - adjustable" Element. Each field label together with the user's input will be listed in the Mail Text:
As mentioned in step 2, a string field can hold up to 255 characters. This includes the field label, colon and space. There is no theoretical limit to the number of characters in a text field,. but the Mail Text field itself has a limit of 32767 characters. This imposes a limit on the user's submission as a whole. The user's submission will be truncated if it contains more than 32767 characters.
After the user presses the [Submit] button, they will be taken to the node that you specified in the Redirect To field in the Contact Us Form record. If you left this field empty, the user will remain on the "Contact Us" page and will be shown the "Form Submitted successfully" Web Text (Web Text 32503):
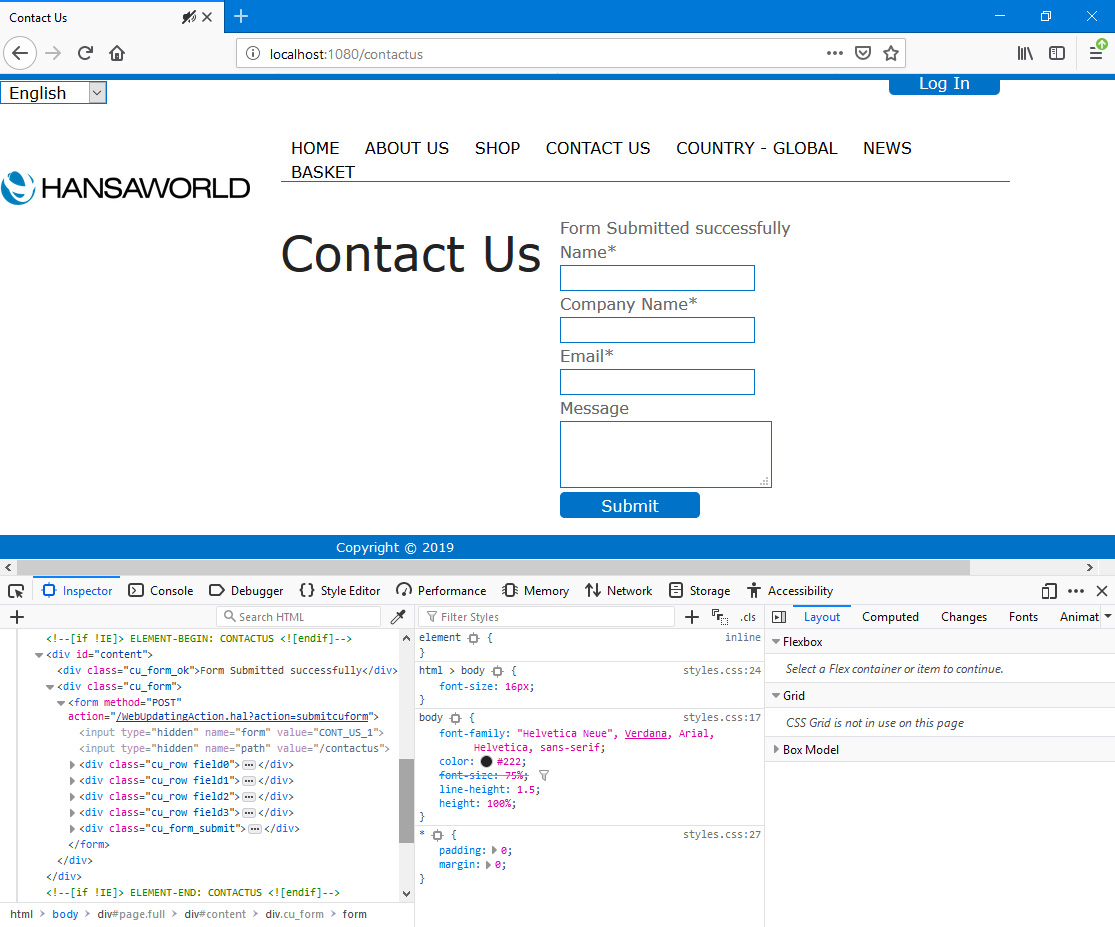
The following attributes are assigned automatically by Standard ERP (i.e. you will not be able to change these attributes, but you will be able to apply styling to them in your .css file):
- <div class="cu_form_ok"> (used for the "Form Submitted successfully" Web Text (Web Text 32503))
- <div class="cu_form_error"> (used for the "Fill Mandatory Fields" Web Text (Web Text 32501), not shown in the illustration, appears in the same position above the fields as the "Form Submitted successfully" Web Text if a browser user submits the form having left at least one mandatory field empty)
You can use the
Web Texts setting to change the following texts:
| Element Type | Default Text | Web Text Code |
| | |
| Contact Us Form - adjustable | Submit [button] | 32505 |
| Contact Us Form - adjustable | Please verify that you are human [used with ReCAPTCHA] | 30081 |
| Contact Us Form - adjustable | Fill Mandatory Fields | 25002 |
| Contact Us Form - adjustable | Form Submitted successfully | 32503 |
"Create Mail Form" Element
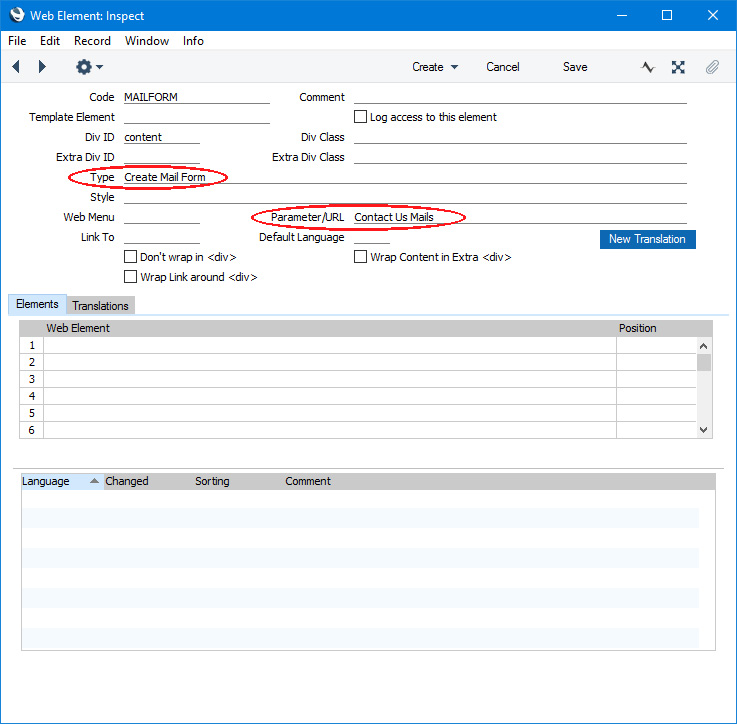
To use a "Create Mail Form" Element, create a "Create Mail Form" Element and add it to the appropriate
Page or parent
Element. Specify the
Mailbox or
Conference that is to receive the Mails in the Parameter/URL field:
In a browser, the "Create Mail Form" Element will contain two fields labelled "Subject" and "Body". These field labels are
Web Texts 25207 and 25208 respectively. There is no need to provide a Translation for this Element. If you need to change the button label and the messages (e.g. the message that will be displayed if a browser user does not fill in the form correctly) (and/or enter translations), use the
Web Texts setting.
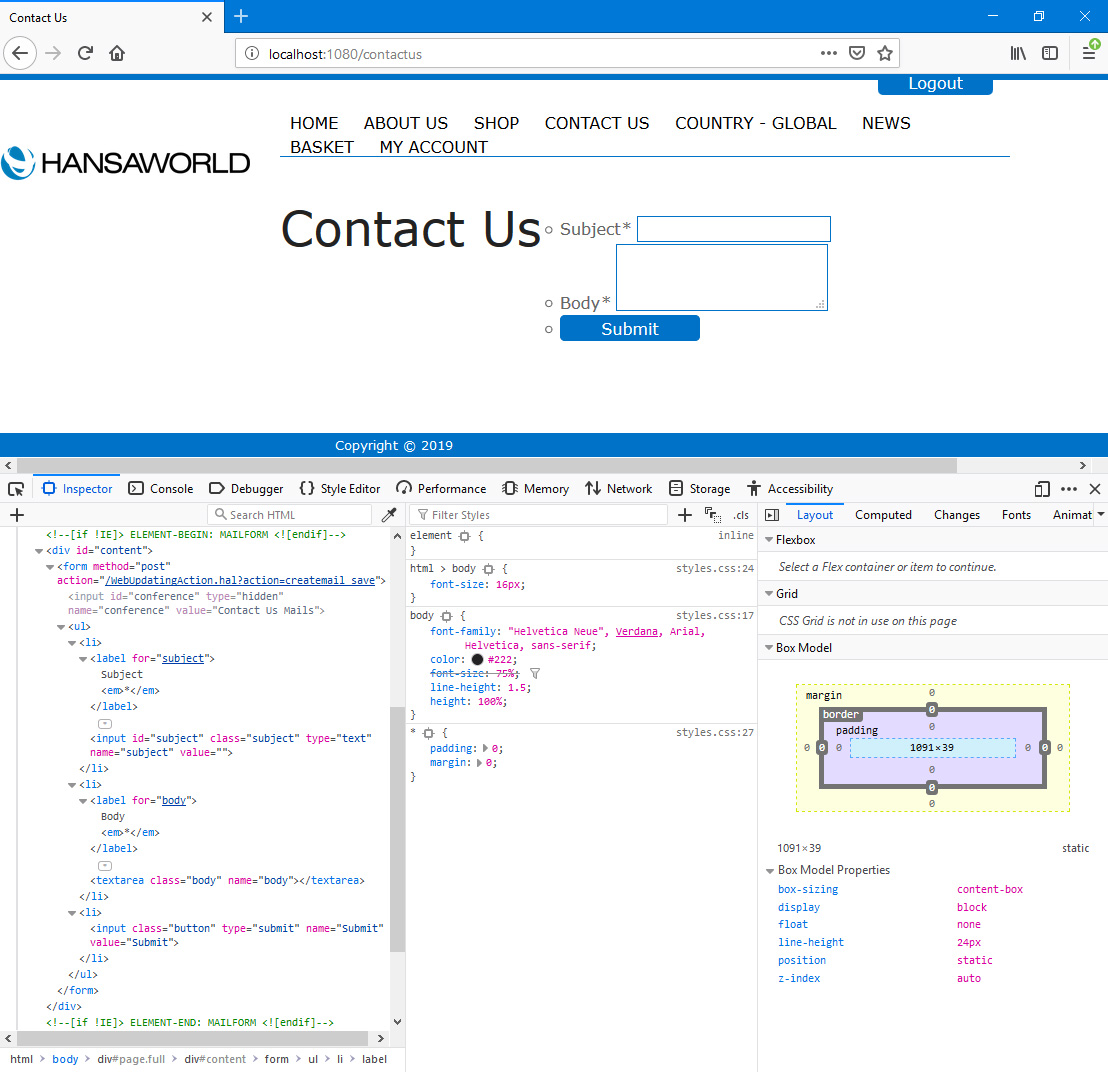
In this illustration, the following
<div> attribute is user-assigned (i.e. you can assign a different attribute or choose not to assign it at all):
- id="content"specified in the "MAILFORM" Element)
The following attributes are assigned automatically by Standard ERP (i.e. you will not be able to change these attributes, but you will be able to apply styling to them in your .css file):
- <input id="subject" class="subject"> (used for the Subject field)
- <textarea class="body"> (used for the Body field)
- <input class="button"> (wraps the [Submit] button (Web Text 20067))
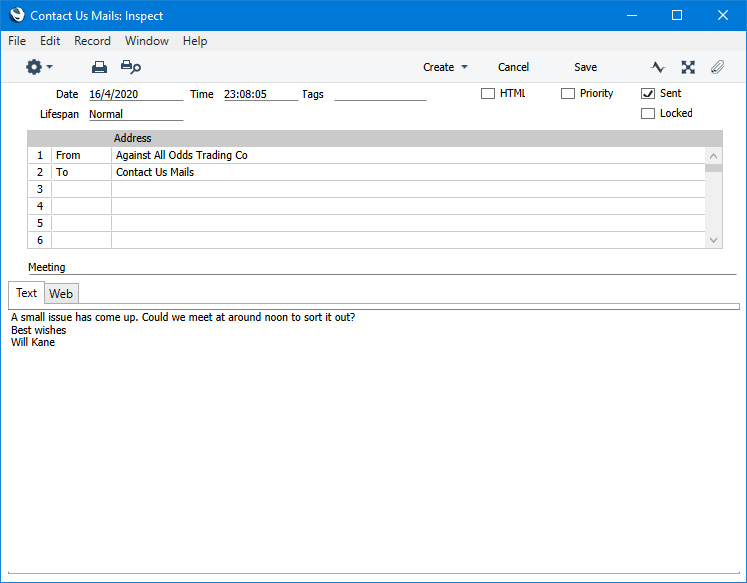
When a browser user fills in the fields and presses the [Submit] button, a Mail will be created in Standard ERP. If the browser user has logged in, the Name from their Contact record will be the sender of the Mail. If the user has not logged in, the sender will be Web Text 25336 (by default, "Anonymous"). The recipient of the Mail will be the Mailbox or Conference in the Parameter/URL field in the "Create Mail Form" Element. The Subject and Text in the Mail will be the user's input:
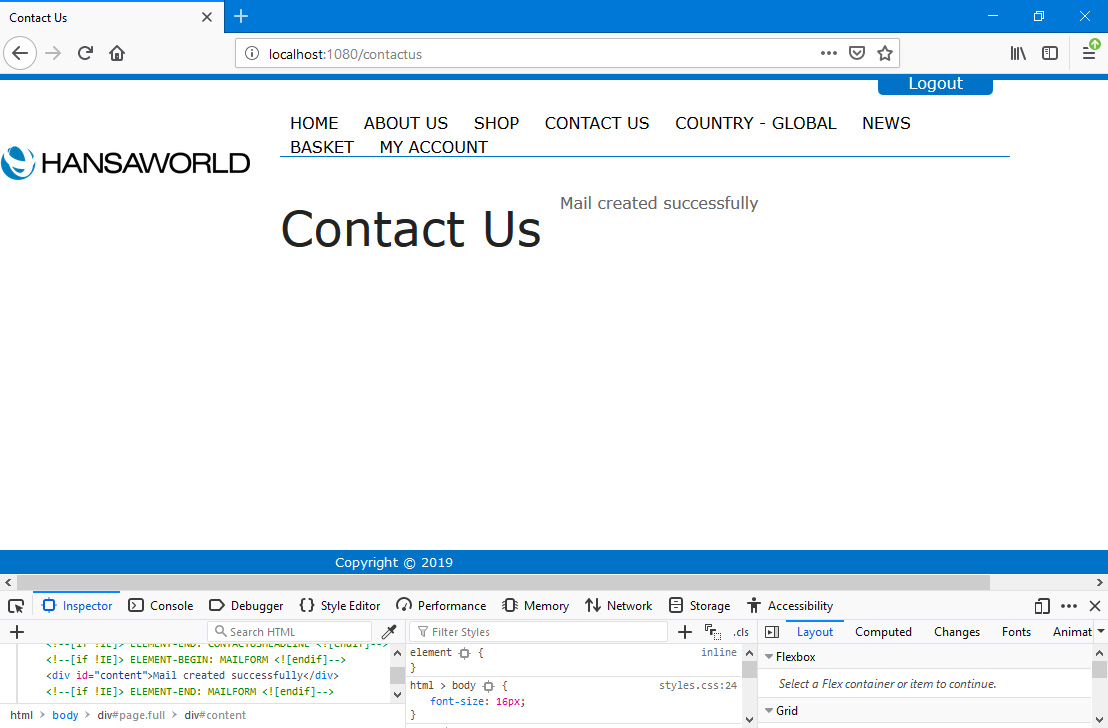
After the user presses the [Submit] button, they will be remain on the same page, but the "Create Mail Form" Element will now display the "Mail created successfully"
Web Text (Web Text 25428):
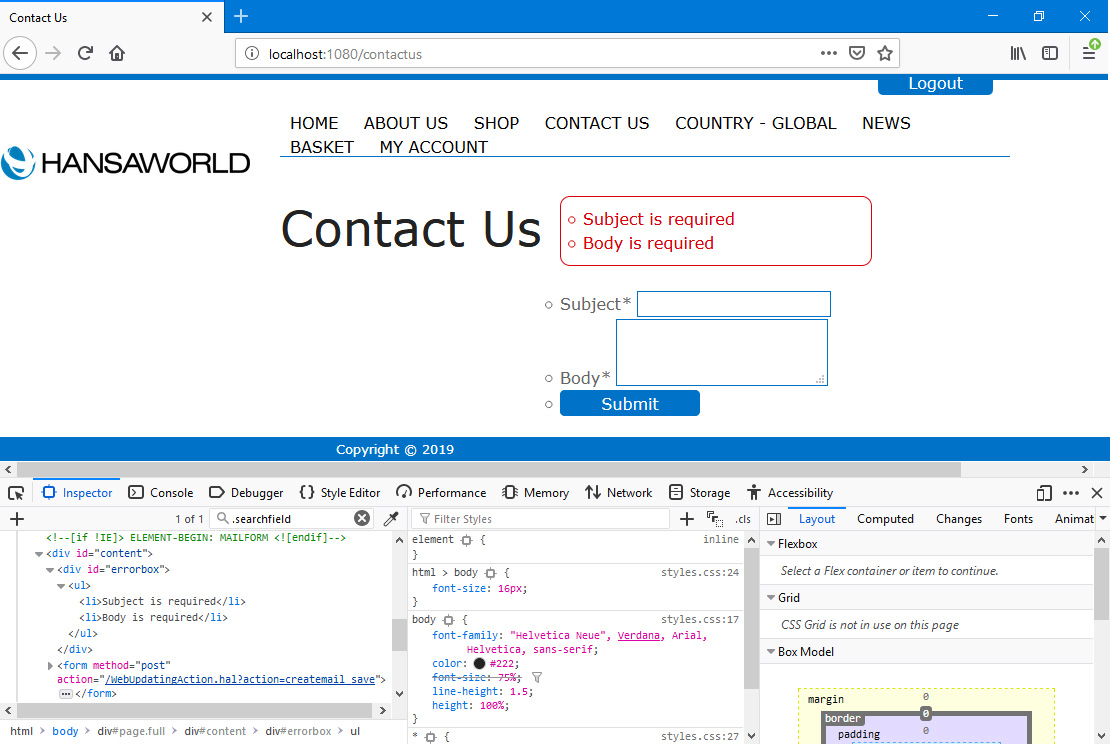
If the user has not filled in the form correctly when they press the [Submit] button, they will be taken back to the form where they will be shown an appropriate error message. The error message will be in
<div id="errorbox">:
You can use the
Web Texts setting to change the following texts:
| Element Type | Default Text | Web Text Code |
| | |
| Create Mail Form | Subject [field label] | 25207 |
| Create Mail Form | Body [field label] | 25208 |
| Create Mail Form | Submit [button label] | 20067 |
| Create Mail Form | Anonymous | 25536 |
| Create Mail Form | Mail created successfully | 25428 |
| Create Mail Form | is required [will be preceded by a field label and a space] | 25044 |
---
Go back to: