Reservation Status
This page describes the Reservation Status setting in the Hotel module.
---
The life of a Reservation will usually see it pass through several stages. As it does so, its Status will be changed automatically, to signify the stage it has reached. For example, a Reservation may begin as an enquiry, then be confirmed, then the Guests will check in and finally the Guests will check out. Alternatively, from being an enquiry or being confirmed, a Reservation might be cancelled.
The Reservation Status setting allows you to define each Status yourself. You should at least enter separate records representing the enquiry, confirmed, check in, check out and cancelled stages.
The Status of a Reservation controls how that Reservation is treated within the system (e.g. how the Reservation is shown in the 'Overview Rooms' window (the second Resource Planner window) and in reports). For example, you can assign a different colour to each Reservation Status, so that you can identify Reservations of each Status in the Resource Planner.
After defining Reservation Statuses, you should use the Reservation Status Sequences setting to specify the order in which the Statuses are to be used.
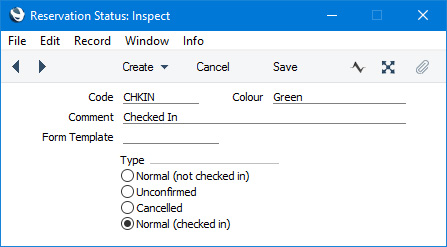
If you do not see all the fields shown in the illustration, the probable reason is that you have not selected the
Hotel Interface option in the
Optional Features setting in the System module.
- Code
- Enter a unique Code for the Reservation Status. The Code can consist of up to five characters, and you can use both numbers and letters.
- Colour
- Paste Special
Choices of possible entries
- Every Reservation with a particular Reservation Status will appear in the same colour in the 'Overview Rooms' window (the second Resource Planner window). Choose that colour using this field.
- If you choose "Default" or "Black" as the colour, then red will be used (black cannot be used because each Reservation will be labelled with black text).
- Comment
- Enter a descriptive name for the Reservation Status record. This will be shown in the 'Reservation Status: Browse' window and the 'Paste Special' list and so should be clear enough to make the selection of the correct Reservation Status easy for all users.
- Form Template
- Paste Special
Form Template register, System module
- If you need Reservations with the Reservation Status to be printed using a particular Form Template, specify that Form Template here.
- This Form Template will be used when you print a Reservation using the following methods:
- Opening the Reservation in a record window and clicking the Printer icon (Windows/macOS) or selecting 'Print' from the File menu (all platforms).
- Opening the Reservation in a record window and clicking the Preview icon (Windows/macOS only).
- Opening the Reservation in a record window, pressing the [Print Form] button and selecting the Reservation option.
- Using the Reservations form (from the [Forms] button in the Navigation Centre if you are using Windows/macOS or the [Routines] button in the Navigation Centre followed by the [Forms] button if you are using iOS/Android).
- If you leave this field blank, the standard Form Template (i.e. the Form Template specified in the 'Form Definition' window for the Reservations form) will be used.
- The Form Template that you specify here will not be used if you print a Reservation using the Reservation Check Outs, Reservation Confirmations or Reservation Enquiries forms.
- Type
- The Type of the Reservation Status controls whether and how Reservations will be included in the 'Overview Rooms' window (the second Resource Planner window) and in various calculations, as follows:
- Normal (not checked in)
- A Reservation should have a Normal (not checked in) Status if it is a booking that has been confirmed by the Customer or if it is a Reservation that has checked out.
- Normal (not checked in) Reservations will be:
- Shown in the 'Overview Rooms' window.
- Included in overbooking calculations (overbooking calculations will only be made if you are using the Disallow Overbookings option in the Hotel Settings setting).
- Included in Room availability calculations.
- Checked for Room double-booking (i.e. you will not be able to enter a Reservation with any Status for a Room on a date when there already is a Normal (not checked in) Reservation for the Room on that date).
- Included in the Newspaper List report (providing they have been assigned Rooms) and in the Rooms Let figure in the Daily Statistics report.
- Unconfirmed
- A Reservation will usually have an Unconfirmed Status if it is an unconfirmed enquiry by a Customer.
- Unconfirmed Reservations will be:
- Shown in the 'Overview Rooms' window.
- Included in overbooking calculations but only if you are using the Include Unconfirmed in Overbookings option in the Hotel Settings setting.
- Included in Room availability calculations but only if you are using the Include Unconfirmed in Availability option in the Hotel Settings setting.
- Checked for Room double-booking but again only if you are using the Include Unconfirmed in Availability option in the Hotel Settings setting (i.e. you will not be able to enter a Reservation with any Status for a Room on a date when there already is a Unconfirmed Reservation for the Room on that date).
- Included in the Newspaper List report (providing they have been assigned Rooms) and in the Rooms Let figure in the Daily Statistics report but in both cases only if you are using the Include Unconfirmed in Overbookings option in the Hotel Settings setting.
- Cancelled
- Cancelled Reservations will be:
- Normal (checked in)
- Normal (checked in) Reservations will be:
- Shown in the 'Overview Rooms' window.
- Included in overbooking calculations.
- Included in Room availability calculations.
- Checked for Room double-booking.
- Included in the In-House Guests report.
- Included in the Newspaper List report and in the Rooms Let figure in the Daily Statistics report.
- A Reservation must have this Status if you need to charge Bar Tabs and/or POS Invoices to the Guest Accounts using the "On Hotel Guest Account" button.
---
Go back to: