Creating a New Database - Installing the Cloud Node
Installing a Cloud Node will allow you to control your server through
MyStandard (i.e. from any browser). MyStandard is a personalised portal that allows you to control and manage your server wherever you are from any device. You must install a Cloud Node if your server is on your premises or in a non-HansaWorld cloud. Do not install a Cloud Node if your server is in the HansaWorld cloud or if you are using Standard ERP in a single-user installation.
Follow these steps:
- Ensure the following ports are open for outgoing traffic only to the following domains in the firewall on your server:
- http://hansaworld.com:80
- https://lookup.hansaworld.com:443
- https://validate.hansaworld.com:443
- http://validate.hansaworld.com:1401
- http://downloads.hansaworld.com:80
- https://cloudcontroller.hansaworld.net:444 (in Australia. open https://cloudcontroller.aus.hansaworld.net:444; in Finland, open https://cloudcontroller.fin.hansaworld.net:500; or in Latvia open https://cloudcontroller.lat.hansaworld.net:444)
- https://cloudcontroller.hansaworld.net:2000 (in Australia. open https://cloudcontroller.aus.hansaworld.net:2000; in Finland, open https://cloudcontroller.fin.hansaworld.net:2000; or in Latvia open https://cloudcontroller.lat.hansaworld.net:2000)
- Disable any anti-virus software that is running on your server until the installation of the Cloud Node has been completed.
- If you are controlling your server using a script such as run-hansa.sh, close the server, disable the script and start the server without it. This is to prevent the script and the Cloud Node attempting to control the server at the same time.
- Connect to your server from a client. Log in as a user with access to the Technics module.
- Open the Internet Enablers setting in the System module and ensure at least the Registered in and Customer Code at HansaWorld fields are filled in. If you know your Contract Number at HansaWorld. fill that in as well.
- Change to the Technics module and open the Program Mode register.
- Make sure you have specified a Web Port on the 'Web' card. If there is no Web Port, specify one and then restart the server.
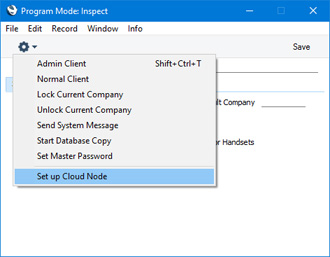
- Choose 'Set up Cloud Node' from the Operations menu:
- The 'Set up Cloud Node' window will appear: press the 'Setup' button to proceed:
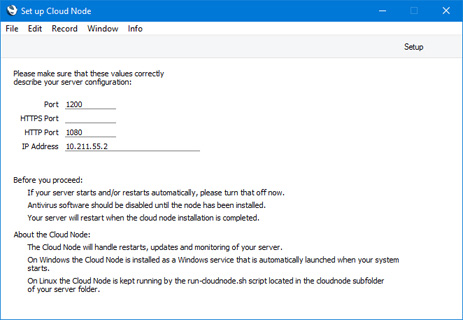
The information in this window will be taken from the Program Mode register and shouldn't be changed. The IP address will mainly be used for logging purposes. It will not be used to connect to your server because the Cloud Node will connect to MyStandard by calling out from your server machine. This allows you to change the IP address of your server at any time and/or to locate the server behind a firewall with a dynamic external IP, with no danger of the server losing touch with MyStandard.
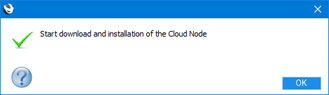
- Finally, press the [OK] button when you are ready to begin the installation of the Cloud Node:
The installation will be carried out as follows:
- A folder named "cloudnode" will be added to the folder containing the Standard ERP server application.
- The Standard ERP server application will be closed. As a result, the client that you are using will lose connection.
- If your server is a Windows machine, the Standard ERP server will be removed from the services registry, and the Cloud Node will be added (with the name "Standard Cloud Node").
- The Cloud Node will be launched.
- The Cloud Node will launch the Standard ERP server application automatically, so you will be able to log in again.
- If you have more than one Standard ERP server installation on a single server machine and have already installed a Cloud Node from one of the servers. the installation process when run from a subsequent server will connect that server to the existing Cloud Node (provided the databases are registered in the same country).
---
Multi-user Installation:
Go back to: