Creating a Report Generator Report - Adding Radio Buttons to the Specification Window - Searches Controlled by Radio Buttons
This page describes using radio buttons to offer mutually incompatible searches in Report Generator reports.
---
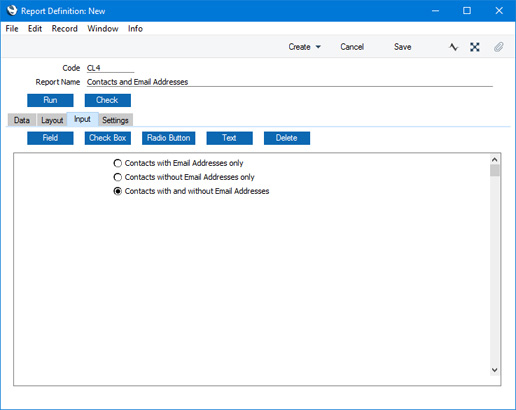
You can use radio buttons when you want to offer some search options in a Report Generator report that are not compatible with each other. In this example of a Contact List report, we will add three radio buttons offering the options to list Contacts with Email Addresses only, Contacts without Email Addresses only, and Contacts with and without Email Addresses. These three radio buttons will control a single variable rEmail. The value of rEmail will vary, depending on the radio button chosen by the person producing the report. A different search will then be carried out, depending on the value of rEmail. Follow these steps:
- Create a new report in the Report Generator module. On the 'Data' card, specify that the Contact register is to be the primary register. On the 'Layout' card, design the output of the report as required.
- Go to the 'Input' card, and click the [Radio Button] button above the report display area. The 'Radio Button' dialogue box opens:
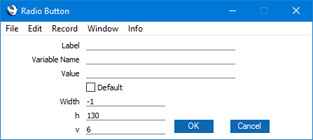
- Label
- Enter the name of the radio button, as it will appear in the specification window. The Label should indicate the purpose of the radio button to the person producing the report.
- Variable Name
- Enter a name for the variable that is controlled by the radio button. Include at least one alpha character in the name and do not use spaces or punctuation marks of any kind. Use the underscore _ instead of a space. Ideally, the variable name should reflect the purpose of the variable.
- This variable will be set to the value in the Value field below if the person producing the report chooses the option in the specification window.
- You must use the same variable name for each radio button in a group. A radio button with a different variable name by definition belongs to a different group.
- Value
- Specify here the value that will be assigned to the variable when the radio button is selected. The variable is an integer variable, so you should enter a whole number. Usual practice should be to assign 0 (zero) to the variable for the first radio button in a group, 1 for the second radio button, and so on. Take care not to assign the same value to more than one radio button in a group: if you do, the report will not run and will fail when you click the [Check] button.
- Default
- Use this option if you want the radio button to be selected by default when the specification window opens. If you do not choose a default radio button in a group, the one with the value 0 will be selected. Take care not to choose more than one default radio button in a group: if you do, the report will not run and will fail when you click the [Check] button.
- Width
- This field is not used in radio buttons.
- h, v
- Use these two fields to specify where you want the radio button to be placed in the specification window. Enter co-ordinates (in pixels) for the top left-hand corner of the radio button (not the label): h (horizontal) is the distance from the left-hand edge of the specification window, while v (vertical) is the distance from the top edge. Defaults are offered: they assume the standard Standard ERP vertical spacing of 20 pixels between radio buttons.
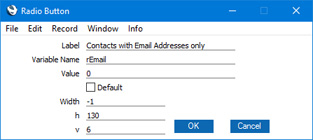
- Click the [OK] button. The radio button is placed in the report display area. This shows what the specification window will look like:

Placing the radio button in the specification window in this way has the effect of declaring the variable, so there is no need to do this on the 'Data' card as well.
- Repeat steps 2 and 3 to add two further radio buttons to the specification window, for Contacts without Email Addresses only, and Contacts with and without Email Addresses. Remember to use the same variable name that you used for the first radio button, and to choose one of them as the default. It is recommended that these radio buttons set the value of the variable to 1 and 2 respectively.
- At the moment the radio buttons exist only in the specification window. Now you need to specify what should happen when the user chooses each one. In this example, if the person producing the report chooses the first option and thereby sets the variable to 0, there should be a search for Contacts with no Email Address. If they choose the second option setting the variable to 1, there should be a search for Contacts with an Email Address. Otherwise, there will be no need to carry out a search and Contacts with and without Email Addresses will be shown in the report.
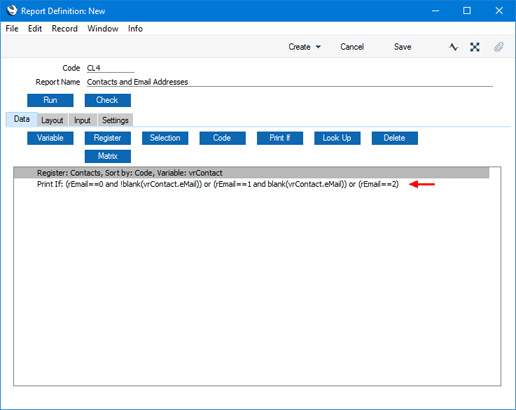
Change to the 'Data' card. Click on the line in the report display area marked "Register: Contacts..." to specify that the search is to be carried out in the Contact register, and then click the [Print If] button.
- Enter a formula in the 'Print If' dialogue box as shown below:

The formula is:
- (rEmail==0 and !blank(vrContact.eMail)) or (rEmail==1 and blank(vrContact.eMail)) or (rEmail==2)
This states that if the variable rEmail is set to 0, there will be a search for Contacts with an Email Address. If rEmail is set to 1, there will be a search for Contacts with no Email Address. If rEmail is set to 2, no action will be taken. Note that you must test to check whether rEmail has been set to 2, even though there is no need to take any action in this case.
- Click the [OK] button to add the Selection to the Contact register section of the report display area:
The three radio buttons will now be placed in the specification window, and the appropriate search will be carried out depending on the option chosen by the person producing the report.
Please follow the links below for more details about:
---
Go back to: