Shared Registers
This page describes sharing registers (i.e. sharing information) between Companies in a multi-Company database.
---
You can choose to make the information in certain registers available to every Company in your database. Such registers are termed "Shared Registers".
For example, you may choose to make the Contact register a Shared Register so that you use the same Contact list in all your Companies. This will mean that all Contacts will be available to all Companies. You will not be able to isolate a particular single Contact so that it can only be used by a particular single Company. However, you will be able to make the same Contact list available to four of your Companies and have a completely separate Contact list in a fifth Company.
If you are using Global Users, it is strongly recommended that you share the Access Groups setting, to make the same Access Groups available to every Company. The Global Users feature allows Users to log in to several Companies using the same password and StandardID or Signature and is described in more detail here.
To set up a Shared Register, follow these steps:
- Working in any Company, enter the Technics module by selecting 'Technics' using the [Switch Module] button in the Navigation Centre. To be able to do this, you should have logged in as a Person that has access to the Technics module: this is controlled using Access Groups.
- Open the 'Settings' list using the [Settings] button in the Navigation Centre or the Ctrl-S (Windows) or ⌘-S (macOS) keyboard shortcut. In a client-server system, you should be the only user logged in.
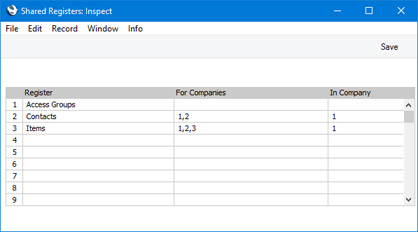
- Double-click (Windows/macOS) or tap (iOS/Android) 'Shared Registers' in the list. The following window opens:
- List the registers that you want to be shared in the Registers column. Use the 'Paste Special' feature (Ctrl-Enter/⌘-Enter) to ensure each register is spelt correctly (an incorrect spelling will mean that the register will not be shared).
- Use the For Companies column to specify the Companies that will be able to use the shared register: enter the Codes of each Company that will share the register, separated by commas.
In the example illustrated above, Companies 1 and 2 will share the Contact register, while Companies 1, 2 and 3 will share the Item register. Company 3 will have its own, separate, Contact register. When you enter a new Contact in Company 1, for example, it will immediately be made available for use in Company 2. When you enter a new Item in Company 2, it will immediately be made available for use in Companies 1 and 3.
If you leave the For Companies field empty for a particular register, that register will be made available to every Company. This is the case for the Access Groups setting in the example illustrated above.
- Use the In Company column to specify the Company in which the shared register will be stored.
In the example illustrated above, the shared Contact and Item registers will be stored in Company 1. Note that you cannot store the shared Contact register in Company 3, because that Company will have its own Contact register.
If you leave the In Company field empty for a particular register, that register will be stored in Company 0. Company 0 is a partition of the database usually used to store information that is available to every Company (Mails, Mailboxes and Conferences are always stored in Company 0). This is the case for the Access Groups setting in the example illustrated above.
- Click the [Save] button to save and close the window, or click the close box if you don't want to save changes. Any changes will be implemented immediately: there's no need to restart.
If you decide to store the shared register in Company 0, if any of these registers in any Company contained any records before they were shared, these records will no longer be available. If you decide to store the shared register in another Company (e.g. in Company 1 as in the illustration), you are effectively sharing that Company's register. So, in the example, any records already in the Contact register in Company 1 will be made available to the other Companies, but you will no longer be able to use any Contacts already in Company 2. If you want to carry on using these Contacts, you should export them before sharing the register and then import them after sharing the register. To export them, use the
'Base Registers' Export function in the Integration module. To import them, use the
'Automatic' or
'Manual file search' Import functions in the System module. Make sure you are working in the correct Company (1 or 2 but not 3 in the example) when importing. If you have Contacts in several Companies and want to carry on using them all, you should export them from each Company in turn, creating several export files. By default, on import, if a Contact Number has been used more than once, it will end up being used for the Contact in the first file imported. For example, Contact Number 001 refers to Contact Name A in Company 1 and to Contact Name AA in Company 2. Having shared the Contact register and assuming you import the Contacts from Company 1 followed by those from Company 2, Contact Number 001 will now refer to Contact Name A. If you want to change this behaviour, change the Replace Mode in the files before importing them, as described
here.
If you share the Account register, only the static information in the Account register (e.g. Account Number and Name, Account Type and so on) will be shared. There will not be a single balance for each Account made up from the Transactions in all Companies. Separate account balances will be maintained for each Account in each Company. If you want there to be a single balance for each Account made up from the Transactions in all Companies, use the Consolidation module.
It is possible to remove a register from the Shared Registers setting, you should proceed with care. Before doing so, you may want to copy the records in the shared register to the separate Companies. To do this, use the 'Unshare Registers' Maintenance function in the Technics module. You will need to log in to every Company first. For example, the Contact register stored in Company 1 is shared between Companies 1, 2 and 3, and the Contact register stored in Company 4 is shared between Companies 4 and 5. The 'Unshare Registers' function will copy the Contacts in Company 1 to Companies 2 and 3, and the Contacts in Company 4 to Company 5. Attachments will be copied as well including links to other records if those records are in registers that are also shared. After running this function, you can then remove the register from the Shared Registers setting, and you should then restart Standard ERP. If you remove the register from the Shared Registers setting without running the 'Unshare Registers' function first, you will no longer be able to use any records entered since you first shared the register, but you will regain access to any records that were previously in each Company.
You can also share blocks. There are two types of block: the setting that is a set of fields and check boxes (e.g. Account Usage S/L, Account Usage P/L, Locking); and the setting that is a series of rows (e.g. Payment Modes, VAT Codes). To do this, use the Shared Blocks setting in the Technics module, following the same steps as described above for the Shared Registers setting. You cannot apply the 'Unshare Registers' function to a block.
---
The Company register in Standard ERP:
---
See also:
- Consolidation module - To be used to produce consolidated reports that include many or all Companies in a database
- Inter Company module - To be used when sending Invoices between Companies in a database
---
Go back to: