Cash Up
The Cash Up report is a powerful tool that you can use to analyse the day's work on each till. From the report, you can open and close work sessions and record the results of a work session in the Nominal Ledger.
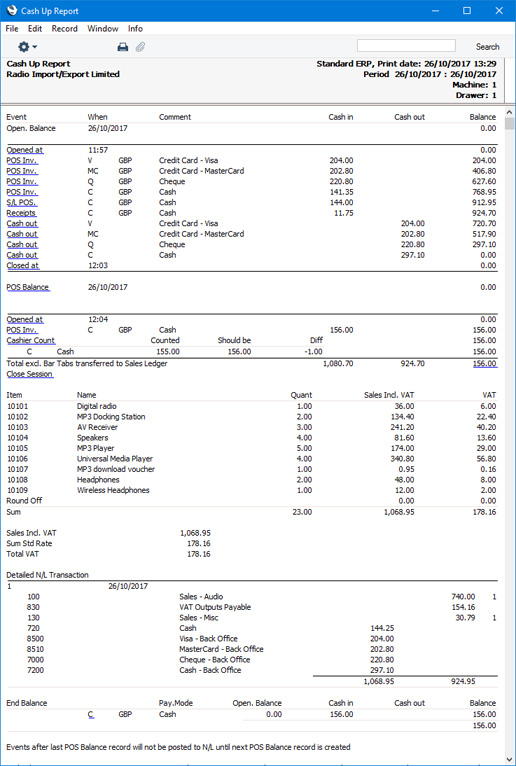
The report is divided into several sections, as follows:
- The first section displays an opening balance for the Till Drawer. If you regularly run the 'Cash Up' Maintenance function, the opening balance will be zero.

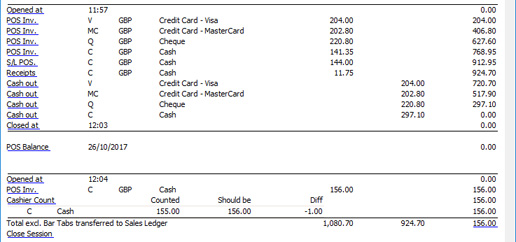
- The next section will summarise the payments made into and out of the Till Drawer during the report period. This section will contain separate lines for each Payment Mode/transaction combination (for example, there might be separate lines for POS Invoices paid using cash, POS Invoices paid using credit cards, Bar Tabs paid using cash, Bar Tabs paid using credit cards and so on). Incoming and outgoing Cash Events (e.g. movements of cash floats and takings into and out of the Till Drawer) will be included. If you are using work sessions, the times when the session opened and closed will also be shown. If more than one work session was opened and closed during the report period, each one will be shown in separate sections. The illustration below contains an example of this.
When you run the report, you will be able to choose which registers will be included in this section.
This section will also show any Cashier Counts that have been entered for the Till Drawer during the report period. The value of each Cashier Count will be shown together with the calculated value (i.e. the value that should be in the Till Drawer) and any discrepancy.
This section includes the following drill-downs:
- Drill down from the [Opened at] text link to view the POS Session record that opened the work session.
- Drill down from a transaction name (e.g. [POS Inv.]) to open a separate report listing the transactions (e.g. the POS Invoices) that were paid using a particular Payment Mode.
- If the work session(s) in the report are closed, there will be an [Open Session] text link that you can use to open the next work session. A new POS Session record will be created and opened in a new window: simply save this record to open the next session.
- If a work session in the report is still open, there will be a [Close Session] text link that you can use to close the session. A new POS Session record will be created and opened in a new window: simply save this record to close the session.
If you produce the report on a particular till, you can use the [Open Session] and [Close Session] text links to open and close sessions for that till. This applies both to live tills and to live-sync tills. If you produce the report for a particular till from a remote desktop client, you can open and close sessions for that till remotely. This applies to live tills only.
- Drill down from the Till Drawer balance figure to create a POS Balance record for the Till Drawer. A new POS Balance record will be created and opened in a new window. If you mark this POS Balance record as OK and save, a Nominal Ledger Transaction will be created, recording the sales and cash movements that contribute to the balance figure in the Nominal Ledger. If you are using work sessions, you must close the session before creating a POS Balance.
An alternative method of creating a POS Balance and updating the Nominal Ledger is to use the 'Cash Up' Maintenance function. This function will create a Cash Event that moves the takings from the Till Drawer to the back office or bank, it will close the work session (if it is open) and then it will create a POS Balance record. The POS Balance record will be marked as OK, generating a Nominal Ledger Transaction. If you create a POS Balance from this report by drilling down from the balance figure, you must close the work session yourself first, and the Cash Event will not be created. In effect, the takings will be left in the Till Drawer and will not be moved to the back office or bank. It may be that this is the desired result, in which case you should not use the 'Cash Up' function.
- If any work session(s) in the report are closed, each one will have a [POS Balance] text link that you can use to open the POS Balance record that posted the results of the work session to the Nominal Ledger. If you need to check the Nominal Ledger Transaction, you can open it from the POS Balance record by selecting 'Open NL Transaction' from the Operations menu (with 'cog' icon, Windows/Mac OS X) or Tools menu (with 'wrench' icon, iOS/Android).
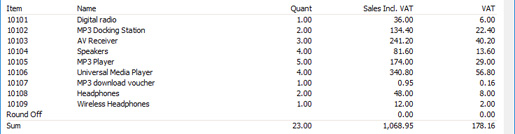
- The third section lists the Items that have been sold through the Till Drawer. When you run the report, you will be able to choose whether this section will list Items or Item Groups.
- The fourth section is a VAT or tax summary.

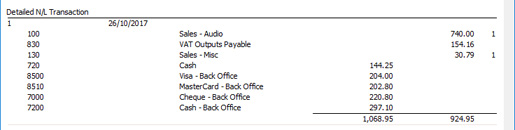
- The fifth section (headed "Detailed N/L Transaction") will only be included in the report if you produce it using the Print N/L Transaction option. It shows how the payments made into and out of the Till Drawer will be recorded in the Nominal Ledger. In other words, it lists the Accounts in the Payment Modes that have been used during the work session(s) and the amounts that will be posted to those Accounts. Postings to Sales and VAT/Tax Accounts will also be shown.
As previously mentioned the 'Cash Up' Maintenance function will create a Cash Event that moves the takings from the Till Drawer to the back office or bank. If you produce the report before running the 'Cash Up' Maintenance function, this Cash Event won't yet exist, so the posting that will result from this Cash Event won't be included.
If there were several work sessions during the report period, most of those work sessions will already have been closed and the results of those work sessions may already have been posted to the Nominal Ledger. These postings will be included in this section. In other words, this section can include both postings that have already been made and postings that will be made when the next POS Balance is created. This is shown in the illustration below: the postings to the Back Office Accounts arise from the final Cash Events in each closed work session that moved the Till Drawer’s contents to the back office:
- The next section is a summary of the payments made using each Payment Mode through the Till Drawer.

Each Payment Mode in this section has a drill-down that will be useful in Sweden as it will produce a Fiscal Control (Sweden) report for the period, Till Drawer and Payment Mode. This report lists the Invoices that have been registered or not registered in the CleanCash fiscal control unit.
- The final section is a summary of the payments made using each Payment Mode through every Till Drawer in the report. If the report is for a single Till Drawer, this will be the same as the previous section. Otherwise, it will display the overall totals for the report.
You can use the following methods to produce a Cash Up report:
- In the Point of Sales or Restaurant modules, click (Windows/Mac OS X) or tap (iOS/Android) the [Reports] button in the Navigation Centre and choose to produce the Cash Up report.
- You can produce a Cash Up report from a POS Balance record. Open the POS Balance record and choose 'Cash Up Report' from the Operations menu (with 'cog' icon, Windows/Mac OS X) or Tools menu (with 'wrench' icon, iOS/Android).
- Cashiers and waiters will be able to produce Cash Up reports if you add a "Cash Up Report" button to the POS Invoice and/or Bar Tab windows.
In the case of the first option only, the 'Specify Cash Up' window illustrated below will appear. In the case of the other options, the 'Specify Cash Up' window will not appear and instead the report will be produced immediately.
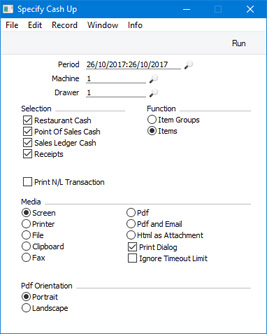
- Period
- Paste Special
Reporting Periods setting, System module
- Specify the period to be covered by the report.
- If you produce the report from the [Reports] button in the Navigation Centre, the default period will be the current day.
- If you produce a Cash Up report from a POS Invoice or Bar Tab using the "Cash Up Report" button, the period will depend on the Start from Previous POS Balance option in the POS Settings setting. If you are using this option, the report period will begin on the date of the most recent POS Balance record for the current Till Drawer. If you are not using this option, the period will begin one day before the current day. In both cases, the period will end on the current day.
- If you produce a Cash Up report from a POS Balance record, the period will always begin on the date of the most recent POS Balance record for the specified Till Drawer and end on the current date (i.e. it will behave as if you had selected the Start from Previous POS Balance option).
- Machine
- Paste Special
Local Machines setting, Point of Sales/restaurant/Technics module
- Range Reporting Alpha
- Specify the Local Machine Code of the till or cash machine whose transactions are to be shown in the report.
- The default is the Local Machine Code of the machine you are currently using. If you produce a Cash Up report from a POS Balance record, it will be for the machine specified in that record.
- If you enter a range of Local Machine Codes, the report will include every Local Machine in the range that you have recorded in the Local Machines setting. If the Local Machine Code of a till or cash machine is in the range but has no entry in the Local Machines setting, it will not be included in the report.
- You must specify a Machine, otherwise the report will be empty.
- Drawer
- Paste Special
Drawers setting, Point of Sales/Restaurant module
- Range Reporting Alpha
- Specify the Drawer whose transactions are to be shown in the report.
- The default is the Drawer that you most recently linked to the machine you are currently using (i.e. in the most recent POS Session record for the machine). If you produce a Cash Up report from a POS Balance record, it will be for the Drawer specified in that record.
- If you enter a range of Drawers, the report will include every Drawer in the range that you have recorded in the Drawers setting. As a till or cash machine will usually only have one Drawer, this will mean that the report will contain many empty sections. This issue will be multiplied if you also specify a range of Local Machines, because the report will contain a separate section for each Machine/Drawer combination, most of which will not be combinations that exist in reality.
- You must specify a Drawer, otherwise the report will be empty.
- Selection
- As described above, the second section in the report will summarise the payments made into and out of the Till Drawer during the report period. This section will contain separate lines for each Payment Mode/transaction combination (for example, there might be separate lines for POS Invoices paid using cash, POS Invoices paid using credit cards, Bar Tabs paid using cash, Bar Tabs paid using credit cards and so on).
- Use these options to choose which transactions should be included in this section.
- If you choose the Sales Ledger Cash option, payments received into the Till Drawer through Sales Ledger Invoices (i.e. Cash Notes, and payments entered using the 'Add Cash Line' and 'Add Credit Card Line' Row menu functions) will be included in the report. If you are also using the Include Open Invoice value in Cash Up option in the POS Settings setting, any unpaid parts of those Invoices will be included as well.
- Function
- As described earlier on this page, the third section in the report will list the Items that have been sold through the Till Drawer. Use these options to choose whether this section should be a list of Items or of Item Groups.
- Print N/L Transaction
- Select this option if you would like the report to include a section that lists the Sales and VAT/Tax Accounts and the Accounts in the Payment Modes that have been used during the work session(s) and the amounts that will be or have been posted to those Accounts.
- If you need this option to be selected in reports that you produce from POS Balance records or using the "Cash Up Report" button in the POS Invoice or Bar Tab window, select the Print Detailed N/L Transaction option in the POS Settings setting.
---
Reports in the Point of Sales module:
Go back to:
|