Entering a Purchase Order - Items Card
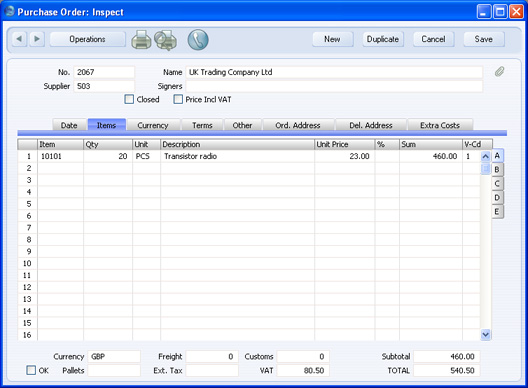
Use the grid on the 'Items' card to list the Items that you want to order. This grid is divided into five horizontal flips. When you click on a flip tab (marked A-E), the two or three right-hand columns of the grid are replaced.

Before adding any rows to a Purchase Order, ensure that the Currency and conversion rates specified are correct. If there is a conversion rates (on the 'Currency' card), all prices transferred from the Purchase Item register will be converted. However, if you change the conversion rate after you have added rows to the Purchase Order, their prices will not be converted.
To add rows to a Purchase Order, click in any field in the first blank row and enter appropriate text. To remove a row, click on the row number on the left of the row and press the Backspace key. To insert a row, click on the row number where the insertion is to be made and press Return. You cannot remove or insert rows after you have created at least one Goods Receipt from the Purchase Order.
You can also bring Items into a Purchase Order by opening the 'Items: Browse' window, selecting a range of Items by clicking while holding down the Shift key, and then dragging them to the Item field in the first empty Purchase Order row. You can also copy a list of Item Numbers in a spreadsheet or word processor and paste them in the Item field in the first empty row.
Flip A
- Item
- Paste Special
Item register
- With the cursor in this field, enter the Item Number or Bar Code for each Item ordered. If the Item has a related Purchase Item in the name of the Supplier of the Purchase Order, pricing, descriptive and other information will be brought in from there. Otherwise, it will be taken from the Item record. If you leave this field blank, you can enter any text in the Description field, perhaps using the row for additional comments to be printed on Purchase Order documentation. You can also choose an Item by entering a Supplier's Item Number on flip B.
- If you want there to be a check if the Item is in fact sold by the Supplier, switch on the Warning If Not Default Supplier option in the Purchase Order Settings setting. If you are using this option, you will be given a warning if the Item does not have a related Purchase Item in the name of the Supplier of the Purchase Order. If you are not using this option, it will be your user's responsibility to ensure that you have chosen the correct Supplier/Item combination.
- Qty
- Enter the number of units ordered. Press Return to calculate the Sum, and the cursor will move to the Item field on the next row.
- This figure refers to the main Unit of the Item (the Unit you use to sell the Item, shown on the 'Pricing' card of the Item record and in the field immediately to the right). This may not be the Unit used by the Supplier. For example, your firm might sell an Item in single units, but the Supplier might sell in boxes of 12. If so, enter "12" to the Unit Conversion field of the Purchase Item. Then, if you need to order 240 of the Item, enter "240" here as the Quantity. The Sup. Qty field on flip B will be calculated to show "20", i.e. the order quantity from the Supplier's point of view (Quantity divided by Unit Conversion).
- Unit
- The Unit of the Item will be brought in from the Item register when you enter the Item Number. It cannot be changed.
- Description
- If the Item has a related Purchase Item in the name of the Supplier of the Purchase Order, the Description will be taken from that Purchase Item record. Any text entered on the 'Texts'card of the Purchase Item will also be brought in, taking up as many Purchase Order rows as necessary.
- In other circumstances, the Description will be taken from the Item record.
- Unit Price
- If the Item has a related Purchase Item in the name of the Supplier of the Purchase Order, the Unit Price will be taken from that Purchase Item record.
- If the Purchase Item has a Unit Conversion and a Supplier Unit, then this figure will be the Unit Price per Supplier Unit. For example, your firm might sell an Item in single units, but the Supplier might sell in boxes of 12. If so, enter "12" to the Unit Conversion field of the Purchase Item and "Dozen" to the Supplier Unit field. The figure here will be the price per dozen.
- If there is no suitable Purchase Item, the Unit Price will be taken from the 'Costs' card of the Item record.
- The Unit Price will include VAT if you have checked the Price Incl. VAT box in the header. In this case, the Price in the Purchase Item or the Cost Price in the Item record (as appropriate) will be treated as including VAT.
- If you have specified a Currency and Exchange Rate in the Purchase Order, this figure will be in the Currency concerned (i.e. having undergone currency conversion).
- %
- A discount percentage.
- Sum
- The total for the row: Supplier Quantity (from flip B) multiplied by Unit Price less Discount. Changing this figure will cause the Discount Percentage to be recalculated.
- Even if the Unit Price has been taken from the Purchase Item record, the Sum will take any Price Factor entered for the Item into account.
- This figure will be rounded up or down according to rounding rules set for the Currency in the Currency Round Off setting in the System module.
- V-Cd
- Paste Special
VAT Codes setting, Nominal Ledger
- When you create a Purchase Invoice from this Order, the VAT Code entered here will determine the rate at which VAT will be charged on this Item and the Input VAT Account to be debited. A default is offered, taken from the Purch. VAT Code field in the Contact record for the Supplier. If that field is empty, the default is taken from the Item, the Item Group or from the 'VAT' card of the Account Usage P/L setting. In the last three cases, the appropriate VAT Code for the Zone of the Supplier will be used. You can change this default in a particular Order row if necessary.
Flip B
- Purch. A/C
- Paste Special
Account register, Nominal Ledger/System module
- Default taken from Purchase Accruals Account of Item Group or from Account Usage Stock
- If you are using the Use Item Groups for Cost Accounts option in the Cost Accounting setting in the Stock module and the Item belongs to an Item Group, the Purchase Accruals Account from that Item Group will be copied here by default. Otherwise, the default will be the Purchase Accruals Account specified in the Account Usage Stock setting. In both cases, the appropriate Account for the Zone of the Supplier will be used.
- When you raise a Purchase Invoice from this Order, if you are using the Transfer Each Row Separately option in the Purchase Invoice Settings setting, this Account will be copied to the Cost Account field in Purchase Invoice row. It will then be debited in the resulting Nominal Ledger Transaction.
- If you are using the Transfer Account to Goods Receipt option in the Purchase Order Settings setting is in use, this Account will be copied to the Purchase Accruals Account field in the appropriate row of any Goods Receipt created from this Purchase Order. It will then be debited in the Nominal Ledger Transaction resulting from that Goods Receipt.
- Objects
- Paste Special
Object register, Nominal Ledger/System module
- Default taken from Item
- Used as default in Goods Receipt row
- You can assign up to 20 Objects, separated by commas, to this row and all transactions generated from it. You might define separate Objects to represent different departments, cost centres or product types. This provides a flexible method of profit centre analysis that can be used in Nominal Ledger reports.
- If you are using the Transfer Each Row Separately option in the Purchase Invoice Settings setting, the Objects specified here will be copied to the corresponding row of the Purchase Invoice when it is created from this Order. In the resulting Nominal Ledger Transaction these Objects specified here will be assigned to the debit posting to the Purchase Account. This assignment will merge these Objects with those of the parent Order (shown on the 'Date' card).
- These Objects will also be copied to the Objects field in the appropriate row of any Goods Receipt created from this Purchase Order (flip E). They will then be assigned to both the debit and credit postings in the Nominal Ledger Transaction resulting from that Goods Receipt.
- Sup. Item
- Paste Special
Purchase Item register, Purchase Orders module
- The code allocated to the Item by this Supplier.
- If you have registered the Item as a Purchase Item and if the Supplier of the Purchase Order is the same as the Supplier entered for the Purchase Item, then the Supplier's code will be brought in from the Purchase Item record when you enter an Item Number on flip A.
- If you choose an Item using 'Paste Special' from this field, all relevant information will be brought in to the Purchase Order row from the Purchase Item and Item registers, in the same way as if you had entered an Item Number on flip A.
- If you want this to be printed as the main Item Code in the Purchase Order document, include the "Supplier Item Code" field in your Form design. If you want to print the Item Number from flip A in the document as well, include the "Item Code" field.
- Sup. Unit
- The Unit used by the Supplier for shipping and pricing the Item. This information will be taken from the Purchase Item record and cannot be changed.
- Sup. Qty
- This shows the number of Items the Supplier needs to despatch to fulfil your Purchase Order and is dependent on the Unit Conversion field in the Purchase Item record. For example, your firm might sell an Item in single units, but the Supplier might sell in boxes of 12. If so, enter "12" to the Unit Conversion field of the Purchase Item. Then, if you need to order 240 of the Item, enter "240" as the Quantity on flip A. The Sup. Qty field will be calculated to show "20", i.e. the order quantity from the Supplier's point of view (Quantity divided by Unit Conversion). Alternatively, enter "20" here and the Quantity on flip A will be calculated to show "240".
- If you want this figure to be printed as the Quantity in the Purchase Order document, include the "Quantity" field in your Form design. If you want to print the Quantity from flip A in the document as well, include the "Our Quantity" field.
- If the Purchase Item does not have a Unit Conversion, or there is no Purchase Item, then this figure will be the same as the Quantity on flip A.
Flip C
- Recv. 1, Recv. 2
- The quantity received for each Purchase Order row will be updated automatically when you create Goods Receipts using the 'Create Goods Receipt' function on the Operations menu (you will need to close the Order and re-open it to see the updated figures). The Recv. 1 quantity includes both approved and unapproved Goods Receipts, while the Recv. 2 field only shows approved Goods Receipts. This feature makes it easy to follow up on part shipments.
- If you are using the Automatic receiving of Service and Plain Items option in the Stock Settings setting in the Stock module, these fields will be changed to show the Order Quantity when the Purchase Order is saved, if the Item is a Plain or Service Item. This means that you can create Purchase Invoices for such Items immediately without the need for a Goods Receipt, and that these Items will not appear on any Goods Receipts. It also means that you cannot reduce the Order Quantity for such Items once you have saved the Purchase Order.
- Invoiced
- The quantity invoiced for each Order row will be updated automatically when you raise Invoices using the 'Create Purchase Invoice' function on the Operations menu (you will need to close the Order and re-open it to see this). The quantity usually includes both approved and unapproved Invoices You cannot raise an Invoice until you have created and approved at least one Goods Receipt (unless you are using the Invoice Before Goods Receipt option on the 'Terms' card). In the case of partial Goods Receipts, Invoices can only be raised for the quantity received.
- Note: The quantity shown in this field will not include unapproved Invoices if you are using the Consolidate Items to Supplier Cost Account option in the Purchase Invoice Settings setting. In this case, take care if you need to return to the Purchase Order to create a second Invoice before the first one has been approved.
- If you invalidate a Purchase Invoice related to the Purchase Order, the Invoiced Quantity in the relevant Order rows will be updated automatically, providing you are not using the Consolidate Items to Supplier Cost Account option.
- If you credit a Purchase Invoice related to the Purchase Order, the Credit Notes Update Invoiced Quantity option in the Purchase Order Settings setting controls whether the Invoiced Quantity will be updated automatically.
- If you are using this option (and providing you are not using the Consolidate Items to Supplier Cost Account option), the Invoiced Quantity figure will be updated automatically if you create the Credit Note by duplicating the original Invoice or using the 'Create Credit Note' Operations menu function from the original Invoice or from the Returned Goods to Supplier screen. If you duplicate the original Invoice, the Invoiced Quantity figure will only be updated if you enter the appropriate Payment Term and the number of the Invoice to be credited before you save the Credit Note for the first time. If you save the duplicate before changing the Payment Term, the Invoiced Quantity will not be updated correctly, but you will be able to correct it using the 'Recalculate Purchase Orders' Maintenance function. Similarly, if you are not using the Credit Notes Update Invoiced Quantity option, you can use the 'Recalculate Purchase Orders' function to update the Invoiced Quantity.
- If you create the Credit Note by entering a new record to the Purchase Invoice register, the Invoiced Quantity figure in the originating Purchase Order will not be updated, irrespective of whether you are using the Credit Notes Update Invoiced Quantity option, and it will not be updated by the 'Recalculate Purchase Orders' function.
- If you are using the Consolidate Items to Supplier Cost Account option in the Purchase Invoice Settings setting, the Invoiced Quantity figure in the originating Purchase Order will not be updated correctly from Credit Notes, irrespective of whether you are using the Credit Notes Update Invoiced Quantity option, and it will not be updated by the 'Recalculate Purchase Orders' function.
- Pallet No.
- This field will display the number of pallets you will receive, if the Item is one that will be supplied on a pallet and you have specified on the 'Warehouse' card of the Item record the quantity contained on a single pallet. This figure will be updated automatically each time you change the Quantity or the Sup. Qty on flip B, and it will contribute to the total number of pallets shown in the Purchase Order footer. This feature will be most useful if you are using the Warehouse Management module: please refer to your local HansaWorld representative for full details.
- Project
- If you are using the Job Costing module and you need to connect a single Purchase Order row to a Project, enter its Project Number here. If you need to connect the whole Purchase Order to a Project, use the Project field on the 'Terms' card.
- WS No.
- You can generate Purchase Orders for spare parts from the Service Orders module using the 'Create Purchase Order' function on the Operations menu of the Work Order screen. Such Purchase Orders could feature several Items when there is more than one Work Sheet related to the Work Order from which they were generated. This field will carry a record of the Work Sheet to which each row is related. Please refer here for full details of this feature.
Flip D
- Plan. Del.
- Paste Special
Choose date
- Specify here the date on which you need to receive this Item into stock, if this is different to the Planned Delivery Date on the 'Date' card. Enter this date using the format specified in the Planned Delivery setting in the Sales Orders module. Available options are free text, date, week number or year-week (4 characters).
- If you are using the Force Planned Delivery Date option in the Planned Delivery setting in the Sales Orders module, you must enter a Planned Delivery Date either here or on the card before you can save the Purchase Order.
- Comment
- Record any further details about the Item here.
Flip E
- Fr. Cost
- An optional Freight Cost (per unit) for the Purchase Order row. This figure is in the home Currency (or in Base Currency 1 as defined in the Base Currency setting in the System module). You can enter a value in a particular row, or you enter the Freight amount for the whole Purchase Order in the Freight field in the footer. When you move to the next field, the total Freight amount will be distributed to the different Item rows according to the cost value of each row. In order for the distribution to be accurate, enter the Freight figure after you have made sure the Item and Quantity information in each row is complete.
- When you raise a Goods Receipt from the Purchase Order, the value will be copied to the Freight field on flip H of the corresponding Goods Receipt row, with the total Freight value in the Purchase Order footer being copied to the Goods Receipt footer. If the Freight value in the Purchase Order footer and the Fr. Cost fields on each row are all empty, the Purchase Cost on the 'Other' card will be used as the Freight value in the Goods Receipt (distributed proportionally to the different rows).
- Customs
- This field works in the same manner as the Freight fields, using the Customs field in the footer area. It refers to any customs charges attached to the Purchase Order.
- This value will default to the Purchase Cost from the relevant Purchase Item (multiplied by the quantity).
- You can enter either an amount in the home Currency (or in Base Currency 1 as defined in the Base Currency setting in the System module), or a percentage followed by the % character. The percentage will be applied to the Unit Price of the Item in the home Currency.
- Costs 1-5
- Use these fields to record any additional costs (per unit) for the Item. They will be shown added to the Unit Price in the Cost Price column on flip A. Enter an amount in the home Currency (or in Base Currency 1 as defined in the Base Currency setting in the System module).
- You can also enter total additional cost figures for the whole Purchase Order on the 'Extra Costs' card: the total amount will then be distributed to the various Item rows according to the cost value of each row.
- When you raise a Goods Receipt from the Purchase Order, the values in these fields will be copied to the equivalent fields in the corresponding Goods Receipt row (flip H), with the total figures being copied to the 'Extra Costs' card of the Goods Receipt.
- If you want to give a name to each of the Extra Cost fields, use the User Defined Field Labels - Extra Costs setting in the Stock module.
Footer
|