Printing Purchase Order Contracts
There are two ways to print a Purchase Order Contract.
- While entering or inspecting a Purchase Order Contract, click the Printer icon in the Button Bar (Windows and Mac OS X) or select 'Print' from the File menu (all platforms). If you want to print to screen, click the Preview icon (Windows and Mac OS X only).
- After ensuring you are in the Purchase Ledger, click the [Forms] button in the Navigation Centre or use the use the Ctrl-D (Windows and Linux)/ ⌘-D (Mac OS X) key combination. Double-click 'Purchase Order Contract' in the 'Forms' list window or highlight it and press the Enter key. If you are using iOS or Android, tap the [Routines] button in the Navigation Centre and then tap [Forms]. Tap 'Purchase Order Contract' in the 'Forms' list window. In all cases, enter the Purchase Order Contract Number (or range of Purchase Order Contract Numbers) to be printed and press [Run].
To specify the Form Template that will be used when you print Purchase Order Contracts both singly and in batches, follow these steps using Windows or Mac OS X (not iOS or Android):
- Design the purchase order contract Form Template using the Form Template register in the System module. Use the 'Properties' function on the Operations menu to name the Form Template (in this description, we have used the name "PO_CONTRACT") and to assign it a Form Type of "Purchase Order Contracts". You might want to design different Form Templates for use with different Languages. A full list of the fields you can include in the Form Template design can be found here.
- Select the Purchase Ledger using the [Switch Module] button in the Navigation Centre or the Ctrl-0 (Windows and Linux) or ⌘-0 (Mac OS X) keyboard shortcut.
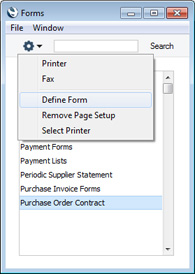
- Click the [Forms] button in the Navigation Centre or use the Ctrl-D/⌘-D key combination. The 'Forms' list window will be opened: highlight 'Purchase Order Contract'.

- Select 'Define Form' from the Operations menu.
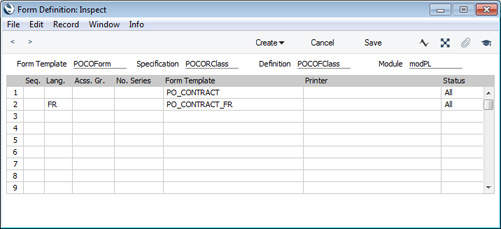
- In the subsequent window, enter "PO_CONTRACT" in the Form Template field in the first row (you can use 'Paste Special' to ensure the spelling is correct).
- If you have designed different Form Templates for use with different Languages in step 1 above, enter the Form Template Code of each one on separate rows in the grid. In the Lang. field of each row, enter the appropriate Language. You can use 'Paste Special' to open a list of Languages from which you can choose the correct one.
You can also use Languages to specify the printer that will be used to print Purchase Order Contracts. This can include sending a Purchase Order Contract to a fax machine, if your hardware can support this feature. To do this, enter separate rows in the 'Form Definition' window for printing and faxing, with appropriate Languages and Printers.
- Click [Save] to save the Purchase Order Contract Form definition. From now on, the Purchase Order Contract Form Template that you have designed will be used, from the 'Forms' function and from the Printer icon. If you have designed more than one Form, the correct one will be used depending on the Language of the Purchase Order Contract.
---
The Purchase Order Contract register in Standard ERP:
Go back to: