Routines - Settings
Settings are preferences that allow you to tailor certain aspects of the program's operation to your requirements, and to supply information that will be used throughout the program.
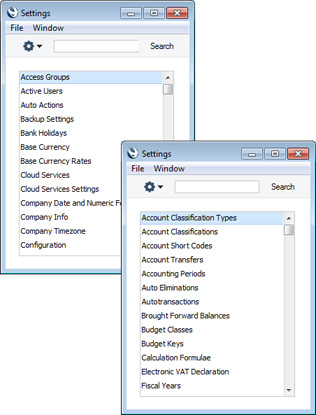
To work with settings, click the [Settings] button in the Navigation Centre or use the Ctrl-S (Windows and Linux) or ⌘-S (Mac OS X) keyboard shortcut. This will open the 'Settings' list window where you will find an alphabetical list of the settings that are available. This list will vary according to the module selected. The illustration below shows the different settings in the System (on the left) and Nominal Ledger modules.
Choose an entry in the list by double-clicking it, or by selecting it and pressing the Enter key. Settings are described in detail in the appropriate sections of these web pages.
Types of Setting
The settings in Standard ERP can be divided into three groups:
- Settings of the first type take the form of a single screen where you can set preferences to determine exactly how Standard ERP is to operate in a certain situation. Examples of such settings include Account Usage S/L and P/L, Company Info and Locking.
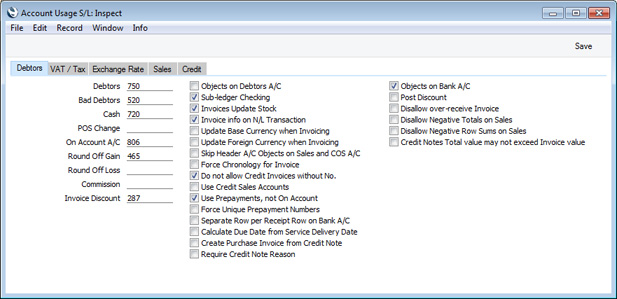
When you open one of these settings from the 'Settings' list, you can change any of the fields as required. To save changes and close the window, click the [Save] button. To close the window without saving changes, click the close box.
- Settings of the second type contain a number of records that are displayed in a grid. Each row in the grid represents a separate record. Examples of such settings include Payment Modes and VAT Codes.
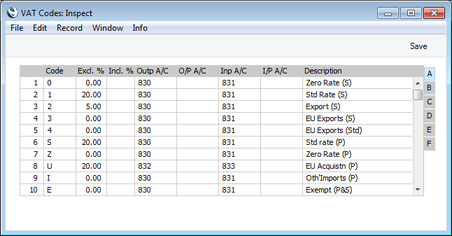
When you open one of these settings from the 'Settings' list, you can change any of the fields in the existing records as required. To add new records to the list, click in any field in the first blank row and enter appropriate text. To remove a record, click on the row number on the left of the row containing the record and press the Backspace key. To insert a row, click on the row number where the insertion is to be made and press Return. To save changes to all records in the grid and close the window, click the [Save] button. To close the window without saving changes, click the close box.
When working in one of the main registers, you may need to refer to a particular record in a setting of this type: the 'Paste Special' look-up function is provided to make this task as easy as possible. For example, when entering a Payment or Receipt, you can use 'Paste Special' to choose the relevant Payment Mode. To help you choose the correct record using 'Paste Special', it is recommended that you keep the rows in the alphabetical order of the Codes. An exception is the Fiscal Years setting which should never be re-arranged (rows should not be inserted or removed, you can only add new ones).
- Settings of the final type also contain a number of records, but behave in a similar manner to the main registers in that their contents are displayed in a browse window and have to be opened in a record window for editing. Again, when working in one of the main registers, you may need to refer to a particular record in a setting of this type using the 'Paste Special' look-up function. Examples of such settings include Autotransactions and Payment Terms.
When you open one of these settings from the 'Settings' list, the browse window is displayed, listing the records already entered.
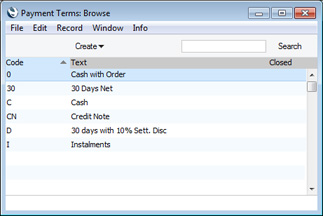
You can sort and search in these browse windows in the normal way, as described here. Double-click an item in the list to edit it, or add a new record by selecting 'New' from the Create menu in the Button Bar. Alternatively, highlight a record similar to the one you want to enter and select 'Duplicate' from the Create menu. A record windowwill be opened, where you can change the existing record or enter the new one.

To save changes, click the [Save] button. To close the window without saving changes, click the close box. You can also close the browse window using the close box.
Individual Settings
Please click the links for details about the individual settings in the following modules:
Go back to: