Routines - Reports
Reporting in Standard ERP is non-destructive, i.e. you can make and print a report as many times as you wish. Some accounting programs are designed in such a way as to allow journal printing only directly in connection with the data entry. Standard ERP does not have this limitation.
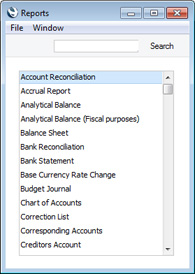
When you click the [Reports] button in the Navigation Centre or use the Ctrl-R (Windows and Linux) or ⌘-R (Mac OS X) keyboard shortcut, a window will be opened, containing a list of the available reports. The contents of this window will vary with the selected module: the illustration below shows the reports in the Nominal Ledger module:
Choose a report by clicking an item in the list once. If you need to set the page size, number of copies and other printer options for the report, choose 'Page Setup' from the File menu. You can also use this function to choose the printer on which the report is to be printed. These settings will be used whenever you print the particular report until you choose 'Page Setup' once again.
Once you have done this, double-click the report name in the list. A specification window will open, where you can choose the information that you want to be shown in the report. For example, when producing a Balance Sheet, you can use its specification window (illustrated below) to choose the period that is to be covered by the report.
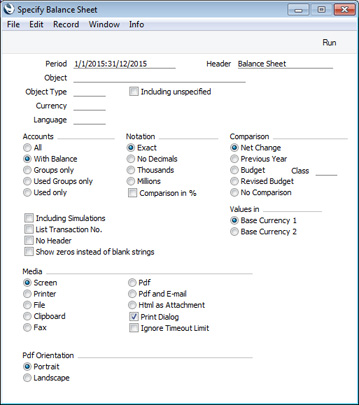
While the specification window is open, you can choose the destination of the printout by selecting one of the Media options at the bottom of the window. These are the available options:
- Screen
- If you print to screen (the default setting), the report will be shown in a new window (described here). You can subsequently send the report to a printer by clicking the Printer icon in the Button Bar of this window or by selecting 'Print' from the File menu.
- Printer
- Use this option to send the report directly to a printer.
- File
- Choose this option to export the contents of any report to a tab-delimited text file on your hard disk. You can then open this file in Excel, for further calculations etc or in Word or a page make-up program, for incorporation in publicity material or published reports.
- Clipboard
- This option will place the contents of a report in your computer's clipboard, from where you can paste it into another application.
- Fax
- You cannot use this option with reports.
- Excel
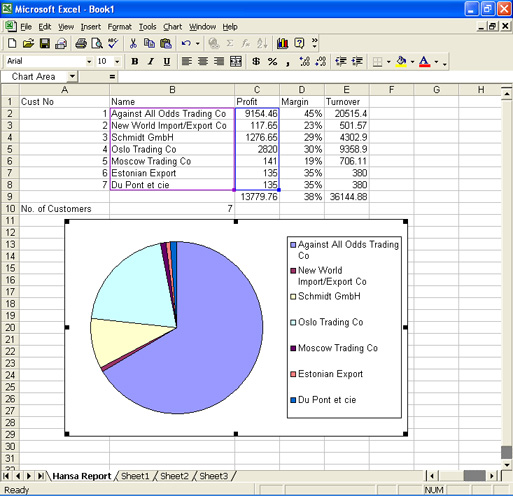
- This option opens the Excel application and creates a new workbook containing the report.
- The following example shows a Customer Statistics report opened in Excel, after which a chart has been added:
Depending on the operating system that you are using, the Excel option may only be visible if Excel is installed on the machine you are using.
- Pdf
- Choose this option to print a report as a PDF file on your hard disk. Use the Pdf Orientation options in the bottom left-hand corner of the window to choose the report should be printed to the PDF in Portrait or Landscape format.
- Pdf and E-mail
- This option will create a Mail in your Mailbox with a PDF version of the report as an Attachment in the Document Manager. Again, use the Pdf Orientation options in the bottom left-hand corner of the window to choose whether the report should be printed to the PDF in Portrait or Landscape format.
- Html as attachment
- This option will place a file containing report in your Personal Desktop. You may need to close and re-open the Navigation Centre to see the report there.
- You can only use this option in a multi-user system, where it can be useful when you need to produce a long report. You can print a report using this option, log off and leave the server to produce the report overnight, and the report will be waiting for you in your Personal Desktop the next day. To use this option, you must also turn on Parallel Reporting, as described below.
- To open the report, highlight it in your Personal Desktop and choose 'Open Record' from the Navigation Centre's Operations menu (Windows and Linux) or 'Open Link' from the + drop-down menu immediately above the Personal Desktop (Mac OS X). The report will be shown in a new window in your browser.
If your database is in restricted mode, you will only be able to print a report using the
Screen option.
You can use Access Groups to control the printing of reports. If you grant "Read" access to a particular report in an Access Group (i.e. set the Level to "Read" for the report), members of that Access Group will only be able to print the report using the Screen option.
There are also two check boxes at the bottom of each report specification window:
- Print Dialog
- If you want a print dialogue to appear when you send the report to a printer, check this box. You might do this if you want to print several copies of a report.
- Ignore Timeout Limit
- Please refer to the 'Parallel Reporting' section at the bottom of this page for details of this option.
Once you have entered the reporting criteria and have chosen a print destination, click [Run] to produce the report.
Defining Reports
For some reports in the Nominal Ledger module, you can redefine the contents and layout of the report. To do this, use the
Report Settings setting in the Nominal Ledger.
Parallel Reporting
By default, inside the Standard ERP application a single process will be used both for working with records (searching, opening, saving) and for producing reports. This process is known as the "Main Thread". Within the main thread, working with records will be given a higher priority than producing reports. Despite this prioritisation, if some users in your system will frequently produce reports, the other users may find that performance suffers.
In a multi-user system, you can use the Parallel Reports options on the 'Performance' card of the Optional Features setting in the System module to specify that the production of reports will be moved away from the main thread to separate dedicated threads (i.e. within the application, separate processes will be used to produce reports). As modern servers all have multiple cores and processors, it is strongly recommended that you use the Multi Thread option.

- Off
- Reports will be produced in the main thread. The server will calculate a single report at a time, so reports will be produced in the order in which they were requested. Reflecting the higher priority given to working with records, the calculation of each report will be paused periodically to allow records to be read and saved.
- Single Thread
- Reports will be produced using a single dedicated thread. The server will be able to calculate a number of reports simultaneously. It will do this by working on a particular report for a few moments, then working on a second report for a few moments, then on a third, before returning to the first. This will give a benefit when there is a long report queue that includes both short and heavy reports, as the short reports will be produced more quickly. The server will be able to start working on them more quickly, without always needing to wait until the earlier reports in the queue have been produced. This benefit by its very nature will be much reduced when there is a short report queue or no queue at all.
- By default, the server can work on up to five reports at once, but you can change this using the Report Slots field underneath the Parallel Reports options. The number of Report Slots can be between one and 100.
- If the users in your system will frequently produce many reports, you may find it beneficial to increase the number of Report Slots. If reports will be produced infrequently, you might consider reducing the number. Depending on the complexity of the reports in the queue, increasing the number may mean each individual report will be produced more slowly, so you may need to experiment to find the optimum setting for the typical report queue in your system.
- Multi Thread
- Reports will be produced using several dedicated threads. Each thread will be able to produce a separate report, allowing several reports to be produced simultaneously. When a report is requested, it will be placed in an overall report queue, to be assigned to the first thread that becomes available.
By default, there can be up to five separate report threads. Again, you can change this using the Report Slots field. A good guideline is to set the number of Report Slots to twice the number of processor cores in the server. The maximum number of threads is 100.
As most modern servers are multiple-core or multiple-processor, it is always recommended that you use this option.
You will need to restart the server after changing the
Parallel Reports options.
By default, the server will spend up to 300 seconds calculating each report. You can change this report time-out limit by entering a number of seconds in the Seconds a Report is allowed to Run before Timing out field in the Timed Operations setting in the Technics module. If a report takes longer than the report time-out limit, the following will happen, depending on the Parallel Reporting option:
- Off
- There is no report time-out limit if Parallel Reporting is Off, so every report will always be produced in its entirety.
- Single Thread
- The report calculation will be halted, and the incomplete report will be printed. If you are using the Report Statistics option in the Optional Features setting in the System module, report statistics will not be added to the end of an incomplete report, thus indicating that it is incomplete.
- Multi Thread
- The report calculation will be halted, and the incomplete report will not be printed.
When you produce a report, if you believe it will take longer than the time-out limit and you want it to be produced in its entirety, use the
Ignore Timeout Limit option at the bottom of every report specification window.
If you are using the single- or multi-thread options, you can monitor the reports that the server is working on. To do this, produce a Report Status report from the User Settings module. As well as showing you the calculation times for each report being produced, this report also gives you the chance to cancel a particular report. To do this, click the [Cancel] text button next to the report name. If you are using the single-thread option, the incomplete report will be printed. You cannot use the Report Status report if Parallel Reporting is off. In this case, the Report Status will be placed in the report queue behind the other reports, which will be completed before calculation of the Report Status report begins. When it is produced, it will therefore be empty.
Massive Cache
Another way to improve reporting speed is to increase the size of the cache used by the Standard ERP server application. By default, this is 12 MB. By increasing the size of this cache, you will improve the speed of operation because data that is in the cache can be accessed much more quickly than data on disk. Data in the cache is data that has already been used during the work session. In particular, the speed of importing will improve if you increase the cache size and, in many installations, the speed of reporting and processing records will improve as well.
The optimum size of the cache will vary, depending on the server type, RAM size and operating system, and can only be established through experimentation. A good guideline, especially for Windows servers and for servers with smaller RAM sizes, is never to assign more than 40% of the machine's RAM size to the cache. If the cache is too large, the memory available for other tasks may not be enough. If the machine then runs out of memory, it will start using its hard disk as extra memory. This will cause it to slow down significantly and may also increase instability. If the server is a 32-bit machine, the maximum cache size is between 1 and 3.5 GB, depending on machine and operating system. If the server is a 64-bit machine with a 64-bit capable operating system (Mac OS X or Linux) and a large amount of RAM and if you are using the 64-bit version of Standard ERP, then the 40% guideline becomes less important. For example, if the server has 12 GB RAM, you could assign up to 10 GB to the cache.
Increasing the cache size requires purchasing the Massive Cache feature as part of your Standard ERP package.
Follow these steps to increase the cache size:
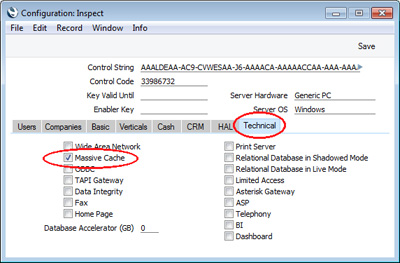
- In the Configuration setting in the System module, choose to use the Massive Cache feature using the option on the 'Technical' card:
- You can start the application on the server using the --db-cache parameter. For example:
- ./StandardERP --db-cache=1G (Linux 32-bit),
- ./StandardERP64 --db-cache=1G (Linux 64-bit) or
- ./HansaWorld --db-cache=1G (Mac OS X)
- Starts the server application and sets the cache to 1 GB. You can set the cache size using K, M (not MB) or G (not GB). Make sure the parameter does not contain any spaces. This assumes the application is named "StandardERP", "StandardERP64" or "HansaWorld". If this is not the case, type the application name after "./".
The --db-cache parameter sets the cache size for the particular work session only. After quitting and restarting the server, the cache size will revert to the default.
To make it more permanent, place the --db-cache parameter (including cache size) in a text file named "parameters.txt" and save this file in the same folder or directory as the server application. Each time you launch the server application, the --db-cache parameter will be taken from the "parameters.txt" file. You should only place the parameter (--db-cache including cache size this example) in the "parameters.txt" file: do not include ./StandardERP, ./StandardERP or ./HansaWorld in the file.
If your server is a Windows machine, you must place the --db-cache parameter in a "parameters.txt" file. This is the only way to launch the Windows server application with parameters.
Individual Reports
Please click the links for details about the individual reports in the following modules:
Go back to: