Creating a New Database - Server
This page describes creating a new Standard ERP database for use in a multi-user environment.
---
The Standard ERP server applications do not have graphical interfaces. As described on the Installation - Multi-user page, it is recommended that you use the Standard ERP client application (with graphical user interface or GUI) to create and configure a new database. You can do this on the server machine itself if it is accessible. Otherwise, work on a local machine and copy the database to the server when you have finished, as described on that page.
- Ensure there is no database file with the name "HANSA.HDB" in the folder containing the Standard ERP application, then start it by double-clicking the application icon.
The "DBDEF.TXT" and "DEFAULT.TXT" text files must be present in the same folder as the application when you create a new database. Standard ERP will use these files to set some initial preferences in the new database.
- The first window to appear will ask how you want to use the application:
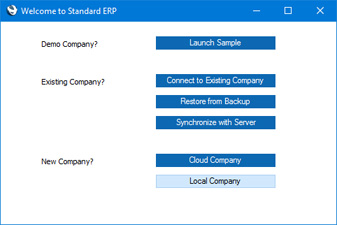
Click the [Local Company] button if you are starting Standard ERP for the first time, or the [Restore from Backup] button if you have already been using Standard ERP and you need to import a back-up file to a new database. The first option is described here: for details of the second, please refer to the Restoring from a Back-up page.
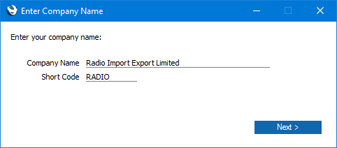
- The 'Enter Company Name' window will appear, asking for your company name. Enter your company name and a shortened version of it (up to ten characters), then click the [Next] button.
- The 'Set up User' window will be opened:
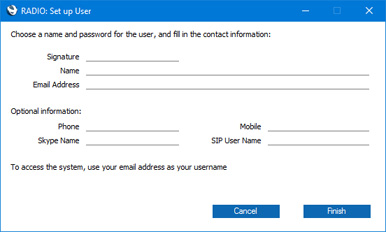
Here you can enter your personal details, to create a User Account for yourself. You must enter your Signature, Full Name and Email Address before you can progress to the next step, but the other information is optional. You can use your initials or other abbreviation of your name as the Signature, and the Email Address will become your StandardID. Whenever you log in to your Standard ERP system, you will be able to do so using your Signature or your Email Address (StandardID). You will also be able to log in to other HansaWorld services (such as your MyStandard page and the support forum) using your StandardID.
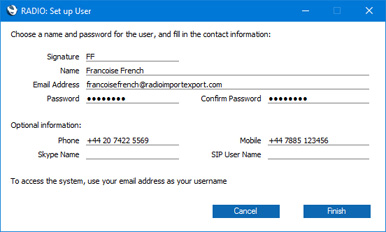
When you enter the Email Address and either change to another field or click the [Finish] button at the bottom of the window, the Email Address will be checked to see if it has already been used as a StandardID. If it hasn't, two fields will be added to the window allowing you to specify a password. The password must contain at least eight characters. You will be able to use the password when logging in using your Signature and when logging in to any HansaWorld service using your StandardID. If the Email Address has already been used as a StandardID, the password fields will not appear because you will be able to use its existing password.
Note that if you are using Windows, you cannot include special characters such as *, å, ä, ö in passwords. Bear this in mind if you are creating the User Account on a macOS machine but you will need to be able to log in on either platform.
When you click the [Finish] button, your User Account will be created.
- The 'Login' window will appear, with your Signature already entered:
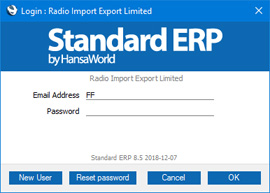
Enter your Password and click [OK].
- If you specified an Email Address that has not previously been used as a StandardID, an email address validation mail will be sent to the address that you specify.
When you receive the email address validation mail, click the link in the mail or copy it to a browser window to confirm that the email address is valid.
- You will be asked if you want Standard ERP to remember your Signature and Password, so that you do not have to enter them yourself each time you log in.
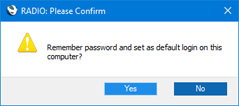
Bearing in mind that logging in is a security feature, it is recommended that you only click the [Yes] button if you are absolutely sure no-one other than yourself will have access to your computer. If you click the [Yes] button and then change your mind, you can turn off the feature by choosing 'Stop Auto Login' from the File menu.
- The Navigation Centre will appear, with your name shown in the title bar. This is illustrated on the Work Area page.
- Refer to the pages listed below to prepare the database for work. It is recommended that you carry out this work described in this manual on the server, effectively working single-user. Do this now before proceeding to step 10. Otherwise, if you want to carry out the configuration work from a client machine, proceed now to step 10, and refer back to this step after completing step 14. The steps are:
- By default, when you start the application as a server (steps 12 and 13 below), it will expect clients to connect through Port 1200. If you want to change the Port, refer to the Program Mode page.
- Quit the application by selecting 'Quit' from the File menu (Windows) or from the Standard ERP menu (macOS). You can also use the Ctrl-Q (Windows) or ⌘-Q (macOS) keyboard shortcuts.
- If you are working on the server machine, launch the command line or service version of the Standard ERP server application as follows:
- If your server is a Linux or macOS machine, open a Terminal and type the following (the examples assume you have retained the default directory structure):
- cd /Applications/StandardERPServer
- Changes to the folder containing the Standard ERP server application.
- ./StandardERPServer & (Linux 32-bit),
- ./StandardERPServer64 & (Linux 64-bit) or
- ./StandardERPServer & (macOS)
- Starts the Standard ERP server application. The & is optional: it allows you to run the program in the background and to use the Terminal window for other tasks.
- This assumes the application is named "StandardERPServer" or "StandardERPServer64". If this is not the case, type the application name after "./"
Remember when typing that the Terminal environment on Linux is case-sensitive.
- If your server is a Windows machine, the Standard ERP server application is a service that by default will be launched automatically when you start up the server machine. If for some reason the service does not start automatically, open the Control Panel and double-click 'Administrative Tools' and then 'Services'. Find and select 'Standard ERP Server (32-bit)' or 'Standard ERP Server (64-bit)' in the list as appropriate and choose to start the service. (The name may vary slightly, depending on the precise version of Standard ERP you are using.)
- If you are not working on the server machine, copy the database (named "HANSA.HDB") to the directory on the server containing the command line or service server application. If the "Attach" folder is not empty, copy that as well. Then, launch the command line or service application as described in the previous step.
- Connect to the server from a client. Please refer to the Creating a New Database - Client page for details.
- If you have not already done so, carry out the work listed in step 9.
- Continue with the following steps:
---
See also:
Go back to:
|