Conversions - Master, Conversions - Accounts and VAT Codes
This page describes the Conversions - Master and Conversions - Accounts and VAT Codes setting in the System module.
---
The Conversions - Master and Conversions - Accounts and VAT Codes settings together allow you to change the Account Number of an Account, and/or to merge two or more Accounts into one. You can also use them to change a VAT Code. For example, you might have been using Account 100 for sales of a particular product before realising that you should have been using Account 102 instead. Using these settings, you can change Account 100 wherever it appears in the database to Account 102 (e.g. in the Account register itself, in Nominal Ledger Transactions and in Invoices). All previous postings to the old Account will appear under the new Account in all reports. Follow these steps:
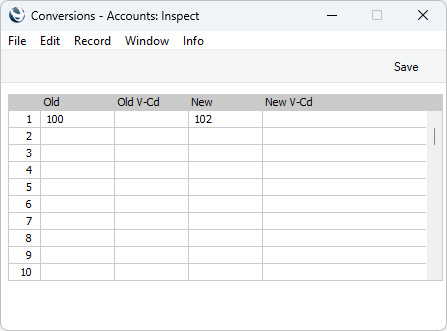
- Change to the System module and open the Conversions - Accounts and VAT Codes setting. If you need to change Account Numbers, enter each pair of old and new Account Numbers in the Old and New fields as shown in the illustration below. If you need to change VAT Codes, enter each pair of old and new VAT Codes in the Old V-Cd and New V-Cd fields. In the example illustrated, we will change Account 100 to 102:
In the case of Accounts, the new Account Number does not have to exist in the Account register. In this example, if there is no existing Account 102, Account 100 will be changed to 102 by the conversion process and so Account 100 will no longer exist. If there is an existing Account 102, Account 100 will be deleted. In effect, this will mean that you are merging 100 with 102.
In the case of VAT Codes, both the old and new VAT Codes should exist in the VAT Codes setting. The conversion process will not update the VAT Codes setting itself, and the process may not be complete if the new VAT Code does not exist.
If you specify old and new Accounts and old and new VAT Codes in the same row, the result will be:
- where the old Account and old VAT Code appear together in a transaction (e.g. in an Invoice row), the Account will be changed to the new Account.
- wherever the old VAT Code appears in a transaction, it will be changed to the new VAT Code (i.e. it will be changed when it is used in combination with an Account that is not the old Account).
- wherever the old Account appears in a non-transactional record (e.g. an Item), it will be changed to the new Account.
- wherever the old VAT Code appears in a non-transactional record (e.g. an Item), it will be changed to the new VAT Code.
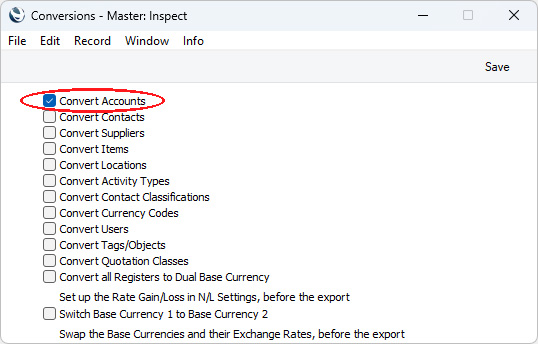
- Remaining in the System module, open the Conversions - Master setting and select the Convert Accounts option:
- Make a text or timed back-up of your database and quit Standard ERP.
- Remove the Standard ERP database file (named "Hansa.HDB") from the folder or directory containing your Standard ERP application.
- Launch Standard ERP again. Because there is now no "Hansa.HDB" file, the 'Welcome to Standard ERP' window will appear. Select the [Restore from Backup] option.
- When the 'Import files available' window appears, choose to import the back-up file that you created in step 3.
- During the import process, the Account records in the Account register will be renumbered as required. In the example, Account 100 will be given the new number of 102. Any use of the old Account in any other register (e.g. in the Purchase Invoice, Invoice, Transaction and Item registers) will also be changed. If you change to update VAT Codes, any use of the old VAT Code in any register will similarly be changed.
Note that use of the old Account and/or old VAT Code in some settings (settings of types 1 and 2 as described here) will not be updated. Examples include the Account Usage settings, Payment Modes and VAT Codes. You will need to update these settings yourself to ensure that they contain valid Accounts and/or VAT Codes.
- Produce a Nominal Ledger report for one of the new Accounts and check that all the Transactions have been converted as you expected.
- You must now inspect and change all report definitions in the Nominal Ledger where the old Account Numbers and/or old VAT Codes have been used. Please refer to the description of the Report Settings setting here for details.
- Return to the Conversions - Master setting in the System module and turn off the option to Convert Accounts.
- Return to the Conversions - Accounts and VAT Codes setting and delete everything line by line.
If you have more than one Company in your database, you must repeat steps 1 and 2 above in every Company in which the conversion is to take place . In all other Companies, leave the Conversions - Accounts setting empty and do not tick any of the options in the Conversions - Master setting. If you want a different conversion to take place in another Company, enter old and new Account numbers and/or old and new VAT Codes in the Conversions - Accounts and VAT Codes setting in that Company as necessary, and select the option to
Convert Accounts in the Conversions - Master setting in that Company as well.
If the Account register is a shared register, you should repeat steps 1 and 2 above in every Company that shares the register. For example, if you have three Companies and Companies 2 and 3 are sharing the Account register, follow steps 1 and 2 in Companies 2 and 3.
If the Account register is a shared register stored in Company 0 (i.e. in the Shared Registers setting in the Technics module, the In Company field is empty), you should again repeat steps 1 and 2 above in every Company that shares the register. Then, follow the procedure described above, but replace steps 5 and 6 with the following:
- Launch Standard ERP again. Because there is now no "Hansa.HDB" file, the 'Welcome to Standard ERP' window will appear. Then:
- Close the 'Welcome to Standard ERP' window using the close box.
- You will be prompted to enter a new Company: a Code and Name will be sufficient. Press [Save].
- You will be presented with a blank screen: quit Standard ERP and restart.
- Repeat steps 1 and 2.
- Ensure you are in the System module and use the 'Automatic' or 'Manual file search' import functions to import the back-up file that you created in step 3.
Steps 1 and 2 will cause the old Account to be replaced with the new one in every transaction (e.g. in Invoices, Nominal Ledger Transactions, etc) in the relevant Companies. The new step 5 will cause the old Account to be replaced with the new one in the Account register in Company 0.
---
Go back to: