Balance Sheet - Defining
You can define the structure of the Balance Sheet to suit your requirements. The following example illustrates the set-up process.
To change the report definition of the Balance Sheet, first click the [Settings] button in the Master Control panel and double-click 'Report Settings' in the subsequent list. Then, highlight 'Balance Sheet' in the list on the left-hand side of the 'Report Settings' window and click the [Definition] button. The 'Definition of Balance Sheet: Browse' window is opened.
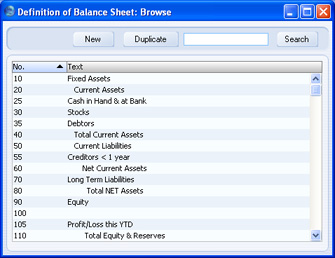
The window shows the Balance Sheet row by row, as it has been presented up to now. The rows are numbered 10, 20, 30, 40 etc., so there is room to insert new rows in between. You can insert new rows using the [New] or [Duplicate] buttons in the usual manner.
Double-click the first row, "10: Fixed Assets".
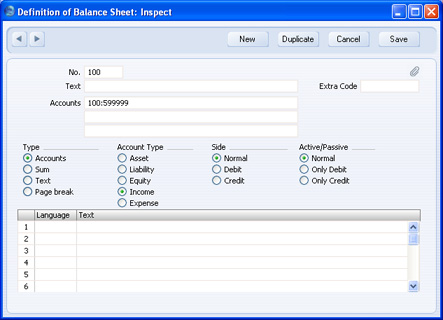
The 'Definition of Balance Sheet: Inspect' window is opened, showing the current definition of the row.
The number identifies the row in the Balance Sheet, and the Text "Fixed Assets" is printed in the report as a heading for a group of Accounts when the report is sent to the screen or to the printer.
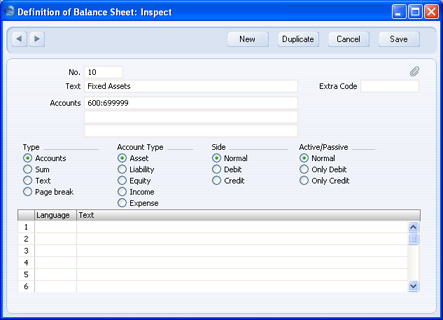
The Accounts field contains a range of Account numbers. Every Account in this range will be printed in the Balance Sheet, under the heading specified in the Text field. An alpha sort is used so, in the example illustration above, "600:69999" effectively means that all Accounts whose first digit is "6" are to be printed in the report.
Of the four Type options, "Accounts" has been selected, which means that each of the Accounts in the range will be printed individually in the report. After the last Account in the group, a total for the group will be printed.
The Account Type is "Asset". The Account Type concept is explained here.
The Side and Active/Passive options are described on the Special Features of the Balance Sheet page.
You should use the grid to enter various translations of the Text (i.e. the report heading or sub-heading). Specify a Language in the first column using 'Paste Special' if necessary, and the appropriate translation in the second column. There is no need to enter a row for your home Language. When you print the report, you can specify which Language is to be used.
The Extra Code is used in Russia where the Balance Sheet is printed using a standard report design that includes line numbers: use this field to specify the correct line number for this row of the report. The Extra Code only appears in the report when you produce it using the No Comparison option.
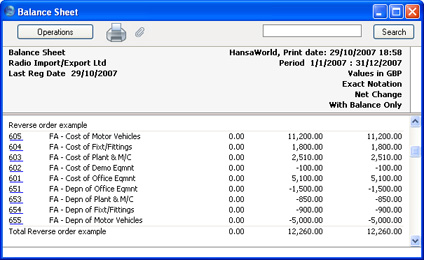
The Accounts field consists of three rows, with room for a definition 300 characters long. As alternatives to specifying a range of Accounts, you can also specify a number of individual Accounts, or ranges of Accounts, separated by commas. If you enter a range of Accounts with the highest number first, the Accounts in that range will be presented in reverse order. For example, the sequence "605:601,626,651:655" will appear as follows in the printed report:
From the record for row 10,click the [Next Record] button twice (on the left-hand side of the Button Bar) or select 'Next' from the Record menu twice, so that the next definition row, number 25, "Cash in Hand & at Bank", is shown. This definition also contains a range of Accounts : 700 to 739999. The Type is "Accounts", and the Account Type is "Asset".
! | If you move from record to record by clicking the [Next Record] or [Previous Record] buttons, remember that any changes you make will be saved. If you don't want to save the changes, you must use the close box, or click [Cancel]. |
|

Click forward to row 40, "Total Current Assets". The Type of this row is "Sum", which means that the total values from rows 25, 30 and 35 will be added together. The result will be shown on line 40 under the heading "Total Current Assets". The Account Type is still "Asset".
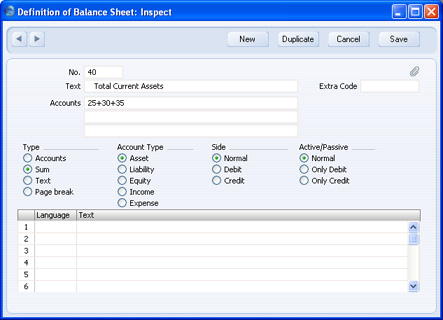
Since the Type is "Sum", the Accounts field contains previously defined row numbers (25+30+35), not Account Numbers. Do not enter Account Numbers in the three Accounts fields if the Type is "Sum".
Click forward to row 100.
This row has no Text, which means that it will not be printed in the report. If this row had some Text, it would cause the balances of every Account between 100 and 599999 to be listed in the report, followed by the total balance for that range of Accounts. As there is no Text, the processing will still take place (i.e. the total balance for that range of Accounts will still be calculated), but this processing will effectively be hidden as nothing will be printed. The total balance is then used in row 105:

Taken together, rows 100 and 105 will print the total balance for Accounts 100:599999 without listing those Accounts individually. Since these are the Income and Expense Accounts, this is appropriate for the Balance Sheet.
When you have finished with the last row, if you want to save your changes, click [Save], or else close the window with the close box. Then, close the list of definitions using the close box once again.
The new Balance Sheet report is now ready to print.
! | HansaWorld Enterprise is supplied with a standard Chart of Accounts and a set of Report Definitions. This is a well-structured Chart, with systematic groupings of Accounts. It is suitable without any changes for most small or medium companies, but it is also easily modified by you or your financial adviser. |
|
If you stay within the structure of the Chart (e.g. avoid putting Liability Accounts among the Assets!), there is no need to alter the definitions. But remember, it is a good idea to print a test Balance Sheet to see if your definitions produce exactly what you expect.
Inserting a Row in the Balance Sheet
- Ensure you are in the Nominal Ledger, then open the 'Settings' list window and double-click 'Report Settings' in the subsequent list. Then, highlight 'Balance Sheet' in the list on the left-hand side of the 'Report Settings' window and click the [Definition] button.
The 'Definition of Balance Sheet: Browse' window is opened.
- Click [New] or highlight a row similar to the one you are creating and click [Duplicate]. An empty form or a copy of the highlighted row is opened.
- Enter the information for the new row. Remember to give the new row a number that will insert it in the right place in the Balance Sheet (e.g. if you want to insert a row between rows 30 and 40, you can use 35.)
- Click [Save] and close the window, or click the close box to cancel. You will be returned to the 'Definition of Balance Sheet: Browse' window, where the new row is shown in its proper place in the list.
Deleting a row from the Balance Sheet
- Ensure you are in the Nominal Ledger, then open the 'Settings' list window and double-click 'Report Settings' in the subsequent list. Then, highlight 'Balance Sheet' in the list on the left-hand side of the 'Report Settings' window and click the [Definition] button.
The 'Definition of Balance Sheet: Browse' window is opened.
- Double-click the row you want to remove, to show its definition window.
- Select 'Delete' from the Record menu. The row is deleted from the Balance Sheet and the definition for the following row is shown in its place.
- Close the window. You will be returned to the 'Definition of Balance Sheet: Browse' window.
! | You cannot undo the deletion of a row in the Balance Sheet. |
|