Entering a Transaction - Transaction Rows (Journal Postings)
In the centre of the 'Transaction: New' and 'Transaction: Inspect' windows are the rows of the Transaction, where you should list the postings to the individual Accounts. These must balance (the debits must equal the credits) before you can save the Transaction.
The Transaction row matrix is divided into seven horizontal flips. When you click a flip tab (marked A-G), the two or three right-hand columns of the grid are replaced.

To add rows to a Transaction, click in any field in the first blank row and enter appropriate text. To remove a row, click on the row number on the left of the row and press the Backspace key. To insert a row, click on the row number where the insertion is to be made and press Return.
Flip A
- Account
- Paste Special
Account register, Nominal Ledger/System module
- Specify here the Account used by the Transaction row.
- You can also enter the Code of an Autotransaction to this field. Autotransactions are used to automate the entry of frequently used Transactions, not only reducing labour but also ensuring the correct Accounts are used every time. Autotransactions are fully described here.
- Objects
- Paste Special
Object register, Nominal Ledger/System module
- You can assign up to 20 Objects, separated by commas, to each Transaction row. You might define separate Objects to represent different departments, cost centres or product types. This provides a flexible method of analysis that can be used in Nominal Ledger reports.
- You can use the Skips Object option in the Transaction Settings setting to have the insertion point skip over this field when you press Return or Enter (but not Tab) if you don't use Objects.
- If you enter more than one Object, they will automatically be sorted alphabetically when you move to the next field.
- If you have specified an Object On All Rows in the Transaction Settings setting, that Object will be placed here automatically when you enter a debit or credit amount.
- Description
- The Account Name will be entered here automatically when you specify the Account above. You can change it for this Transaction if necessary.
- You can use the Skips Description option in the Transaction Settings setting to have the insertion point skip over this field when you press Return or Enter (but not Tab).
- If you have entered a Language in the Company Info setting in the System module, you have entered an appropriate translation of the Account Name on the 'Texts' card of the Account screen and you are using the Account Description in Company Language option in the Transaction Settings setting in the Nominal Ledger, then the appropriate translation of the Account Name for the Company Info Language will be used here.
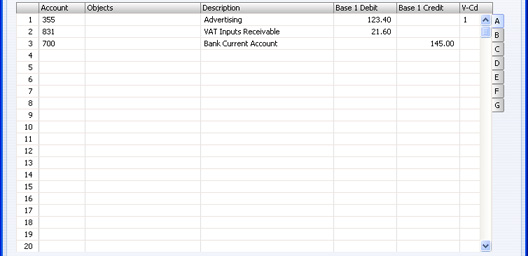
- Base 1 Debit, Base 1 Credit
- For each row, specify a debit or credit amount. Use figures in Base Currency 1 as specified in the Base Currency setting in the System module or in your home Currency if you are not using the Dual-Base Currency system. The debits total must equal the credits total before you can save the Transaction: each Transaction must therefore have at least two rows. If you are using the Warn On Unusual Amount option in the Transaction setting and a particular Account can only have amounts posted to one side (debit or credit) you will be warned if you attempt to post a figure to the other side. Note that this warning will not be enforced and you can override it.
- V-Cd
- Paste Special
VAT Codes setting, Nominal Ledger
- Default taken from Account
- You can mark each row in a Transaction with a VAT Code. This Code may be brought in automatically when you enter the Account number, or you can enter it manually. No calculation ensues: the field is for reporting purposes only. Nevertheless, take care to ensure you enter the correct VAT Code (if any), since it will affect the accuracy of the figures for Net Sales and Net Purchases in your VAT Return, as shown in the illustration of the VAT Report Definition.
Flips B-D: Multi Currency accounting
If you are using the
Dual-Base Currency system, you should enter values in Base Currency 2 on flip B. The Dual-Base system will be useful for companies that have offices in two countries that need to report in both Currencies, for companies operating in countries where there is a second Currency (usually the US Dollar or Euro) in common use in addition to the national one, and for companies in the Euro zone who retain their old national Currency for comparison purposes.
If the Transaction is one that uses a simple conversion from a foreign Currency to the home Currency, you should enter the foreign Currency together with values in that Currency on flip C. If you use an Account where a Currency has been specified, this Currency will be brought in automatically. When you specify the Currency or it is brought in from the Account, the current Exchange Rates will be brought in to flip D.
Please click here for full details of these features.
In the case of Transactions solely in the home Currency where you are not using the Dual-Base or simple conversion systems, you can ignore flips B-D.
Flip E
You can use Flip E to pay off Sales and Purchase Invoices. On one row of the Transaction, specify the Bank Account to be debited (in the case of a Sales Invoice) or credited (in the case of a Purchase Invoice). On the next line, on flip E, specify the Invoice(s) being paid as described below. The Debtor or Creditor Account as appropriate will be brought in automatically from the Invoice.
Invoices and Purchase Invoices paid off in this manner will no longer be treated as open, but records in the Receipt or Payment registers will not be created.
It is also possible to create Invoices and Purchase Invoices using flip E. Again, records will not be created in the Invoice or Purchase Invoice registers, but such Invoices will appear in any Open Invoice 'Paste Special' list until they have been paid off: in this respect they are treated as normal Invoices. On separate rows of the Transaction, specify the Debtor/Creditor Account, Sales/Purchase Account(s) and VAT Output/Input Account. No defaults are offered. On flip E in the row posting to the Debtor/Creditor Account, set the T (Type) field to "C" or "S" as appropriate and enter a Customer or Supplier and an Invoice Number.
If you are going to use flip E, there is no need to turn off the Sub-ledger Checking options in the Account Usage S/L and P/L settings. You can use any Accounts that have been protected by this feature in a Transaction if you set the T (Type) field to "C" or "S". This means that there is no risk you will use the Debtor or Creditor Account accidentally and incorrectly in other Nominal Ledger Transactions, thus rendering their balances inaccurate.
In the case of Transactions generated automatically from Sales and Purchase Invoices, Receipts and Payments, the fields on flip E will contain values if you are using the Cust. Info. on Trans. (in the case of the Sales Ledger) or Supp. Info. on Trans. (Purchase Ledger) options in the Account Usage S/L or P/L settings.
- T (Type)
- Paste Special
Choices of possible entries
- Use this field to specify whether the Transaction row is a debtor or creditor posting. Enter "C" (for "Customer") if you are registering a Receipt or Sales Invoice or "S" (for "Supplier") if you are registering a Payment or Purchase Invoice. The 'Paste Special' lists attached to the Serial No and Company fields will vary, depending on what you have entered here.
- You should only use "C" or "S" if the row is a posting to the Debtor or Creditor Accounts. Balancing postings to Sales, Purchase, VAT and Bank/Cash Accounts should carry the default entry of "M". You should also use "M" in all other Transactions.
- Ser No
- Paste Special
Open, approved Purchase or Sales Invoices
- Once you have entered "C" or "S" in the Type field, you must enter a Sales or Purchase Invoice Number here before you can save the Transaction.
- Enter an existing Invoice Number to signify the Invoice that you want to be paid off. When you press the Tab or Enter key, its Customer or Supplier Number will appear in the Company field, the appropriate Debtor or Creditor Account will be brought in, and the outstanding amount will be placed in the Credit (Sales Invoice) or Debit (Purchase Invoice) field.
- Enter a non-existent number to signify that a new Invoice is to be created.
- Due
- Paste Special
Choose date
- Once you have entered a Sales or Purchase Invoice in the Serial No field, its Due Date will be shown here.
- If you are creating a new Invoice, enter a Due Date as appropriate.
- Company
- Paste Special
Customers or Suppliers in Contact register
- Once you have entered a Sales or Purchase Invoice in the Serial No field, its Customer or Supplier will be shown here.
- If you are creating a new Invoice, enter a Customer or Supplier as appropriate.
- If the Type is "C", the 'Paste Special' list will contain Customers. If the Type is "S", it will contain Suppliers. If the Type is "M", the 'Paste Special' list will not open.
An example Receipt against a Sales Invoice entered using the Transaction screen is shown below (flip E is shown in the illustration).
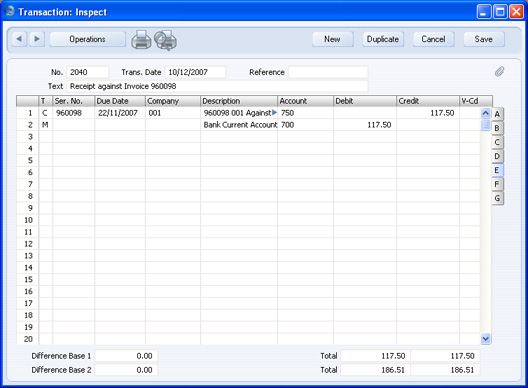
When you enter "C" or "S" to the Type field and a Sales or Purchase Invoice Number to the Serial Number field, the Debtor or Creditor Account (750 in the illustration above) will be brought in automatically, and the outstanding amount will be placed in the Credit or Debit field as appropriate. If the original Invoice was in a foreign Currency, the outstanding amount will be converted using the Exchange Rate in the Invoice. If the Exchange Rate has changed since the Invoice was raised or received, you can optionally have a new row added automatically to the Transaction, posting the gain or loss to the Rate Gain or Loss Accounts specified in the
Rate Gain/Loss setting. If you would like to make use of this option, check the Calculate Rate Differences box in the
Transaction Settings setting.
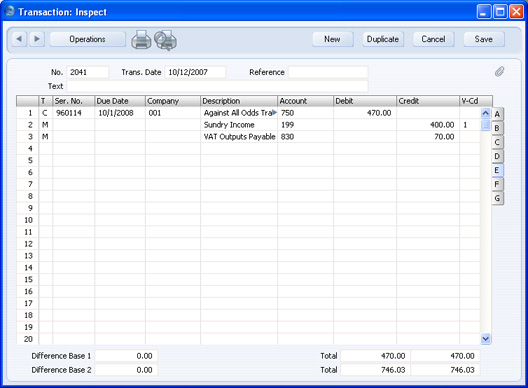
An example creation of a Sales Invoice is shown below (again, flip E is shown in the illustration).
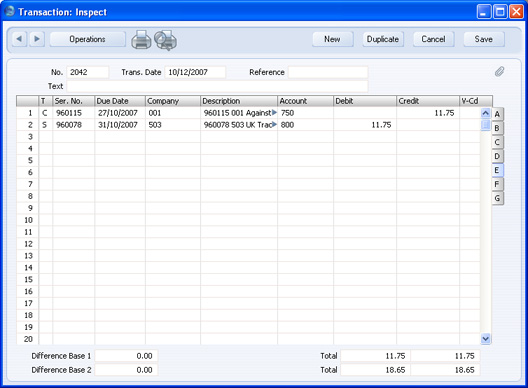
If a company is both a Customer and Supplier, you can use Flip E to set their Sales and Purchase Invoices against each other (contra transactions). If the values of the Sales and Purchase Invoices are not the same, the Invoice with the lower amount will be fully paid off, while the other will be partially paid off, so it will continue to be treated as open. In the example shown below, a Sales Invoice issued to Customer 001 has been set against a Purchase Invoice received from Supplier 504:
Flip F
- Corr
- If you are using the Check Corresponding A/C Rules option in the Transaction Settings setting, the Accounts used on each side (debit/credit) of a Transaction will be subject to certain rules (the "Corresponding Account Rules"). These rules mean you should enter Transactions in such a way to show clearly how each individual posting is balanced. You will not be able to save a Transaction that does not comply with these rules.
- It can be difficult to establish correspondence in some complex Transactions, where, for example, the first two lines are debit Accounts and there are then several credit lines. So, if you are using this option and you need to enter such a complex Transaction, you must establish correspondence manually using this field. Enter an arbitrary number in the Corr field in each Transaction row. Enter the same number in the rows that correspond to each other.
- Corresponding Account Rules are fully explained on the page describing the Transaction Settings setting.
Flip G
You can use the Quantity field when you enter Transactions manually from a list produced by the
N/L Transfer - Invoices report in the Sales Ledger. There is an option to show quantities in this report. Typically, you will use this field for Transactions representing Invoices
raised in the Job Costing module.