Designing Forms - Adding and Editing Objects
To add an object to the Form, click the appropriate button at the top of the window and then draw a box with the mouse in the Form where you want the object to appear. When you release the mouse button, a dialog box will be opened, where you can place the object more precisely using coordinates, specify a font style and so on. To edit an object, double-click on it with the mouse. The same dialog box will open, where you can edit the specifications of the object. Each object type has its own dialog box, described below.
Text Objects
To add a new text object to the Form, click the [Text] button and then draw the object where you want the text to appear.
When you release the mouse button, the following dialog box will appear:
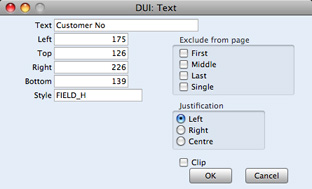
- Text
- The text that is to be printed on the Form. This can be up to 80 characters long, but it is limited to one line. To create a text area with more than one line, use the appropriate number of separate one-line text objects.
- Left, Top, Right, Bottom
- Use these fields to specify the size and position of the text box that is to contain the text. When you create a new text box, the measurements of the box that you have just drawn will appear here.
- Style
- Paste Special
Style register, System module
Use this field to assign a font and font style to the text. You should define your Styles using a separate register that is fully described here. If you do not enter a Style here, the first record in the Style register will be used.
- Justification
- Use these options to specify where the text will appear inside the text box.
- Exclude from page
- Please refer to the Single- and Multi-Page Forms page for details about these options.
Click [OK] to close. The text field is visible on the screen, and you can move it across the Form with the mouse.
To edit a text object once it has been created, double-click it to open the 'Text' dialog box.
Lines and Frames
Use these tool buttons to draw lines and frames on the Form. Click either button and then draw the object. When you release the mouse button, a dialog box will appear where you can indicate the width in pixels of the line or frame, and the pages on which it is to be printed.
Fields
A field is an area on the Form where a piece of information from your Books by HansaWorld database is to be printed. The following example from an Invoice Form explains how:

Fields are shown as boxes containing the field name. The boxes are for identification only: they will not be printed. You can use the [Frame] button to add a printing frame if necessary. Above each field is a text object (created using the [Text] button as described above) that identifies the information shown in the field. These would not be necessary if the Form is to be printed on pre-printed stationery. Text objects can be distinguished from fields as they are unboxed.
To add a field, click the [Field] button, and mark the position of the field. A dialog box opens:
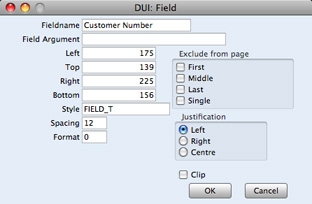
- Fieldname
- Paste Special
Fields for the Document Type
- Enter the Field Name using 'Paste Special'. If you have assigned a Document Type to the Form as described here, 'Paste Special' will only list the fields for that Document Type. Otherwise it will list all fields. Fields belonging to other Document Types will not be printed.
- Field Argument
- You can use the Field Argument with certain fields to control how they will be printed. For example, in some fields you can use the Field Argument to specify the number of decimal places that will be printed. The Field Argument can only be used with a few fields: please refer to the descriptions of the individual documents for details.
- Left, Top, Right, Bottom
- Use these fields to specify the size and position of the text box that is to contain the text. When you create a new text box, the measurements of the box that you have just drawn will appear here.
- Style
- Paste Special
Style register, System module
- Use this field to assign a font and font style to the text. You should define your Styles using a separate setting that is fully described earlier in this manual. If you do not enter a Style here, the first record in the Styles setting will be used.
- Spacing
- Some fields will cause more than one line of text to be printed (e.g. the text in Letters and Mails, and the fields listing the Items in Quotations, Orders and Invoices). In these fields, you should use the Spacing field to specify the spacing between lines (in pixels). Usually the number of pixels that you specify here should be the same as the font size. If you leave this field empty, the lines of text will be printed on top of each other.
- Escape Sequence
- The Escape Sequence is used when printing cash receipts: please refer to your local Books by HansaWorld representative for details of this feature.
- Format
- In the case of matrix fields (for example, those printing the Items in Invoices), you should enter "1" as the Format (as well as specifying a Spacing). If the Format is 0, the printed matrix columns may not be aligned correctly if the first row only contains text.
- Exclude from page
- Please refer to the Single- and Multi-Page Forms page for details about these options.
- Justification
- Use these options to specify where the text will appear inside the text box.
Click [OK] to save.
Usually each field that you place in a Form corresponds to a field in the original record. For example, the Customer Number field in the illustration above will print the contents of the Customer Number field in each Invoice. An exception is the "Note" field. If you include the "Note" field in your Form design, this will print the first note or comment that you attach to the original record using the Attachments feature.
Pictures
Use the [Picture] button to include a picture in your design. As with other tools, click the button and draw a frame for the picture on the Form. A dialog box then appears.
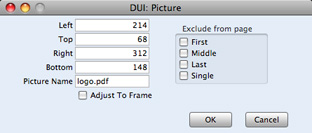
In the Picture Name field, enter the file name of the picture as it is on your hard disk. You can use 'Paste Special' to ensure that the file name is spelt correctly and that the case is correct (important for Linux). However, doing so will bring in the absolute path name of the picture. It is recommended that you store picture files in the same directory or folder as your Books by HansaWorld database and application and that you remove the path name to leave the file name only (i.e. that you use a relative path name). If you use the absolute path name, it will become incorrect if you move your Books by HansaWorld folder and as a result the picture will no longer be printed.
In multi-user systems, pictures should be stored on the server. If you are working from a client machine when you design a Form and you want to see pictures in your Form designs, then the pictures should be on your client machine as well. If you store your pictures in the same directory or folder as the Books by HansaWorld application on both the server and your client and you use relative path names as recommended in the previous paragraph, then those path names will point to the picture files both when printing and when editing Forms.
The following file formats are supported:
- Windows
- BMP
- Mac OS X
- PDF and PICT
If you will use the Form to create pdf files, the only picture format that is supported on any platform is 24-bit BMP. This applies when the pdf file will be generated by Books by HansaWorld. Please refer
here for details about pdf generation.
In mixed networks, you should have versions of each picture on your server in each format, and you should use the [Picture] button to include all versions in your Form design (i.e. you should have BMP and PDF/PICT picture objects in each Form, depending on the machines in your network). This will ensure the picture will print correctly from clients of all types.
It is recommended that EPS files should be saved in Adobe Photoshop. EPS files created in Adobe Illustrator are not supported. EPS files should be smaller than 200K.
All picture file names should have the correct extensions.
When you design a Form, pictures in formats supported by the machine you are using will be visible immediately in the Form editor. Pictures in other formats will be marked by placeholders. For example, if you are using a Mac OS X machine, PDF and PICT images will be visible in the Form editor while BMP images will be marked by a rectangle of the appropriate size.
---
In this chapter:
Go back to: