|
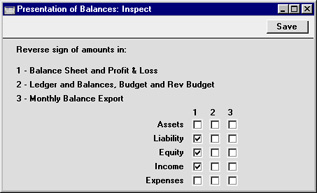
Search HansaManuals.com HansaManuals Home >> Standard ERP >> Nominal Ledger >> Settings Eelmine Järgmine Prindi kogu peatükk Otsi Juhend HansaWorld Enterprise'i versioonile 4.0 Presentation of Balances Internally, Hansa interprets a Credit entry as a value that is subtracted from an account balance, while a Debit entry is added. Assets and costs are therefore stored as positive values, while liabilities, equity and incomes are negative.These internal calculation and storage methods are often impractical when it comes to displaying balances in reports on the screen or on paper. Therefore, Hansa has a default setting for displaying balances, whereby some values are inverted, e.g. liabilities and equity are shown as positive values. There are, however, many different accounting conventions in this world, and you are therefore given the option to change the default settings. You may have your own standard, or you may wish to exchange data with other accounting systems using conventions other than Hansa's default method. It is not unusual for the board, the bank, auditors, and tax authorities to request different presentations of the company's figures. With Hansa's flexible method for presentation, you can solve this easily by changing the settings of Presentation of Balances. This can be done any time, e.g. between printing two reports of the same kind. Open the 'Presentation of Balances' window by double-clicking 'Presentation of Balances' in the 'Settings' list.
A checked box indicates that the field will be presented with the sign opposite to the internal representation. An empty box means that Hansa's internal sign will be used. Internally, Hansa regards all debits as positive numbers, and all credits as negative numbers. The default setting is that values for Assets, Liabilities and Equity follow the internal values, while Revenues and Costs are presented with the opposite sign. Check the boxes in the window to select your settings. Confirm your changes by clicking [Save] or revert to the previously saved setting by clicking [Cancel]. |