|
Search HansaManuals.com HansaManuals Home >> Standard ERP >> Sales Ledger >> Invoice Register Previous Next Entire Chapter in Printable Form Search This text refers to program version 4.0 Entering an Invoice Hansa provides several shortcuts to simplify your work with entering Invoices. You may for example enter the current date into a date field with the 'Paste Special' function. This can also be used to simplify the entering of Item Numbers, Customer Numbers, Payment Codes etc.To enter a new Invoice, click [New] in the Button Bar or use the Ctrl-N (Windows and Linux) or ⌘-N (Macintosh) keyboard shortcut. Alternatively, highlight an Invoice similar to the one you want to enter and click [Duplicate] on the Button Bar. The 'Invoice: New' window is opened, empty if you clicked [New] or containing a duplicate of the highlighted Invoice. In the case of the duplicate, the Invoice and Transaction Dates of the new Invoice will be the current date, not the date of the original one, and the Due Date will be recalculated accordingly.
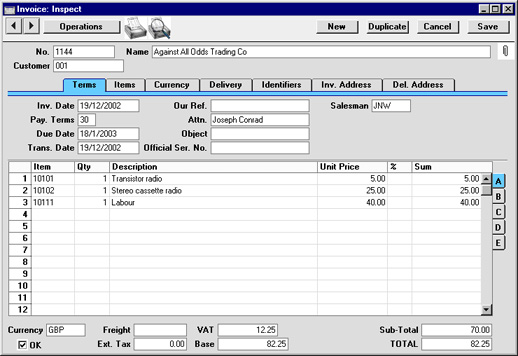
Since the amount of information stored about each Invoice will not fit on a single screen, the Invoice window has been divided into seven cards. At the top of each is the header. This contains the Invoice Number, the Customer Number and Name. There are seven named buttons ('tabs') in the header.
If you have the Sales Orders module, it is likely that most Invoices will be created remotely from the Sales Orders screen, using the 'Invoice' function on the Operations menu. If so, you will find that most of the fields in the Invoice will contain information carried over from the corresponding Sales Order. You can also create an Invoice by dragging an Order from the 'Orders: Browse' window to the 'Invoices: Browse' window. When you have added the Items to the Invoice, you may want to check it. Click the [Save] button to save the Invoice and then click the Printer icon in the Button Bar to print a sample Invoice document. If you want to print to screen, click the Preview icon. In multi-user systems, Hansa will assign the next available Invoice Number to the Invoice when it is saved for the first time. You will still be able to make changes until you approve the Invoice by clicking the OK check box. When this is done and the Invoice saved once again, it will be entered to the Sales Ledger, a Nominal Ledger Transaction for the Invoice will be created and it will no longer be modifiable. |