Record Window - Button Bar
At the top of each record window there is an area known as the Button Bar. This contains a set of buttons:


- Windows/Linux keyboard shortcuts: PgUp and PgDn
- Mac OS X keyboard shortcuts: ⌘-- and ⌘-+
- These are the [Previous Record] and [Next Record] buttons. On the left are the Windows versions, on the right are the Mac OS X versions. The left-hand button of each pair is the [Previous Record] button.
- Use these buttons to move from record to record. Once you have opened a record from a list in a browse window, click the [Next Record] button to move to the next record in that list. At the same time everything you may have changed in the record you are leaving will be saved. If you want to cancel the changes, close the record window with the close box or press the [Cancel] button on the right of the Button Bar. Similarly, clicking the [Previous Record] button will open the previous record in the list.
- These buttons have the same effect as selecting 'Previous' and 'Next' from the Record menu.

- This button appears in many record windows, such as those for Invoices and Orders. Click it to open the Operations drop-down menu.
- The Operations menu contains different functions depending on the window. For the Order record, the following menu items are available:
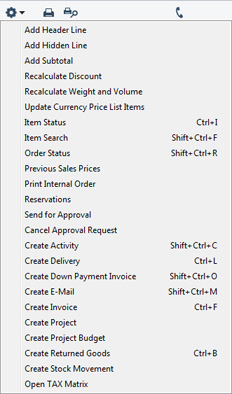
- For example, 'Item Status' shows the stock position of the Item in the Order row containing the cursor. 'Create Delivery' and 'Create Invoice' allow you to continue with the sales process from the Order, and 'Order Status' opens a window containing a summary of the status of the Order, listing Deliveries, Invoices and any other connected records.
- Each Operations menu function is described in full on the appropriate web page.

- Windows/Linux keyboard shortcut: Ctrl-P
- Mac OS X keyboard shortcut: ⌘-P
- Click this Printer icon to print the current record. The Printer icon will only appear in the Button Bar when the record window contains a record that can be printed, e.g. an Invoice or Purchase Order. The 'Print' command on the File menu has the same function.
- The record will be printed using a Form that you specify using the 'Define Document' function for the document in question. Please refer to the description of this function on the Documents page for details.
- When you start a printout, it will print directly on your selected printer.

- Windows/Linux keyboard shortcut: Ctrl-Shift-P
- Mac OS X keyboard shortcut: ⌘-Shift-P
- Clicking the Preview icon will cause the current record to be printed to screen in a new window. This will allow you to see what it will look like when you print it on a printer by clicking the Printer icon immediately to the left.

- In some record windows, such as those for Activities, Invoices and Contacts, there is a [Communicate] button in the Button Bar. If you need to call the Contact quoted in the Activity or Invoice or whose Contact record you are viewing, click this button. Please refer to the Business Communicator Window page for details.
- [New]
- Windows/Linux keyboard shortcut: Ctrl-N
- Mac OS X keyboard shortcut: ⌘-N
- Click this button to save the current record and to close it. A new blank record will then be opened for data entry.
- [Duplicate]
- Windows/Linux keyboard shortcut: Ctrl-K
- Mac OS X keyboard shortcut: ⌘-Y
- Click this button to save the current record and to create a copy of it. The original record will be closed and the new copy opened. In many cases, the new record will contain the current date, not the date of the copied record.
- [Cancel]
- If you have not saved the current record (i.e. the window title is 'New'), click this button to cancel the data entry process and to close the record window. The record will not be saved. If you have previously saved the current record (i.e. the window title is 'Update'), click this button to discard all changes made since it was last saved. In this case, the record window will not be closed.
- [Save]
- Windows/Linux keyboard shortcut: Shift-Enter
- Mac OS X keyboard shortcut: Shift-Enter
- This button saves all changes to the current record but does not close it.
---
In this chapter:
Go back to: