Creating a Report Generator Report - Bringing Information in from Other Registers - Linked Registers and Calculations
This page describes using information in related registers in the calculations in a Report Generator report. Please refer
here for details about connecting to a related register.
---
On this page, we described using the [Look Up] button to bring information in from a related record and printing it in a Report Generator report. We will now bring information in from a related record and use it in the report calculations. To illustrate this, we will establish a link to the Item register from the Invoice matrix in our example Customer List report. This will allow us to look up the Base Price of each Item used in an Invoice, so that we can print a comparison of the standard sales price of an Item (its Base Price) with the actual sales price (the Unit Price in an Invoice). Follow these steps:
- Return to the Report Definition record and go to the 'Data' card.
- Select the register that you are linking from. In this case, we are linking from the Invoice Items matrix to the Item register, so we will click on the line marked "Register Matrix: Invoices...".
- Click the [Look Up] button above the report display area. Complete the 'Lookup Record' dialogue box as shown below:
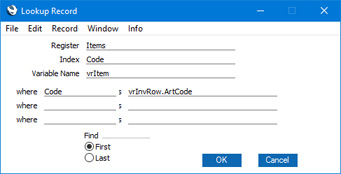
"Code" is the internal name for the Item Number field in the Item register. The Item Number field is the one that is common to the Invoice Items matrix and the Item register, so you should sort the Item register by Item Number.
The search expression in the Where and Is fields states that there will be a search for the Item whose Code is the same as that in the current Invoice row. "vrInvRow" is the variable containing the current Invoice row, and "ArtCode" is the internal name for the Item Number field in the Invoice row.
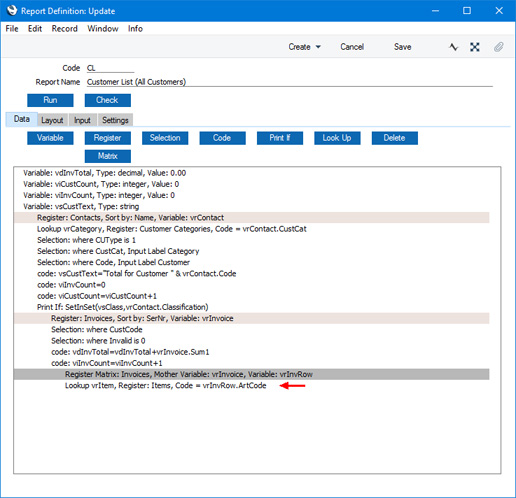
- When you click [OK], a new "Lookup:" line is placed in the Invoice Matrix section in the report display area:
- The next step is to add the formula that will calculate the difference between the Base Price of an Item and the Unit Price used in an Invoice. The result of this formula should be printed next to the Invoice Sum. So, go to the 'Layout' card and click on the Invoice Matrix Before section.
- Click the [Formula] button and enter a formula as shown below:

vrItem.UPrice1 is the expression holding the Base Price of the current Item, while vrInvRow.Price is the expression holding the Unit Price of the current Invoice row. As is always the case, these expressions are case sensitive. In this example, it has been assumed that all Invoices are in the home Currency so there is no need to convert vrInvRow.Price before making the comparison (vrInvRow.Price contains a figure in the Invoice Currency). Please refer to the description of the MulRateToBase1 function on the Useful Functions page for details about converting figures in Currency to your home Currency.
In the example illustration we have placed spaces on either side of the - to make the formula easier to read. These spaces are acceptable, and will be ignored when the formula is executed. Spaces in the variable and expression names (e.g. vrInvRow . Price) are not legal and will show up as errors if you click the [Check] button.
- The illustration below shows the formula that would be used to express the difference between the Base Price and the Unit Price as a percentage:

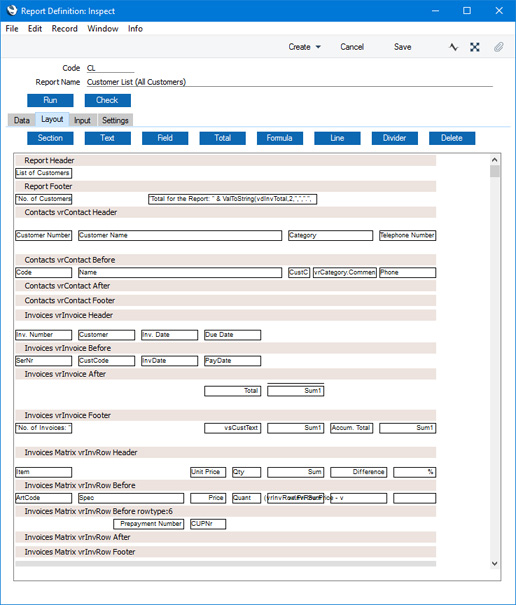
The two formulae are shown in the Invoice Matrix Before section in the illustration below (appropriate column headings have been placed in the Invoice Matrix Header section so that the resulting report will be easy to read:
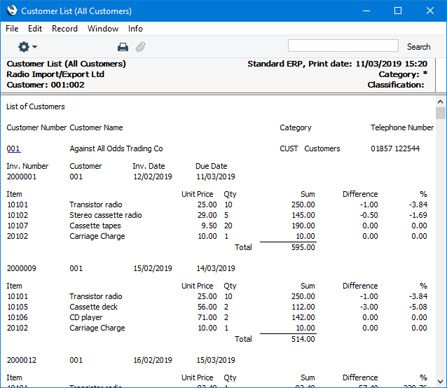
This is the result:
Please follow the links below for more details about: