Creating a Report Generator Report - Adding a Secondary Register - Linking the Primary and Secondary Registers
This page describes linking primary and secondary registers in a Report Generator report. Please refer
here for details about adding a primary register to the report, and
here for details about adding a secondary register.
---
When you first add a secondary register to the report, its entire contents will be in the current selection for that register. Therefore, if the report is left as it is immediately after adding the secondary register, , the output will be as follows:
- First record in the primary register
- All records in the secondary register
- Second record in the primary register
- All records in the secondary register
- Third record in the primary register
- All records in the secondary register
In the example Customer List that we are using in this documentation, after each Customer is printed in the report, the
current selection of Invoices (i.e. all Invoices) will be printed. Therefore, the next step in defining the report is to reduce the
current selection of Invoices to those Invoices made out to the Customer on the line above (the
current Customer). This is the result being aimed for:
- Customer 1
- Customer 1's first Invoice
- Customer 1's second Invoice
- Customer 1's third Invoice
- Customer 2
- Customer 2's first Invoice
- Customer 2's second Invoice
- Customer 2's third Invoice
- Customer 3
- Customer 3's first Invoice
- Customer 3's second Invoice
- Customer 3's third Invoice
To achieve this, you need to search in the secondary register for records that are connected to the
current record in the primary register. In the example. we will search for Invoices whose Customer Number is the same as the Contact Number of the
current Customer. Follow these steps:
- On the 'Data' card in the Report Definition window, click on the "Register" line in the report display area that represents the secondary register (marked "Register: Invoices..." in the example) to signify that the search is to be carried out in this register.
- Click the [Selection] button. The 'Selection' dialogue box opens. Complete it as shown below:
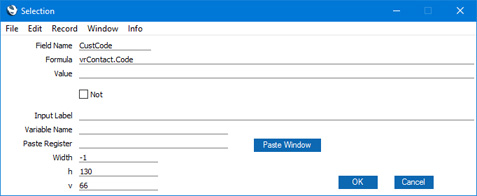
Enter "CustCode" as the Field Name, or choose it using 'Paste Special'. This is the internal name for the Customer Number field in the Invoice register.
Then enter "vrContact.Code" as the Formula.
This expression refers to the Contact Number field in the Contact register. The expression is in two parts: the first part ("vrContact") is the name of the variable containing the Contact register. This name was given to the variable in the 'Register' dialogue box as described here. The second part ("Code") is the internal name for the Contact Number field in the Contact register. The two parts are separated by a full stop. The expression is case sensitive, so you must use "Code" and not "code". This expression therefore means "the Contact Number of the Contact record that is currently in the vrContact variable" i.e. "the Contact Number of the current Contact".
Acting together, the Field Name and the Formula state that there will be a search in the Customer Number field in the Invoice register for Invoices whose Customer Number is the same as the Contact Number of the current Contact. Invoices that meet this condition will be printed in the report.
There is no need to enter an Input Label, Variable Name or Paste Register, because there is no need to place a variable in the specification window as the search will be automatic. Leaving the Input Label empty will mean that the v measurement will be set to zero automatically when you close the 'Selection' dialogue box for the first time. This confirms that no variable will be placed in the specification window.
- Click the [OK] button. A new "Selection:" line representing the search is added to the Invoice register section in the report display area:

Please follow the links below for more details about:
---
Creating a Report Generator Report:
Go back to: