Creating a New Database - Multi-user Demo
A demo database allows you to test new or unfamiliar HansaWorld Enterprise features before using them in your "live" database. A demo database is fully functional with the exception that Internet Services are disabled. You can use a demo database for 30 days, after which it will go into restricted mode. From that time onwards, you will only be able to print reports and documents to screen, not to a printer, to file or to any other medium. Exporting from a demo database and importing to a new database before the 30-day point will cause the new database to go to restricted mode immediately. In this section, we describe configuring a multi-user HansaWorld Enterprise demonstration database with the server and client application on the same machine. This configuration is for trial and demonstration purposes only and is not supported for "live" databases.
- Referring to the Multi-user Installation page, download the server and client applications that are appropriate for your test machine.
- Install the server application as follows:
- If you are using a Windows machine, install the service version by running the server installer (named "hw-install-server.msi"). The default installation path is C:\Program Files\HansaWorld Enterprise 5.4 XXXXXX\ where XXXXXX is the date of the version of HansaWorld Enterprise you are installing. For simplicity, change this path to C:\Program Files\HansaWorld\.
- If you are using Mac OS X, open the server .dmg file (named "hw-install-server.dmg") by double-clicking, and then copy the folder it contains to the 'Applications' folder. For simplicity, change the name of this folder from "HansaWorld Enterprise Server" to "HansaWorld".
- If you are using Linux, expand the server .tgz file (named "hw-install-server-linux.tgz" (Intel) or "hw-install-server-linuxppc.tgz" (PowerPC)) by double-clicking, and then copy the folder it contains to the 'Applications' folder. For simplicity, change the name of this folder from "hansaworld-linux-server" or "hansaworld-linuxppc-server" to "HansaWorld".
- The "HansaWorld" folder or directory will contain a folder or directory named "Demo". Open this folder and copy the "DemoDataGeneral2008-01.txt" file into the "HansaWorld" folder (to the same level as the server application). Again for simplicity, rename this file "Demodata.txt".
If there is no file named "DemoDataGeneral2008-01.txt", use the demo data file whose name appears to be the most generic.
- If you are using a Windows machine, start the server application as follows:
- Use Notepad or a similar text editing program to create a text file named "parameters.txt". Save this file in the "HansaWorld" directory, on the same level as the server application. The file should contain a single line of text:
- Demodata.txt
For reference, the "parameters.txt" file can contain the name of any .txt file containing data that you want to import. If the file is not in the "HansaWorld" directory at the same level as the server application, refer to the file using the correct path.
- Start the server application. To do this, restart the machine: the service will be launched automatically. If you do not want to restart, open the Control Panel and double-click 'Administrative Tools' and then 'Services'. Find and select 'HansaWorld Enterprise 5.4 Service' in the list and choose to start the service. When it starts, it will obey the instruction in the "parameters.txt" file and import demonstration data from the "Demodata.txt" file.
- When the import finishes, for security reasons the service will quit (you may need to monitor the log file (named "hansa.log") to see when the service quits). Empty or rename the "parameters.txt" file and then restart the application as described in (ii) above (if you do not empty or rename the “parameters.txt” file, the demonstration data will be imported again).
- If you are using a Mac OS X or Linux machine, start the server application as follows:
- Launch the Terminal application using the Terminal icon in the Panel or Dock (or from the "Utilities" folder in the "Applications" folder).
- Change to the "HansaWorld" directory by typing:
- cd /Applications/HansaWorld
- Type:
- ./HansaWorld Demodata.txt
This instruction will launch the server application and cause it to import demonstration data from the "Demodata.txt" file. As described in point 4 i above, you can include in this instruction the name and path of any .txt file containing data that you want to import.
- When the import finishes, for security reasons the application will quit. You will be informed when this happens in the Terminal window. Restart the application by typing:
- ./HansaWorld
- Locate the client installer that you downloaded in step 1, and install it. In the case of Windows, run the installer application. In the case of Mac OS X and Linux, open the .dmg file or expand the .tgz archive. In all cases, it is recommended that you install the client in a folder or directory named "HansaWorld Client" in your "Program Files" directory or "Applications" folder.
- Start the HansaWorld Enterprise client application by double-clicking the application icon. The first window to appear will ask how you want to use the application:
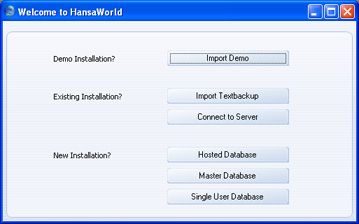
- Click the [Connect to Server] button. The 'Server Address: Inspect' window will appear, listing the available servers in the same subnet as your client computer:
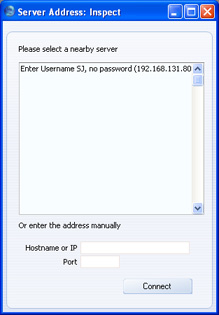
- Double-click the server in the list that you want to log in to, or click once and then click the [Connect] button.
If you are using the service (Windows) version of HansaWorld Enterprise as your server application, it will not appear in the list of available servers. In this case, if the server is the same machine, enter "localhost" as the IP Address in the Hostname or IP field, otherwise enter its IP address. Enter "1200" as the Port.
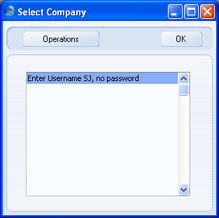
- The 'Select Company' window appears: select the single option by double-clicking:
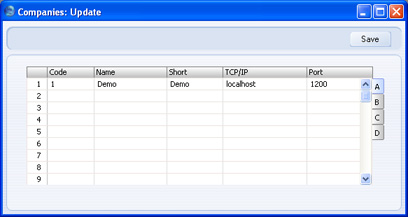
If the 'Select Company' window does not appear and instead your client is unable to connect to the server, this will be because you did not highlight the server before clicking the [Connect] button in the previous step. If so, an empty 'Companies: Inspect' window will appear. Complete it as shown below and click the [Save] button:
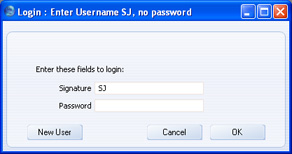
- Log in as SJ with no password:
- After logging in, a window will appear, reminding you that you are using a demo database:
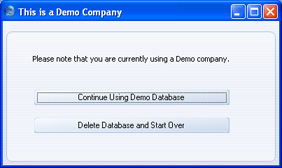
This window will appear each time you log in to the demo database, as a reminder that you should use it for testing only and not for real data. Click the [Continue Using Demo Database] button to begin work. The Master Control panel will appear, as illustrated on the Work Area page.
- If you are using Skype, Skype will now ask you if you will allow HansaWorld Enterprise to use Skype. Please refer to the Interaction with Skype page below for details.
|