The Bank Reconciliation register
If you are periodically importing your bank statements into Standard ERP, you can use the Bank Reconciliation register in the Nominal Ledger to reconcile the transactions in your bank statement with the transactions in your Standard ERP database.
You can use the following methods to import your bank statements into Standard ERP:
- In Estonia, you can use the SEB Bank Payments Cloud Service to make and receive payments through SEB Bank. Built in to the SEB Bank Payments Cloud Service is a second Cloud Service: SEB Bank Statements. This Cloud Service will allow Bank Statements to be sent from SEB Bank to your Standard ERP database.
- You can import bank statements from OFX, CSV or XML text files using the 'Bank Transactions' Import function in the Nominal Ledger. You can also activate this function from the Bank Reconciliation window (step 8 below).
- In Canada (i.e. if the VAT Law in the Company Info setting is set to "Canadian"), you can import American Express statements from text files using the 'American Express Statement' Import function in the Nominal Ledger.
- The Banking File Import function in the Sales Ledger will create Bank Transactions if the Bank on the 'OCR' card in the Bank Transfer setting in the Purchase Ledger is Czech Republic - ABO, USA - Chase, USA - Citi or USA - US Bank.
In all cases, the information will be imported in to the Bank Transactions setting in the Nominal Ledger. A new record will be created in this setting for each transaction on the statement. The availability of the Bank Transactions setting will depend on the VAT Law in the Company Info setting: it will not be available in every country.
After importing your bank statement, you can use the Bank Reconciliation register to connect the transactions in your bank statement to the transactions in your Standard ERP database, as follows:
- Ensure you are in the Nominal Ledger and click (Windows/macOS) or tap (iOS/Android) the [Registers] button in the Navigation Centre. Double-click or tap 'Bank Reconciliation' in the resulting list. The 'Bank Reconciliation' window will be opened. This is a list of transactions in two columns:
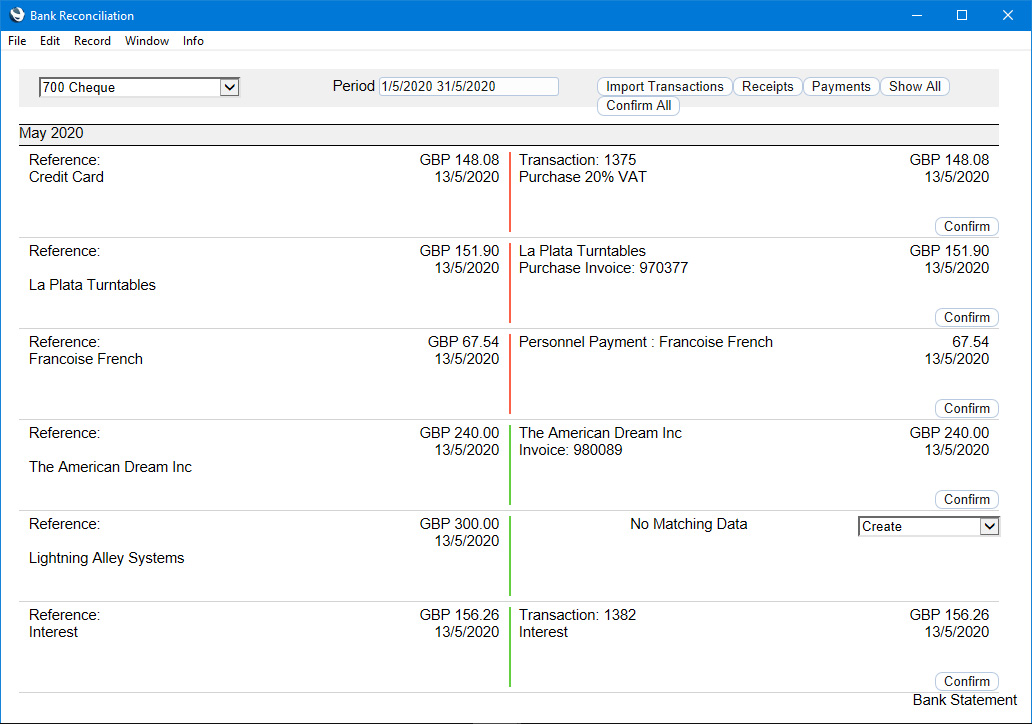
These columns will attempt to match each transaction on the bank statement to a transaction in Standard ERP, as follows:
- The left-hand column will list the transactions on the bank statement.
Behind the scenes, these are transactions that have been imported from your bank statements to the Bank Transactions setting and that you have not yet reconciled to transactions in Standard ERP. The column will list Bank Transactions matching the following criteria:
- In a bank statement transaction representing an outgoing payment, the P. Bank Acc (on the 'Payer' card) is blank or contains the Bank A/C No. that you have specified in the Payment Mode shown in the top left-hand corner of the window. In a bank statement transaction representing an incoming payment, the R. Bank Acc (on the 'Recipient' card) contains blank or the Bank A/C No. in the Payment Mode.
- The Received Date in the bank statement transaction must fall within the period specified in the field at the top of the window.
- The right-hand column will contain an attempted match for each bank statement transaction. The match will be as follows:
- If the bank statement transaction represents an outgoing payment, the matched transaction will be a row in a Payment, Personnel Payment or Nominal Ledger Transaction. To be included in the list, a Payment row must be in a Payment that has been marked as Ordered, but it is not necessary for it to have been marked as OK. However, rows in Personnel Payments that have not been marked as OK will not be included.
- If the bank statement transaction represents an incoming payment, the matched transaction will be a row in a Receipt or Nominal Ledger Transaction. Rows in Receipts that have not been marked as OK will be included.
- The bank statement transaction and the matched transaction will be for the same amount.
- The matched transaction will be from the period specified in the field at the top of the window (with the exception that a matched transaction from a Payment that has not been marked as OK can be from any date).
- In the case of a Payment row only, the Text in the Payment row (usually the name of the Supplier being paid) will be the same as the R. Name in the bank statement transaction.
- If the matched transaction is a row in a Personnel Payment or in a Receipt or Payment that has been marked as OK, that record will have the Payment Mode shown in the top left-hand corner of the window. If the matched transaction is a row in a Receipt or Payment that has not been marked as OK, the record will have any Payment Mode. If the matched transaction is a row in a Nominal Ledger Transaction, it will be a row that posts to the Account specified in the Payment Mode.
If there is no match for a bank statement transaction, the right-hand column will contain the text "No Matching Data" and a 'Create' drop-down menu.
- The separator between the two columns will be green for incoming payments and red for outgoing payments.
- By default, the period will be the current month. If you change the period, bear in mind that, unusually, the separator between the start and end dates is a space. If you want to list all Bank Transactions up to a certain date, enter a space before the date. If you want to list all Bank Transactions from a certain date or later, simply enter the date. Depending on the platform, you may need to press the [Show All] button after changing the period.
- Also by default, the Payment Mode will be the first one in the Payment Modes setting. You can change the Payment Mode using the drop-down menu in the top left-hand corner of the window. Usually you will need to do this if you have more than one bank account or if the first Payment Mode is not one that represents payments into and out of a bank account. Depending on the platform, you may need to press the [Show All] button after changing the Payment Mode.
- If you need to inspect any bank statement transaction in the left-hand-column or any matched transaction in the right-hand column, click (Windows/macOS) or tap (iOS/Android) the first line of the transaction description.
- If a match is correct (i.e. if a bank statement transaction in the left-hand column has been correctly matched to an incoming or outgoing payment in the right-hand column), you can reconcile the two transactions using the [Confirm] button in the relevant row. The row will be removed from the 'Bank Reconciliation' window, and will not be shown the next time you open the window. If you match a bank statement transaction with a row in a Payment or Receipt that has not been marked as OK, the Payment or Receipt will be marked as OK automatically as part of the confirmation/reconciliation process, provided you have reconciled every row in the Payment or Receipt.
If every match is correct, use the [Confirm All] button at the top of the window.
- If there is no matching data for a bank statement transaction, you can create a new matching record. Open the 'Create' drop-down menu in the relevant row and choose the record that you want to create. Enter the record, mark it as OK and save. When you return to the 'Bank Reconciliation' window, refresh it using the [Show All] button at the top of the window. Then [Confirm] the match to remove the line from the 'Bank Reconciliation' window.
- If the list is very long, use the [Receipts] and [Payments] buttons at the top of the window to reduce the list so that it only shows incoming or outgoing payments respectively. Use the [Show All] button to return to the complete list.
- If you need to import a bank statement while the 'Bank Reconciliation' window is open, you can do so from that window using the [Import Transactions] button. This button requires the following configuration:
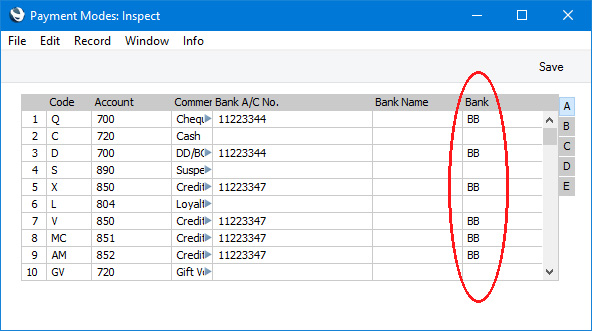
- The Payment Mode that you have specified in the 'Bank Reconciliation' window must be connected to a record in the Banks setting in the Purchase Ledger:
- You must have specified a Bank Statement bank in the 'Banking File' card in the relevant record in the Banks setting:
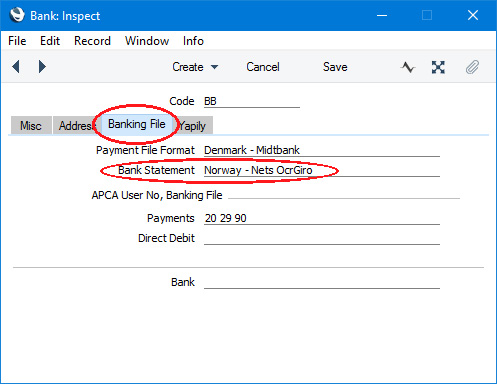
The following banks are supported at the time of writing: Croatia - Addiko, Croatia - Erste, Croatia - Raiffeisen, Croatia - Zagrebačka, Estonia - SEB, Estonia - Swedbank. Latvia - SEB, Latvia - Swedbank, Lithuania - Luminor, Lithuania - Paysera, Lithuania - SEB, Lithuania - Swedbank, USA - Ally, USA - Amex, USA - Bank of America, USA - Chase and USA - Wells Fargo.
- You can use Access Groups to prevent certain users from importing bank statements. To do this, deny them access to the 'Importing Bank Statement' Action. This Action does not apply to the 'Bank Transactions' Import function, so you will need to deny access to that function separately.
The [Import Transactions] button will import bank statements in the same way as the 'Bank Transactions' Import function with the relevant bank selected in the 'Specify Bank Transactions' window. After using the [Import Transactions] button, you may need to use the [Show All] button to update the list of bank statement transactions in the left-hand column.
---
Go back to:
|